| View previous topic :: View next topic |
| Author |
Message |
Colorado CJ

Joined: 29 Jul 2012
Posts: 210
Location: Northern Colorado
|
 Posted: Mon Aug 18, 2014 5:13 am Post subject: Life on the Edge Posted: Mon Aug 18, 2014 5:13 am Post subject: Life on the Edge |
 |
|
Colorado CJ wrote:
Just a photo I took this morning with my 4x5 large format camera. This one was taken about 10 minutes from home, in "The Narrows" area of the Big Thompson Canyon.
The rock walls are full of crystalline structures, so they really shine when the light hits them right.
I'm starting to get the hang of the large format camera. It is VERY different than shooting with a digital camera and even much different than other film cameras. I used front tilt and rise on this shot since I had to shoot upwards and needed to change the perspective to get the rock walls upright again instead of looking like they were "falling away". This image would be impossible to get to look this way without using a camera that has movements. The perspective would just be too off.
Anyway. this was taken with a Zone VI 4x5 large format camera on Fomapan 200 film. Shot using a Nikkor SW 180mm F5.6 lens through a red 25A filter. Processed in HC-110 (dilution H) for 9 minutes.
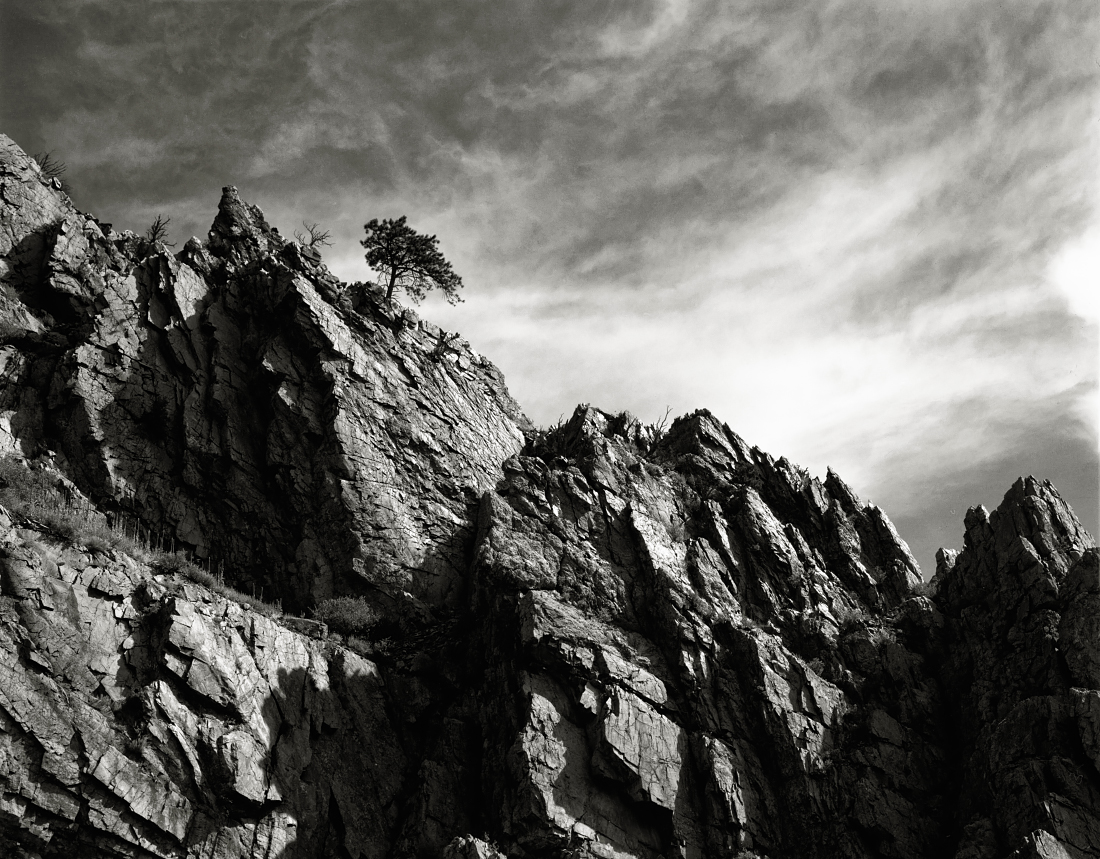 Life on the Edge by Colorado CJ, on Flickr Life on the Edge by Colorado CJ, on Flickr
_________________
http://andrewmarjamaphotography.com |
|
| Back to top |
|
 |
SonicScot


Joined: 01 Dec 2011
Posts: 2698
Location: Scottish Highlands
|
| Posted: Mon Aug 18, 2014 12:59 pm Post subject: |
|
|
SonicScot wrote:
Very dramatic image 
_________________
Gary
Currently active gear....
Sony a7
E-M1 Mkll
Rubinar 1000/10 + 2x matched extender
Tamron 500/8 55BB
Sigma 100-300/4
Vivitar Series 1.... 200/3, 70-210/3.5 (V1 by Kiron), 135/2.3, 105/2.5 macro, 90/2.5 macro (Bokina), 90-180/4.5 Flat Field Macro, 28-90mm f/2.8-3.5
Carl Zeiss.... 180/2.8, 135/3.5, 85/1.4, 35/2.4 Flektagon, 21/2.8 Distagon
Nikon.... 55/3.5 micro, 50/1.2
Elicar 90/2.5 V-HQ Macro
Zhongyi Speedmaster 85/1.2
Jupiter-9 85/2
Helios.... 58/2 44-3
Hartblei 45/3.5 Super-Rotator TS-PC
Zenitar 16/2.8 fisheye
Samyang 8/3.5 fisheye
Nodal Ninja 4, Neewer leveling tripod base
Flickr http://www.flickr.com/photos/gazsus/ Website http://garianphotography.co.uk/ |
|
| Back to top |
|
|
Colorado CJ
Joined: 29 Jul 2012
Posts: 210
Location: Northern Colorado
|
| Posted: Tue Aug 19, 2014 10:56 pm Post subject: |
|
|
Colorado CJ wrote:
Thanks Gary. I'm very happy with the way this one turned out.
I had a go with making a wet print of the photo I shot Sunday. This is a direct scan from an 8"x10" wet print I made today. I used a #4 contrast filter and exposed the paper for 55 seconds. I then burned the sky in for 20 seconds to get definition in the sky.
Printed on some cheap variable contrast RC paper and developed in Illford Multigrade developer. I then brewed some strong coffee and stained the print for 20 minutes in the coffee solution to get somewhat of a sepia tone.
I think I got pretty close to the directly scanned negative. I am EXTREMELY new to wet printing though, so I have a huge amount to learn.
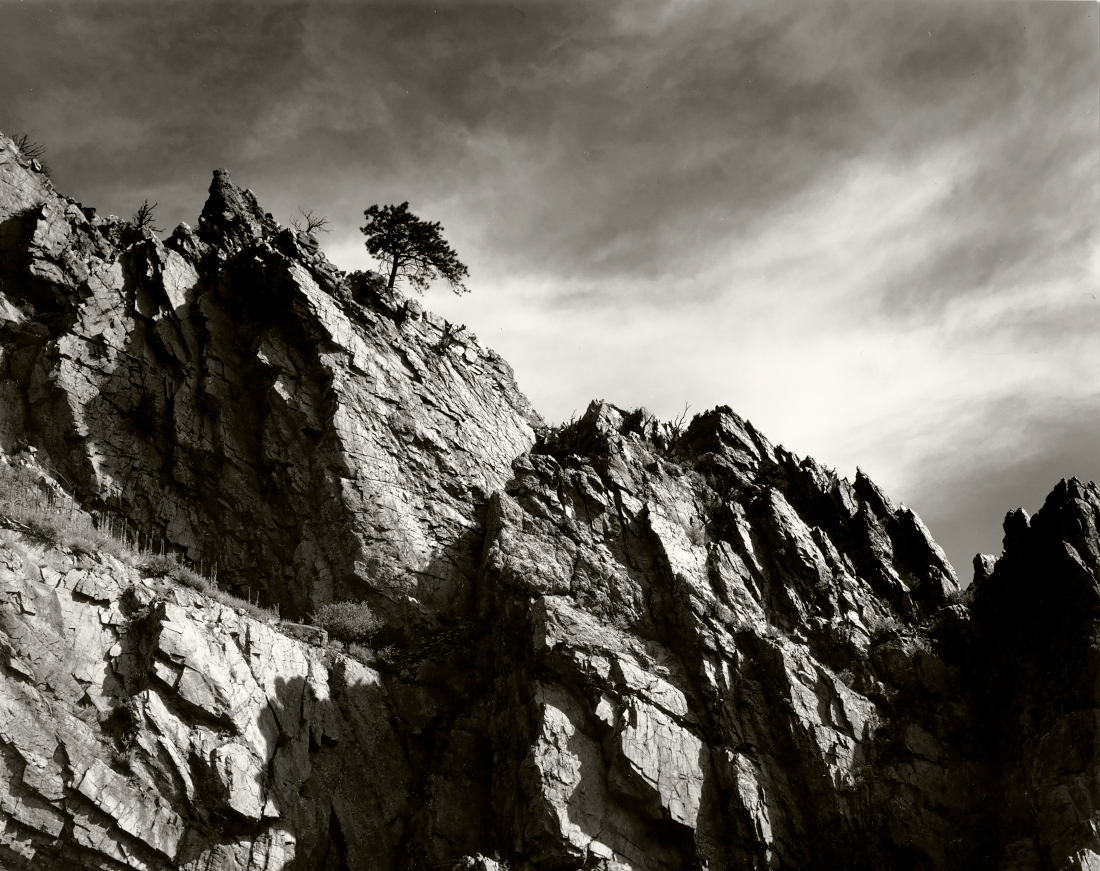 Wet-Print-of-Negative by Colorado CJ, on Flickr Wet-Print-of-Negative by Colorado CJ, on Flickr
_________________
http://andrewmarjamaphotography.com |
|
| Back to top |
|
|
SonicScot
Joined: 01 Dec 2011
Posts: 2698
Location: Scottish Highlands
|
| Posted: Wed Aug 20, 2014 9:10 am Post subject: |
|
|
SonicScot wrote:
| Colorado CJ wrote: |
This is a direct scan from an 8"x10" wet print I made today. I used a #4 contrast filter and exposed the paper for 55 seconds. I then burned the sky in for 20 seconds to get definition in the sky.
Printed on some cheap variable contrast RC paper and developed in Illford Multigrade developer. |
I have no idea what you just said  but the result is great. but the result is great. 
_________________
Gary
Currently active gear....
Sony a7
E-M1 Mkll
Rubinar 1000/10 + 2x matched extender
Tamron 500/8 55BB
Sigma 100-300/4
Vivitar Series 1.... 200/3, 70-210/3.5 (V1 by Kiron), 135/2.3, 105/2.5 macro, 90/2.5 macro (Bokina), 90-180/4.5 Flat Field Macro, 28-90mm f/2.8-3.5
Carl Zeiss.... 180/2.8, 135/3.5, 85/1.4, 35/2.4 Flektagon, 21/2.8 Distagon
Nikon.... 55/3.5 micro, 50/1.2
Elicar 90/2.5 V-HQ Macro
Zhongyi Speedmaster 85/1.2
Jupiter-9 85/2
Helios.... 58/2 44-3
Hartblei 45/3.5 Super-Rotator TS-PC
Zenitar 16/2.8 fisheye
Samyang 8/3.5 fisheye
Nodal Ninja 4, Neewer leveling tripod base
Flickr http://www.flickr.com/photos/gazsus/ Website http://garianphotography.co.uk/ |
|
| Back to top |
|
|
skida


Joined: 02 Mar 2012
Posts: 1826
Location: North East England
|
| Posted: Wed Aug 20, 2014 9:34 am Post subject: |
|
|
skida wrote:
| SonicScot wrote: |
| Colorado CJ wrote: |
This is a direct scan from an 8"x10" wet print I made today. I used a #4 contrast filter and exposed the paper for 55 seconds. I then burned the sky in for 20 seconds to get definition in the sky.
Printed on some cheap variable contrast RC paper and developed in Illford Multigrade developer. |
I have no idea what you just said but the result is great. |
+1 I understand the individual words, but when put together like that - Alchemy!
_________________
Lots of 35mm Film Cameras
Lots of Lenses
New Vlog on Youtube called "The Olduns Shot"
https://www.youtube.com/channel/UCBHCOHaIrcYr7s3is1EcqxQ |
|
| Back to top |
|
|
RSalles

Joined: 12 Aug 2012
Posts: 1373
Location: Brazil - RS / South
|
| Posted: Wed Aug 20, 2014 4:29 pm Post subject: |
|
|
RSalles wrote:
Haha, young generation! (tough newbies, but had'nt the courage to write that)
Andrew,
What I usually did - times when I printed at the labo - it's make a test strip with medium contrast paper in the very deep areas (zones I and II) putting the piece of photo paper in that area - just a strip to make a test - and covering with black paper card in sequences of 1-2 seconds, as this:
base exposure - say 2-5 seconds, depends of the base plus fog density of the film - and displace the black card 1/2 inch another 2-5 seconds exposure, move the card again more 1/2 inch, and so until the area is visibly overexposed. This way I could set the correct exposure time for that area.
The same with highly dense areas - highlights - of the negative. After that it was a question of dodge and burning. I had a dozen of wires measuring maybe 15 inches with little black forms cuted and glued at the end of the wire to dodge procedures if the ares to dodge were smaller then the areas to burn.
It's important to wash and dry the tests exposure sheets if you want consistent results at the beginning because the paper after dried comes a little darker then wet. With more experience you can figure out what will be the amount of darkening of dry paper and adjust accordingly.
Contrary of with negatives, but often forgotten - is that little exposure amounts will be more sensible to dark areas of the printing paper then high dense areas: 1 sec more in the shadows will make a huge difference, much more then 1 sec in highlights.
Keep working, the results will come, better and better,
Cheers,
Renato |
|
| Back to top |
|
|
philslizzy

Joined: 07 Aug 2012
Posts: 4748
Location: Cheshire, England
|
| Posted: Wed Aug 20, 2014 5:57 pm Post subject: |
|
|
philslizzy wrote:
Great results, congratulations. Now here is someone not afraid of dabbling with the 'wet process', no dithering by the pool - just diving right in!
RSalles has good advice, but not knowing what his zones are, I'd do my test strip over an area with a good combo of light and dark.
_________________
Hero in the 'messin-with-cameras-for-the-hell-of-it department'. Official. |
|
| Back to top |
|
|
Nikos

Joined: 17 May 2010
Posts: 1077
Location: Greece
Expire: 2015-01-02
|
| Posted: Sun Sep 14, 2014 11:05 am Post subject: |
|
|
Nikos wrote:
Hello, Ansel 
_________________
Νίκος � www.diafragma.gr

Cameras: Canon EOS 5D Mark II, Sony α7R, Sony NEX-5N
MF lenses:
SLR:
Canon TS-E 17mm f/4, Zeiss 2.8/21 ZE, Zeiss 2/28 Contax, Zeiss 2/35 ZE, Zeiss 1.4/50 Contax, Zeiss 1.4/85 Contax, Zeiss Makro 2/100 ZE,
Zeiss 2/135 Contax, Zeiss 2.8/135 Contax, Zeiss Vario-Sonnar 35-70 Contax, Zeiss Vario-Sonnar 100-300 Contax, Zeiss F-Distagon Rollei, Canon FD 24mm f2, Minolta MD Rokkor 35mm f2.8
Rangefinder:
Zeiss 4.5/21 C Biogon ZM, Zeiss 2/35 Biogon ZM, Voigtl�nder 15mm f/4.5 Heliar L39, Leica Tele-Elmarit 2.8/90mm, Zeiss 2/45 Contax G, Zeiss 2.8/90 Contax G, Canon 50mm 1.8 LTM
AF lenses: Canon 15mm f/2.8 Fisheye, Canon 24-70 f/2.8 L, Canon 70-200 f/2.8 L IS II, Canon 70-200 f/4 L, Canon 300 f/4 L IS, Canon 100 f/2.8 macro
|
|
| Back to top |
|
|
kds315*

Joined: 12 Mar 2008
Posts: 16541
Location: Weinheim, Germany
Expire: 2021-03-09
|
| Posted: Sun Sep 14, 2014 2:14 pm Post subject: |
|
|
kds315* wrote:
Wow, very well done!!
_________________
Klaus - Admin
"S'il vient a point, me souviendra" [Thomas Bohier (1460-1523)]
http://www.macrolenses.de for macro and special lens info
http://www.pbase.com/kds315/uv_photos for UV Images and lens/filter info
https://www.flickr.com/photos/kds315/albums my albums using various lenses
http://photographyoftheinvisibleworld.blogspot.com/ my UV BLOG
http://www.travelmeetsfood.com/blog Food + Travel BLOG
https://galeriafotografia.com Architecture + Drone photography
Currently most FAV lens(es):
X80QF f3.2/80mm
Hypergon f11/26mm
ELCAN UV f5.6/52mm
Zeiss UV-Planar f4/60mm
Zeiss UV-Planar f2/62mm
Lomo Уфар-12 f2.5/41mm
Lomo Зуфар-2 f4.0/350mm
Lomo ZIKAR-1A f1.2/100mm
Nikon UV Nikkor f4.5/105mm
Zeiss UV-Sonnar f4.3/105mm
CERCO UV-VIS-NIR f1.8/45mm
CERCO UV-VIS-NIR f4.1/94mm
CERCO UV-VIS-NIR f2.8/100mm
Steinheil Quarzobjektiv f1.8/50mm
Pentax Quartz Takumar f3.5/85mm
Carl Zeiss Jena UV-Objektiv f4/60mm
NYE OPTICAL Lyman-Alpha II f1.1/90mm
NYE OPTICAL Lyman-Alpha I f2.8/200mm
COASTAL OPTICS f4/60mm UV-VIS-IR Apo
COASTAL OPTICS f4.5/105mm UV-Micro-Apo
Pentax Ultra-Achromatic Takumar f4.5/85mm
Pentax Ultra-Achromatic Takumar f5.6/300mm
Rodenstock UV-Rodagon f5.6/60mm + 105mm + 150mm
|
|
| Back to top |
|
|
|
|
|
You cannot post new topics in this forum
You cannot reply to topics in this forum
You cannot edit your posts in this forum
You cannot delete your posts in this forum
You cannot vote in polls in this forum
|


