| View previous topic :: View next topic |
| Author |
Message |
a20010494


Joined: 15 Feb 2010
Posts: 396
Location: Per�.
|
 Posted: Thu Apr 08, 2010 6:44 am Post subject: Take mount of Sonnar 135mm 2.8 AE Posted: Thu Apr 08, 2010 6:44 am Post subject: Take mount of Sonnar 135mm 2.8 AE |
 |
|
a20010494 wrote:
This is an impossible task? Am i in troubles? I can only say that my frustration is reaching its limits!!
Ok, really, how to take the mount off? Anybody knows?
_________________
www.estudiocaleidoscopio.com |
|
| Back to top |
|
 |
Scheimpflug


Joined: 06 Feb 2010
Posts: 1888
Location: New Zealand / USA
Expire: 2011-11-18
|
| Posted: Thu Apr 08, 2010 6:45 am Post subject: |
|
|
Scheimpflug wrote:
Happen to have a photo?
_________________
Sigma DP1, Nikon D40 (hers  ), Polaroid x530, Pentax P30t, Pentax P50, (P30t/P50 K-A to Nikon F body mount conversion) ), Polaroid x530, Pentax P30t, Pentax P50, (P30t/P50 K-A to Nikon F body mount conversion)
Nikon: 18-55/3.5-5.6 "G ED II DX" (F) Soligor: 28/2.8 (FL->F converted), 135/3.5 (F), 3x TC (F, modified) Kalimar: 28-85/3.5 (F)
Vivitar: 70-210/2.8-4.0 Version 3 (F), Tele 500/6.3 Preset (F), 19/3.8 (F) Minolta: 300/5.6 (SR/MC/MD pending F conversion)
Tamron: 28/2.8 (Adaptall) Panagor: 28/2.5 (FD) Aetna: 300/5.6 (F) Osawa: MC 28/2.8 (F)
Vintage Lenses: Dallmeyer: 1940s A.M. 14in 356mm f4 (ULF->M42) 1930s Adon Telephoto Taylor, Taylor & Hobson: 1880s Rapid Rectilinear 8 1/2 x 6 1/2 11.31in f/8 (LF->?)
Parts Lenses: Nikon 35-135/3.5-4.5 (F), Sigma 70-210/4.5 (F), Nikon 50/1.8 Series E (F) |
|
| Back to top |
|
|
a20010494
Joined: 15 Feb 2010
Posts: 396
Location: Per�.
|
| Posted: Thu Apr 08, 2010 8:49 am Post subject: |
|
|
a20010494 wrote:
Now, yes, i have.
This mount comes from hell.....
Sorry for the fingerprints.
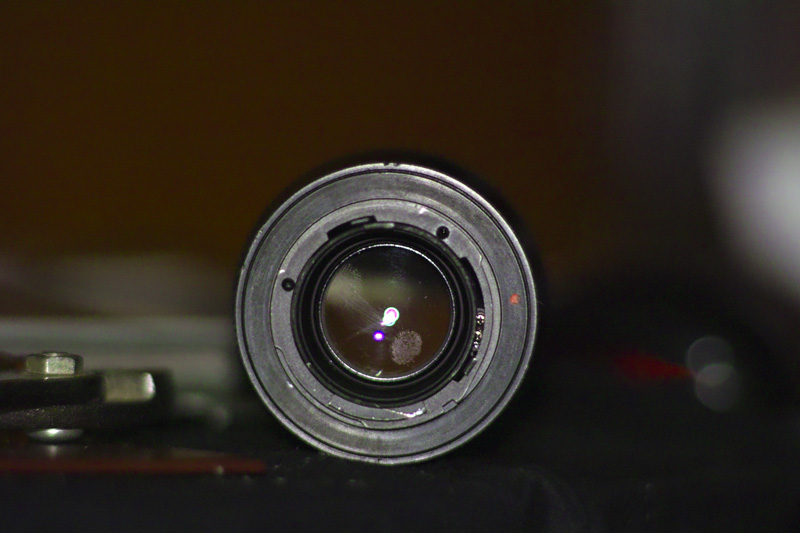

Sweet bokeh, huh? 
_________________
www.estudiocaleidoscopio.com |
|
| Back to top |
|
|
unclemack

Joined: 21 Jun 2009
Posts: 51
Location: UK frozen north
|
| Posted: Thu Apr 08, 2010 9:13 am Post subject: |
|
|
unclemack wrote:
I don't remember your lens but try looking for access to screws through any holes in the aperture ring with the rubber removed (if it is rubber).
If there are any screws in the sleeve between the aperture & focus rings try removing them and sliding the sleeve forward - this may reveal the screws holding the mount assembly.
Sometimes the sleeve between the rear element & the mount unscrews.
Once in a while a lens has to be dismantled from the front.
Sorry my memory isn't better... |
|
| Back to top |
|
|
Kathmandu

Joined: 09 Dec 2009
Posts: 1479
Location: (Kathmandu,Nepal. Currently)Pacific Northwest, USA
Expire: 2012-04-08
|
| Posted: Thu Apr 08, 2010 9:54 am Post subject: |
|
|
Kathmandu wrote:
unclemack: hope you had a great easter and things are well with you.
"a20010494" has an almost impossible lens mount to adapt especially to his Sigma DSLR.
a20010494:
| Quote: |
| Sweet bokeh, huh? |
I love your attitude.
Here are some pictures of the lens- I dug out the lens from my closet and took some pictures for you.
1: lens from the front

2: lens with the first plate (unscrewed and pryed off )and flange wings removed, destructively- I wrote about that on your other post in the Adapter section, you will also notice some extra screw holes that I made when I screwed and glued(fast setting Epoxy) a M42 mount on it

3: showing you the side profile on the barrel after you take off the aperture ring - that ball bearing falls off so be carefull- as I mentioned on the other post its one piece wtih the back plate. The slot on the top right corner is where the linkage for the aperture goes in from the aperture ring where the linking arm is screwed on.

4: and lastly with the aperture ring visible note the white 22 on the ring denoting its the AE version.

Hope this and my other post helps you decide what your best direction with this is. |
|
| Back to top |
|
|
wilson.c

Joined: 18 Jan 2010
Posts: 363
Location: Hong Kong
|
| Posted: Thu Apr 08, 2010 11:19 am Post subject: |
|
|
wilson.c wrote:
There should be three screws underneath the rubber band towards the camera. On my Makro-Planar 100/2.8 the focus was a bit sloppy due to traveling in a box to me. I looked around and tightened them up and all is good. Is suppose if you take the screws out, it is possible to take the lens off the helicoid and allow access from the front.
Good luck with the project!
_________________
Wilson
DSLR: Canon 5DMkII, 500D + Panasonic GF-1
SLR: Canon T90, Canon F1, Canon A1, Canon AE1 + Rolleiflex SL66 + Bronica ETRs
R'finder: Contax G1, G2 + Leica M6, M3 + Contax II
Lenses
M42: Angenieaux 90/1.8
Canon: FD 50/3.5 Macro, FD 80/1.8, FD 80-200L/4
Contax G: CZ Hologon 16/8, CZ Biogon 21/2.8, CZ Biogon 28/2.8, CZ Planar 45/2.0, CZ Sonnar 90/2.8
P-Six: CZJ Sonnar 180/2.8, CZJ Biometar 120/2.8
Contax: Distagon 28/2.8, Distagon 28/2, Planar 85/1.4, Makro-Planar 100/2.8
Others: CZ Sonnar 135/3.5 (Hasselblad V mount)
More little ones to be documented.
|
|
| Back to top |
|
|
unclemack
Joined: 21 Jun 2009
Posts: 51
Location: UK frozen north
|
| Posted: Thu Apr 08, 2010 11:28 am Post subject: |
|
|
unclemack wrote:
Hi Kathmandu and thanks, you too!
Never read the adapters section so missed the other thread.
I don't recall ever seeing a lens mount fixed even partly with adhesive but most of my work was with Mamiya, Hasselblad, Nikon etc.
Heat will usually shift parts bonded even with epoxy - but with anything modern there's usually going to be plastic nearby. And the glass would need to be protected too of course.
Ugh! Just the thought of a glued-on lens mount makes me want to go shower... thanks for that! |
|
| Back to top |
|
|
Kathmandu
Joined: 09 Dec 2009
Posts: 1479
Location: (Kathmandu,Nepal. Currently)Pacific Northwest, USA
Expire: 2012-04-08
|
| Posted: Thu Apr 08, 2010 5:58 pm Post subject: |
|
|
Kathmandu wrote:
wilson.c
| Quote: |
| should be three screws underneath the rubber band towards the camera. On my Makro-Planar 100/2.8 the focus was a bit sloppy due to traveling in a box to me.. |
By all the looks of "a20010494"'s lens it's the AE version of the lens , and when I opened mine which was last year, the front along with inner barrel of the helicoid assembly just unscrews off with some torque . I used rubber band and careful placement of the sliding sunshade-there were no screws,and I did not need to mess with the rubber on the focus ring,to check for screws. The pictures I have posted are from that lens.
I dont know how opening the front is going to help in his case except to check out how the layout of how the front is made, and maybe look inside to see how the helical alignment rods are screwed to the mount itself in this case instead of the rim of the barrel .
He will still have to address the lens mount.Which IMO is not worth messing around with- with this version lens. It might be worth more selling it to someone with a Contax camera .The MM version of this lens has more possibilities for mount adaptation. |
|
| Back to top |
|
|
a20010494
Joined: 15 Feb 2010
Posts: 396
Location: Per�.
|
| Posted: Thu Apr 08, 2010 8:04 pm Post subject: |
|
|
a20010494 wrote:
It's good to take a sleep and retake things. My patience is on its 100% again.
Well, i removed the aperture rubber ring, and no, no screws. So, how do i heat this thing up? drown it on water?
-I took the smal thing that has 2 screws away (was glued.. i thought it was part of the mount, and i was able to remove the "upper" mount. Now i have access to 4 screws! 
_________________
www.estudiocaleidoscopio.com |
|
| Back to top |
|
|
Kathmandu
Joined: 09 Dec 2009
Posts: 1479
Location: (Kathmandu,Nepal. Currently)Pacific Northwest, USA
Expire: 2012-04-08
|
| Posted: Thu Apr 08, 2010 9:35 pm Post subject: |
|
|
Kathmandu wrote:
Those 4 screws hold the helical alignment rods , which is very difficult to screw back on again once your remove it, unless you open the front.
I am still going to suggest you put things back and consider selling the lens or buying a Contax camera for it.
Think about it
Regardos |
|
| Back to top |
|
|
unclemack
Joined: 21 Jun 2009
Posts: 51
Location: UK frozen north
|
| Posted: Thu Apr 08, 2010 10:40 pm Post subject: |
|
|
unclemack wrote:
Hi a20010494,
I would strongly suggest you follow Kathmandu's recommendation.
My intention was to dissuade you from using heat by warning of the possible consequences to your lens.
You could also badly burn yourself when using enough heat to loosen the adhesive bond.
Asking for advice on every detail is wise when you're unsure - but it suggests to me a lack of experience in this kind of work.
A slip of the hand or a moment's inattention can cause serious personal injury - I've injured myself lots of times, thankfully never too seriously.
I don't mean to be critical but I don't want anyone hurt by following what they thought was my advice.
Good luck with whatever you decide to do. |
|
| Back to top |
|
|
a20010494
Joined: 15 Feb 2010
Posts: 396
Location: Per�.
|
| Posted: Fri Apr 09, 2010 2:23 am Post subject: |
|
|
a20010494 wrote:
Thanks. That's probably the best advice to follow-
But, i cant, and i wont. May sound too extreme but i never give up on things i want (only when i end breaking'em).
_________________
www.estudiocaleidoscopio.com |
|
| Back to top |
|
|
a20010494
Joined: 15 Feb 2010
Posts: 396
Location: Per�.
|
| Posted: Fri Apr 09, 2010 2:34 am Post subject: |
|
|
a20010494 wrote:
As a designer, i've been taught to always discard my first idea. So enough of screwing/unscrewing. I got the solution. And i dont need to go deeper into the lens. I'ts not a pretty solution, but it would be great for SA users if everything goes ok.
_________________
www.estudiocaleidoscopio.com |
|
| Back to top |
|
|
a20010494
Joined: 15 Feb 2010
Posts: 396
Location: Per�.
|
| Posted: Fri Apr 09, 2010 3:21 am Post subject: |
|
|
a20010494 wrote:

Watcha think?
It exactly fits on where the contax mount was (on the inner part) and fits the pentax mount on the outher part. I dont even have to take the flanges out. The thickness will be about 2mm, or whatever its necessary to reach infinite focus .
I can use the same pentax and zeiss screws to mount it. Would not be pretty, but i know it will work.
_________________
www.estudiocaleidoscopio.com |
|
| Back to top |
|
|
a20010494
Joined: 15 Feb 2010
Posts: 396
Location: Per�.
|
| Posted: Sat May 01, 2010 4:38 am Post subject: :) |
|
|
a20010494 wrote:

_________________
www.estudiocaleidoscopio.com |
|
| Back to top |
|
|
unclemack
Joined: 21 Jun 2009
Posts: 51
Location: UK frozen north
|
| Posted: Sat May 01, 2010 1:07 pm Post subject: |
|
|
unclemack wrote:
Hi,
Nice result, congratulations!
All fingers present and correct? |
|
| Back to top |
|
|
a20010494
Joined: 15 Feb 2010
Posts: 396
Location: Per�.
|
| Posted: Sat May 01, 2010 5:11 pm Post subject: |
|
|
a20010494 wrote:
Hi, sorry but i didnt understand your phrase....
_________________
www.estudiocaleidoscopio.com |
|
| Back to top |
|
|
unclemack
Joined: 21 Jun 2009
Posts: 51
Location: UK frozen north
|
| Posted: Sat May 01, 2010 9:24 pm Post subject: |
|
|
unclemack wrote:
Erm... was just teasing really.
In my neck of the woods designers' skill with tools isn't highly regarded.
It's a result of those occasions when designs have to be returned because of manufacturing difficulties (or impossibilities).
Sorry. It's unreasonable to generalise in that way and I would only do so in fun.
So I was expressing the hope that you still have all your fingers after your project!
And again, congrats on your conversion... and on coming over to the Dark Side. |
|
| Back to top |
|
|
a20010494
Joined: 15 Feb 2010
Posts: 396
Location: Per�.
|
| Posted: Mon May 03, 2010 7:35 am Post subject: |
|
|
a20010494 wrote:
Hi, i just didnt understand the phrase... thats all!
Thanks for the explanation, hah, i just got it.
_________________
www.estudiocaleidoscopio.com |
|
| Back to top |
|
|
|
|
|
You cannot post new topics in this forum
You cannot reply to topics in this forum
You cannot edit your posts in this forum
You cannot delete your posts in this forum
You cannot vote in polls in this forum
|