| View previous topic :: View next topic |
| Author |
Message |
vilva


Joined: 04 Mar 2007
Posts: 785
Location: Porvoo/Borg�, Finland
Expire: 2015-05-27
|
 Posted: Fri Jan 04, 2008 6:59 pm Post subject: Relighting in LightZone 3.2/3.3 Posted: Fri Jan 04, 2008 6:59 pm Post subject: Relighting in LightZone 3.2/3.3 |
 |
|
vilva wrote:
I have lately been testing LightZone 3.3Beta (for linux), which has the Relight Tool introduced in LightZone 3.2 for Windows/Mac. LightZone in general and the Relight Tool in particular has changed my workflow - a lot. I'll show here an example, a rather hopeless looking photo I took last summer in Tallinn. I was using my old 350D and tried to avoid overexposure under very high dynamic range conditions with the following result:
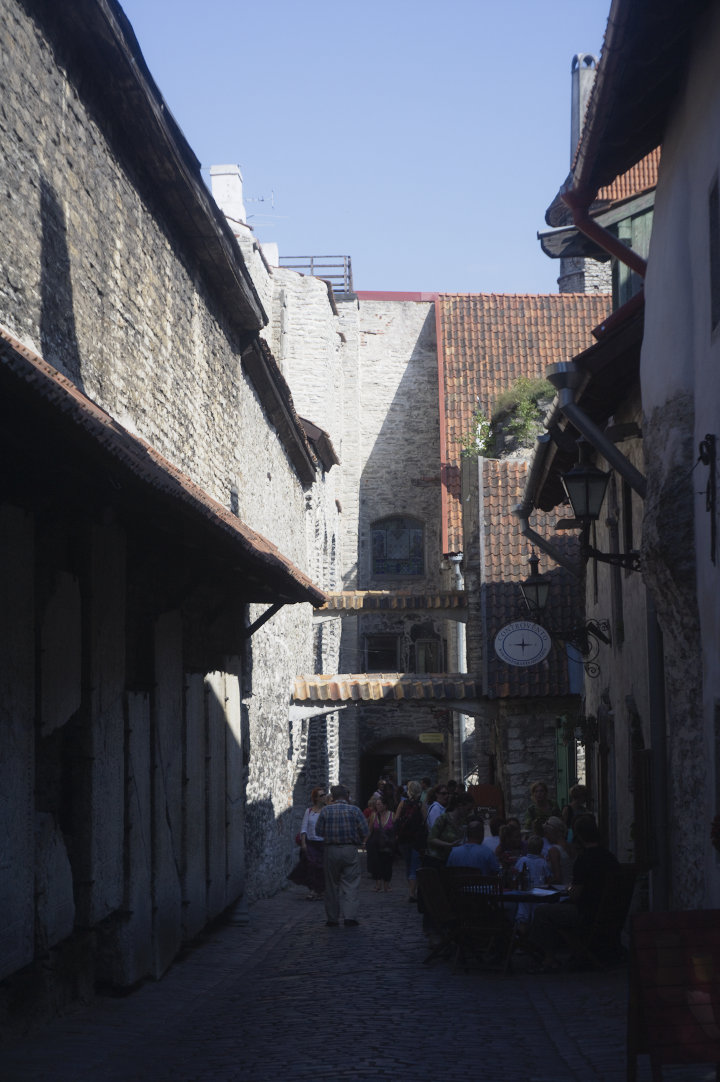
Applying LightZone HDR Bright Scene Style got me to this stage:

which is a lot better. The Relight Tool has slider for adjusting shadows, highlights, detail (roughly the general contast), depth (roughly large radius USM) and fuzz (?), which makes everything much easier and more straight forward than juggling curves and several other tools one by one.
Now I notice that the WB in the shadows is a wee bit on the blue side. In addition to global WB, LZ also offers the possibility of using regional WB. At this point it would be possible to define a region covering the shadow areas, but there is an easier way, I can just tell the program to apply the extra WB to the shadow areas only - the only problem is that the shadow areas aren't very well defined anymore, after the relight operation. Would I have to start from the beginning where the shadows were well defined? Nope. I drop a WB tool on top of the tool stack and drag it to the bottom, below the RL tool, select shadows and adjust getting the following result:

This is beginning to look good  In LZ all the applied tools in the stack can be adjusted any time, dragged to another position and clicked on/off to see the overall effect of a specific tool. Now I feel that a wee bit more light in the shadows might still be needed so I drag a new relight tool to below the original one, to a point where the shadows are still well defined, and set the tool to affect the shadow regions only. After the final adjustments the scene looks like this: In LZ all the applied tools in the stack can be adjusted any time, dragged to another position and clicked on/off to see the overall effect of a specific tool. Now I feel that a wee bit more light in the shadows might still be needed so I drag a new relight tool to below the original one, to a point where the shadows are still well defined, and set the tool to affect the shadow regions only. After the final adjustments the scene looks like this:

No struggle at all, and the total time used was less than two minutes. The result may be a little bit bright on some screens because my home CRT is rather dark, but perhaps the general idea was driven home clearly enough: even at this point, any parameter of any stage can be adjusted to refine the result, and the final tool stack and settings can be saved along with a reference picture. When this reference picture is opened, LZ actually opens the original RAW image and drops the saved tool stack on it, and I can continue from where I was. I can also pick the stack, drop it on another RAW image and just fine tune.
Veijo
_________________
Mainly Schneider-Kreuznach Radionar (1938), VPK Meniscus Achromat (1915), TTH Cooke Anastigmat (1917), TTH Cooke Aviar (1937), Goerz Dopp-Anastigmat III Dagor (1912), Voigl�nder Heliar (1928) or Aldis Uno Series III (1903 design) mounted on EOS 5D or EOS 350D |
|
| Back to top |
|
 |
Orio

Joined: 24 Feb 2007
Posts: 29545
Location: West Emilia
Expire: 2012-12-04
|
| Posted: Fri Jan 04, 2008 7:16 pm Post subject: |
|
|
Orio wrote:
Veijo, aside form confirming that the image looks very bright on my monitors, I'd add that perhaps you pushed the adjustment a little bit too far - I in fact notice the typical "HDR Syndrome" where some of the "closed" shadows (e.g. the darker parts below the outjutting roof on the left) are brighter than the "open" shadows (e.g. the casted shadow on the wall on the left, just above the aforementioned roof). This feels unnatural.
note: with "closed" shadow, I mean the shadow where the casting object is in direct contact with the surface of projection, thus effectively blocking completely the light rays coming from the casting object direction, while with "open" shadow, I mean shadows that are cast by objects that are not in physical contact with the surface of projection, thus allowing for light rays to reach the projection surface from all directions.
it comes without saying that the open shadows must be brighter than the closed shadows, because the cast shadow is partially lit by much more light rays than it's possible with closed shadows.
-
_________________
Orio, Administrator
T*
NE CEDE MALIS AUDENTIOR ITO
Ferrania film is reborn! http://www.filmferrania.it/
Support the Ornano film chemicals company and help them survive!
http://forum.mflenses.com/ornano-chemical-products-t55525.html |
|
| Back to top |
|
|
vilva
Joined: 04 Mar 2007
Posts: 785
Location: Porvoo/Borg�, Finland
Expire: 2015-05-27
|
| Posted: Fri Jan 04, 2008 7:43 pm Post subject: |
|
|
vilva wrote:
| Orio wrote: |
| Veijo, aside form confirming that the image looks very bright on my monitors, I'd add that perhaps you pushed the adjustment a little bit too far |
This was intended to be just a demonstration of the simple to use technical possibilities of LZ, not as a "final" picture - I would change a lot before e.g. printing this photo. This version might serve to discover or exhibit the originally hidden raw material.
In general, I'd be very, very careful with HDR, mostly the results look very unnatural. Sometimes, however, you just want to record what you saw, and with tens or hundreds of "hopeless" photos this kind of quick process is useful - and also to select the few photos which are good enough for more elaborate and/or careful processing. Sometimes you may miss something if you are too careful from the beginning.
LZ is a very nice program because nothing is final, you can always change the order of modifications without redoing the lot and you can insert new steps to where they would have been needed from the beginning. This was the main point of this exercise.
Veijo
_________________
Mainly Schneider-Kreuznach Radionar (1938), VPK Meniscus Achromat (1915), TTH Cooke Anastigmat (1917), TTH Cooke Aviar (1937), Goerz Dopp-Anastigmat III Dagor (1912), Voigl�nder Heliar (1928) or Aldis Uno Series III (1903 design) mounted on EOS 5D or EOS 350D |
|
| Back to top |
|
|
Orio
Joined: 24 Feb 2007
Posts: 29545
Location: West Emilia
Expire: 2012-12-04
|
| Posted: Fri Jan 04, 2008 7:45 pm Post subject: |
|
|
Orio wrote:
yes, modular programs that work in stacks are very powerful.
_________________
Orio, Administrator
T*
NE CEDE MALIS AUDENTIOR ITO
Ferrania film is reborn! http://www.filmferrania.it/
Support the Ornano film chemicals company and help them survive!
http://forum.mflenses.com/ornano-chemical-products-t55525.html |
|
| Back to top |
|
|
LucisPictor


Joined: 26 Feb 2007
Posts: 17633
Location: Oberhessen, Germany / Maidstone ('95-'96)
Expire: 2013-12-03
|
| Posted: Fri Jan 04, 2008 8:57 pm Post subject: |
|
|
LucisPictor wrote:
| vilva wrote: |
| ... This was the main point of this exercise. |
And as such, very impressive!
@Orio: I find your "open" and "closed" shadow explanation highly interesting!
_________________
Personal forum activity on pause every now and again (due to job obligations)!
Carsten, former Moderator 
Things ON SALE
Carsten = "KAPCTEH" = "Karusutenu" | T-shirt?.........................My photos from Emilia: http://www.schouler.net/emilia/emilia2011.html
My gear: http://retrocameracs.wordpress.com/ausrustung/
Old list: http://forum.mflenses.com/viewtopic.php?t=65 (Not up-to-date, sorry!) | http://www.lucispictor.de | http://www.alensaweek.wordpress.com |
http://www.retrocamera.de |
|
| Back to top |
|
|
Orio
Joined: 24 Feb 2007
Posts: 29545
Location: West Emilia
Expire: 2012-12-04
|
| Posted: Fri Jan 04, 2008 9:03 pm Post subject: |
|
|
Orio wrote:
| LucisPictor wrote: |
@Orio: I find your "open" and "closed" shadow explanation highly interesting! |
That's the result of my father teaching me how to observe a scene for painting - it works for photography also
_________________
Orio, Administrator
T*
NE CEDE MALIS AUDENTIOR ITO
Ferrania film is reborn! http://www.filmferrania.it/
Support the Ornano film chemicals company and help them survive!
http://forum.mflenses.com/ornano-chemical-products-t55525.html |
|
| Back to top |
|
|
|
|
|
You cannot post new topics in this forum
You cannot reply to topics in this forum
You cannot edit your posts in this forum
You cannot delete your posts in this forum
You cannot vote in polls in this forum
|


