| View previous topic :: View next topic |
| Author |
Message |
ludoo


Joined: 18 Sep 2009
Posts: 1397
Location: Milan, Italy
Expire: 2011-12-05
|
 Posted: Wed Mar 17, 2010 10:19 am Post subject: Pancolar 50mm zebra focusing (added relubing howto) Posted: Wed Mar 17, 2010 10:19 am Post subject: Pancolar 50mm zebra focusing (added relubing howto) |
 |
|
ludoo wrote:
I have just got a Pancolar 50mm zebra in M42 from a local store, and I noticed the focusing is really rough: it offers little resistance but has "bumps", when you turn it suddenly becomes very rough, then continues turning freely.
I might bring it back and have them check it, but I am also tempted to open it up and clean and regrease the helicoid myself. How hard is it? Anybody opened one of those?
Last edited by ludoo on Wed Mar 31, 2010 10:39 pm; edited 1 time in total |
|
| Back to top |
|
 |
Spotmatic


Joined: 18 Aug 2008
Posts: 4045
Location: Netherlands
|
| Posted: Wed Mar 17, 2010 10:25 am Post subject: |
|
|
Spotmatic wrote:
Interesting. I have the same Pancolar but the focusing is VERY stiff. Maybe I should open it, maybe not 
_________________
Peter - Moderator
Pentax K-5 + Pentax 645 + Canon 5D + Bessa RF 10,5cm Heliar, and a 'little' bag full of MF lenses. The lens list is * here *.
My fast 80s: Asahi-Kogaku Takumar 83mm f/1.9 - Super-Takumar 85mm f/1.9 - FA 77mm f/1.8 Limited - Cyclop 85/1.5 (Helios-40 innards) - Komura 80mm f/1.8 - Meyer G�rlitz Primoplan 7,5cm 1:1.9 - Carl Zeiss Jena 80mm f/1.8 Pancolar - Canon 85mm f/1.8 S.S.C. - Canon 85mm f/1.2 S.S.C. Aspherical |
|
| Back to top |
|
|
Tharos


Joined: 03 Nov 2009
Posts: 322
Location: Istanbul/TURKEY
|
| Posted: Wed Mar 17, 2010 11:43 am Post subject: |
|
|
Tharos wrote:
Mine is not so easy as well. Seems like a common problem, it has some jumps as mentioned. Would be keeping an eye on this topic, in case someone gives some solutions 
_________________
Camera : Yashica Electro 35 GS, Canon 450D, Konica C35 AF
28mm : Asahi Pentax SMC Takumar F3.5, Yashica ML F2.8
35mm : Distagon F2.8 (soon)
50mm : Carl Zeiss Jena Tessar F2,8 // aus Jena Pancolar F1.8 // SMC Tak F1.4 // Planar F1.7
55mm : Auto-Rikenon F1.8
58mm : Helios 44-3 F2
85mm : Jupiter 9 F2
135mm : Pentacon auto 6-blade F2.8 // Super Tak F3.5 // CZJ Sonnar F3.5 Zebra |
|
| Back to top |
|
|
dakoo

Joined: 08 Mar 2008
Posts: 603
|
| Posted: Wed Mar 17, 2010 11:54 am Post subject: |
|
|
dakoo wrote:
I have one that jumps too. But that actually aids to focus
A solution would be great.
_________________
Yashica ML 2.4/24, ML 2.4./28,
Zeiss Distagon 35/1.4, Planer 1.4/50, Planer 1.7/50,
SMC Tak 1.4/50,Tessar 2.8/50, Jupiter2/85
CZJ 4/135; Pentacon 4/200
Canon Tns 24/3.5
|
|
| Back to top |
|
|
Kathmandu

Joined: 09 Dec 2009
Posts: 1479
Location: (Kathmandu,Nepal. Currently)Pacific Northwest, USA
Expire: 2012-04-08
|
| Posted: Mon Mar 29, 2010 4:21 am Post subject: |
|
|
Kathmandu wrote:

I am "curious" if the zebra is similar in assembly/construction to this lens? I have opened these before, if they are similar; and would be happy to share how I opened mine. The focus ring on this was stiff and the lube was brackish/brown.I had to clean clean and lube it.
Last edited by Kathmandu on Mon Mar 29, 2010 7:34 am; edited 1 time in total |
|
| Back to top |
|
|
martinsmith99

Joined: 31 Aug 2008
Posts: 6943
Location: S Glos, UK
Expire: 2013-11-18
|
| Posted: Mon Mar 29, 2010 6:02 am Post subject: |
|
|
martinsmith99 wrote:
It sounds as though it may have been stiff and someone tried to free it by using lighter fluid. Is it gritty as well?
I've opened a Biotar but not sure it would be the same as the pancolar.
_________________
Casual attendance these days |
|
| Back to top |
|
|
ludoo
Joined: 18 Sep 2009
Posts: 1397
Location: Milan, Italy
Expire: 2011-12-05
|
| Posted: Mon Mar 29, 2010 8:33 am Post subject: |
|
|
ludoo wrote:
Well, I bit the bullet last Saturday and opened my Pancolar. Unfortunately I could not find my camera's CF card, so I only took one picture with my girlfriend's camera. Which was a really dumb move, as the focus helicoid is now super smooth but now I have to puzzle over the way everything will fit together again, and it won't be easy.
If I manage to reassemble it I will take pictures and post them here. |
|
| Back to top |
|
|
assaf
Joined: 02 Mar 2010
Posts: 26
|
| Posted: Mon Mar 29, 2010 11:45 am Post subject: |
|
|
assaf wrote:
I also have jumps in my pancolar 50/1.8. Don't think it's that bad it's worth opening for...
_________________
Panasonic DMC-G1, DMC-GF1
m4/3: 14-45/3.5-5.6, 20/1.7
Konica AR: Konica Hexanon 50/1.7, Konica Hexanon 40/1.8, Vivitar 135/2.8, Vivitar 200/3.5
M42: CZJ Pancolar 50/1.8 Zebra, Helios 44M 58/2
Minlota MD: Minolta 28/2.8
C: Cosmicar 12.5/1.9
wishlist: Fast zoom
flickr |
|
| Back to top |
|
|
ludoo
Joined: 18 Sep 2009
Posts: 1397
Location: Milan, Italy
Expire: 2011-12-05
|
| Posted: Mon Mar 29, 2010 12:02 pm Post subject: |
|
|
ludoo wrote:
| assaf wrote: |
| I also have jumps in my pancolar 50/1.8. Don't think it's that bad it's worth opening for... |
Wish I were thinking the same two days ago when I decided to open mine... |
|
| Back to top |
|
|
ludoo
Joined: 18 Sep 2009
Posts: 1397
Location: Milan, Italy
Expire: 2011-12-05
|
| Posted: Wed Mar 31, 2010 10:31 pm Post subject: |
|
|
ludoo wrote:
I found a couple of hours today to try and fix the Pancolar. The good news is that, after some head scratching and a few tries to get infinity focus right, I managed to reassemble it. I cleaned up all the old grease first, and then tried replacing it with some silicon grease for watch repairs, which turned out to be too dense. I then cleaned it off and tried automotive lithium grease, which despite not being ideal seems to work pretty well. Focus is not jumping anymore and is smoother, not Takumar smooth but pretty good.
The bad news is, I broke the thin metal wire that connects the auto aperture pin to the aperture mechanism, and my Pancolar is now a manual-only lens. I will try to replace it with some nylon fishing cable as soon as I find some.
Here a quick set of instructions.

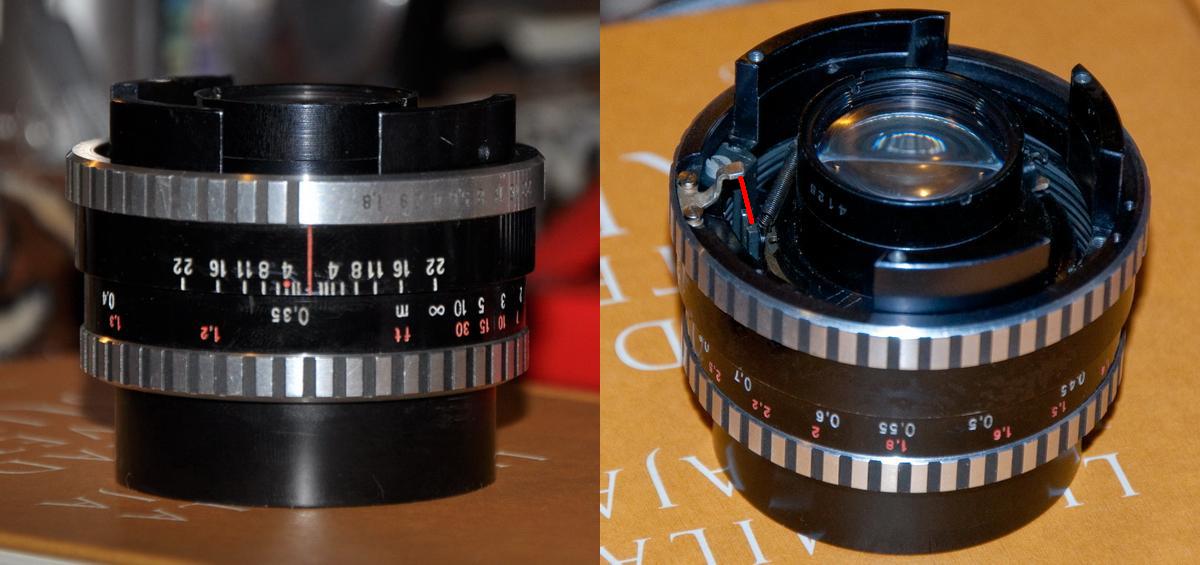
In the picture above I have removed the mount, which is held in place by the three large shiny screws on the back of the lens. When you remove the mount, the auto aperture pin and its spring will come off, don't lose them (the pin has dropped next to A in my picture).
What you see is
A. The damn wire I broke, going around the back optical group, sheated in a very long spring. The wire transmits the auto pin movement from the top left to the aperture mechanism at the bottom right of the picture. To get to the helicoid you have to remove the wire, I stupidly disengaged it from one side only instead of removing it altogether, and managed to break it later. Remove it so it won't suffer any harm.
B. The part that transmits the aperture value from the aperture ring (the one you turn with your hands to set aperture) to the aperture mechanism. This part is fixed to the aperture ring by the two screws you see in the pic, and does not need to be removed. Just lift the ring after having removed the long wire/spring in A. Be careful not to lose the small ball+spring when you lift the aperture ring: they are seated in a tiny hole on the underside of the ring, and are used for the aperture click stops. After lifting the aperture ring, lift the small ring used for the A/M switch if it has stayed in place, mine come away wth the aperture ring.
C. These two parts (the bottom one is hidden below the electrical contacts which are part of the aperture ring) are those that keep the dof ring solid with the optical group. You need to remove them: unscrew the two screws that keep each one in place, then lift the metal angled piece. Before doing this, put the lens at near focus as otherwise you will need to turn the optical element and the depth of field ring together step by step when you remove the depth of field ring. You might also want to mark the position of the dof ring at near focus and infinity, it might come handy when reassembling (I didn't and had to experiment a bit).
Once you have done all the above, you can simply unscrew the depth of field ring (the one with the focus mark and dof marks). It's a regular rh thread, so unscrew counterclockwise.
At this point you are left with the optical group screwed inside the focus ring/helicoid. They are LH, so to unscrew them turn them clockwise. Be sure to mark the point where they separate, as you will need to screw them back together in the same place, or focus will be off. I did, but my mark was not precise enough and it took me three tries to get it right. If I had no mark I would have probably needed about a dozen tries.
Clean the threads with lighter fluid and qtips until no black come out anymore, then regrease and reassemble. |
|
| Back to top |
|
|
Jay Ace

Joined: 03 Jul 2010
Posts: 17
Location: Lexington, KY
|
| Posted: Sun Jul 04, 2010 10:35 pm Post subject: |
|
|
Jay Ace wrote:
What exactly is the piece covering the lower C part for? I don't have that in mine. |
|
| Back to top |
|
|
Kathmandu
Joined: 09 Dec 2009
Posts: 1479
Location: (Kathmandu,Nepal. Currently)Pacific Northwest, USA
Expire: 2012-04-08
|
| Posted: Sun Jul 04, 2010 11:34 pm Post subject: |
|
|
Kathmandu wrote:
Hi Jay,
The C in Ludoo's lens is the helical alignment rods that hold the inner thread core in place as you screw/unscrew the focusing ring. In your lens from your photos in your posts the electrical contacts are not part of the lens as the lens maybe different from Ludoo's that way. If you look at the mounting boss where the lens mount is screwed on(three screw holes) , you will see that it is different from Ludoo's lens.
You should look at the alignment rods C and see what they do as you focus the lens in and and out -it should help you understand what they do.
Anyway dissimilarities aside you will still have to take the screws off from C on your lens and take out the alignment rods .You should through trial and error screw the two parts together where your aperture linking prong and slot does not separate as you move from infinity to "closest distance" . Then at the newly attained infinity spot you should slide the alignment rods you pulled out, back into their slots, and put the screws back on.
I hope you through trial and error will be able to figure it out- and get things working again. Important thing is to take your time and do a careful job.Good Luck. |
|
| Back to top |
|
|
bumford
Joined: 01 Mar 2010
Posts: 5
|
| Posted: Thu Jun 23, 2011 4:08 pm Post subject: |
|
|
bumford wrote:
Hi,
i had the same problem, and i disassembled the lens, and now i don't know how to reassemble it. I forget to mark the point where the the optical group separate from the focus ring/helicoid - could anyone tell me? And where is the point where the dof ring separate from the focus ring/helicoid?
Update: Somewhat i managed to reassemble the lens, but when i focus to closest distance (0,35 m), the little T-shape part from the aperture ring (the "B" part from the picture) lose contact with the aperture pillar from the optical group.
I already contacted ludoo and he was kind to offer me he will send some pictures when he will disassemble his lens, but maybe someone will help me until then: i try every day to assemble the lens, but i just don't get it... to me it seems that it's so much distance from closes focus to infinity, that the little T-shape part from the aperture ring ("B") everytime will lose contact with the aperture pillar... |
|
| Back to top |
|
|
bumford
Joined: 01 Mar 2010
Posts: 5
|
| Posted: Thu Jun 23, 2011 6:39 pm Post subject: |
|
|
bumford wrote:
Some pictures:


So, when i focus to infinity, the T-shape part from the aperture ring fit into the aperture pillar. When i focus to 0,7m, the T-shape part is hitting the top of the aperture pillar. And when i focus to closest distance (0,35m), there is a huge distance from the T-part to the top of the aperture pillar (see the red line.) Why?
Update: When i put the lens on the camera and i focus on something at infinity, i observed the focus mark indicates about 6m on the lens, definitely not right. |
|
| Back to top |
|
|
|
|
|
You cannot post new topics in this forum
You cannot reply to topics in this forum
You cannot edit your posts in this forum
You cannot delete your posts in this forum
You cannot vote in polls in this forum
|