| View previous topic :: View next topic |
| Author |
Message |
Ballu

Joined: 28 Feb 2007
Posts: 912
Location: Columbus, OH. USofA
|
 Posted: Tue Mar 27, 2007 9:59 pm Post subject: Need some help on editing.. Posted: Tue Mar 27, 2007 9:59 pm Post subject: Need some help on editing.. |
 |
|
Ballu wrote:
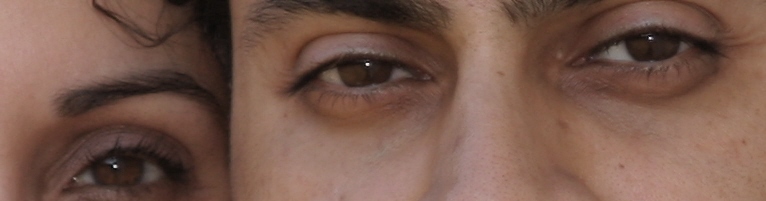
During our NJ/East Coast visit, I captured our friends pics (as couple).
But changing lens with focus confirmation chip and non chip created the havoc with some of the pics.
We really want to have this pic, but it will over exposed (as I moved lens from flek to nikon 200mm wide open at f2.
The pic is overexposed by +1EV..
I am naive at best with digital processing and never touched PS... using Picture Window Pro. (but can get the access to PS if required).
These are resized pics.. thats why soft.. else focus is just on eyes.
Can some one help him.. abd provide the steps to save these.. so that can get the good print of 8x10 size...
(I want to from forum people here..., as overexposure is a common but a fatal mistake in digital photography)...

This is 100% crop of original pic (to provide the captured sharpness)
This is after some play with Picture window pro..
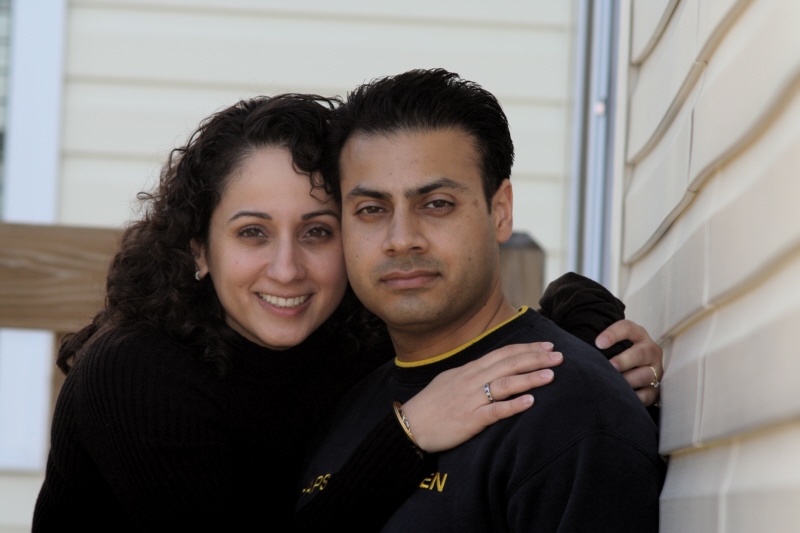
I am not happy with final result yet...
just in case, it can be saved...
Thanks in advance... |
|
| Back to top |
|
 |
Attila


Joined: 24 Feb 2007
Posts: 57849
Location: Hungary
Expire: 2025-11-18
|
| Posted: Tue Mar 27, 2007 10:14 pm Post subject: |
|
|
Attila wrote:
How about this ? Modified with AcdSee 9.0 autoexplosure function.

_________________
-------------------------------
Items on sale on Ebay
Sony NEX-7 Carl Zeiss Planar 85mm f1.4, Minolta MD 35mm f1.8, Konica 135mm f2.5, Minolta MD 50mm f1.2, Minolta MD 250mm f5.6, Carl Zeiss Sonnar 180mm f2.8
|
|
| Back to top |
|
|
Orio

Joined: 24 Feb 2007
Posts: 29545
Location: West Emilia
Expire: 2012-12-04
|
| Posted: Tue Mar 27, 2007 10:15 pm Post subject: |
|
|
Orio wrote:
Ballu, send me a link to the RAW file. Do you have a place to upload it?
I will edit the picture for you, and then tell you what I have done, so that you can do it yourself next time.
I can try editing a TIF or JPG also, but it's much more difficult to obtain perfect results especially with exposure. So if you have the raw file, it's best.
_________________
Orio, Administrator
T*
NE CEDE MALIS AUDENTIOR ITO
Ferrania film is reborn! http://www.filmferrania.it/
Support the Ornano film chemicals company and help them survive!
http://forum.mflenses.com/ornano-chemical-products-t55525.html |
|
| Back to top |
|
|
Attila
Joined: 24 Feb 2007
Posts: 57849
Location: Hungary
Expire: 2025-11-18
|
| Posted: Tue Mar 27, 2007 10:19 pm Post subject: |
|
|
Attila wrote:

_________________
-------------------------------
Items on sale on Ebay
Sony NEX-7 Carl Zeiss Planar 85mm f1.4, Minolta MD 35mm f1.8, Konica 135mm f2.5, Minolta MD 50mm f1.2, Minolta MD 250mm f5.6, Carl Zeiss Sonnar 180mm f2.8
|
|
| Back to top |
|
|
Orio
Joined: 24 Feb 2007
Posts: 29545
Location: West Emilia
Expire: 2012-12-04
|
| Posted: Tue Mar 27, 2007 10:26 pm Post subject: |
|
|
Orio wrote:
I tried to edit the JPG.
Here's what I could do:

In 5 minutes I will explain the steps.
_________________
Orio, Administrator
T*
NE CEDE MALIS AUDENTIOR ITO
Ferrania film is reborn! http://www.filmferrania.it/
Support the Ornano film chemicals company and help them survive!
http://forum.mflenses.com/ornano-chemical-products-t55525.html |
|
| Back to top |
|
|
Katastrofo
Joined: 26 Feb 2007
Posts: 10405
Location: USA
Expire: 2013-11-19
|
| Posted: Tue Mar 27, 2007 10:30 pm Post subject: |
|
|
Katastrofo wrote:
Wow, Orio, that's excellent! You really pulled that one out of the fire!
Bill |
|
| Back to top |
|
|
Ballu
Joined: 28 Feb 2007
Posts: 912
Location: Columbus, OH. USofA
|
| Posted: Tue Mar 27, 2007 10:30 pm Post subject: |
|
|
Ballu wrote:
Thanks Attlia and Orio...
These are much much better than, I was able to do...
Orio,
I have just sent a mail.... with attached file.... No Raw... another misatek.. as I was capturing the pics of Party time at late night... trying to save memory and burst mode.. and forgot to change back to RAW+L in the morning... I really want to hit 200mm Nikkor on my head...  |
|
| Back to top |
|
|
Orio
Joined: 24 Feb 2007
Posts: 29545
Location: West Emilia
Expire: 2012-12-04
|
| Posted: Tue Mar 27, 2007 10:38 pm Post subject: |
|
|
Orio wrote:
OK, here's my Photoshop steps:
1) first thing, I opened the "levels" window and adjusted the white and black point. For black point, I simply moved the cursor to the beginning of the curve. For white point, I decided to sacrifice some detail in the background and moved the cursor farther left, there where the main curve begins. This allowed me to have the maximum dynamic range available for further editing on the face (not to mention, whiter teeth on the womans' face)
2) I then opened "Unsharp mask" to adjust the so called "Local Contrast". I used the following settings (sorry, parameters names in Italian, but you will figure them out anyway):
- fattore = 37
- raggio = 26.6
- soglia = 6
3) for the third step I used a plugin called "black definition" of the Power Retouche suite. I selected a very narrow brightness range, to preserve the purest blacks and any color tone above the very dark grey. In other words, I have limited the action of the filter to the very dark greys only. I then slightly boosted the definition in that area, to bring out the texture on the womans' shirt. If you don't have this plugin, you can do the same thing by lasso-selecting the shirt and carefully adjust the gamma.
4) I then added the needed sharpening by way of Nik Sharpener Pro plugin, you can of course do it with any other sharpening plugin of choice or with Photoshop's own sharpening tools.
_________________
Orio, Administrator
T*
NE CEDE MALIS AUDENTIOR ITO
Ferrania film is reborn! http://www.filmferrania.it/
Support the Ornano film chemicals company and help them survive!
http://forum.mflenses.com/ornano-chemical-products-t55525.html
Last edited by Orio on Tue Mar 27, 2007 10:55 pm; edited 1 time in total |
|
| Back to top |
|
|
Attila
Joined: 24 Feb 2007
Posts: 57849
Location: Hungary
Expire: 2025-11-18
|
| Posted: Tue Mar 27, 2007 10:53 pm Post subject: |
|
|
Attila wrote:
Wow! Great result Orio! Thank you very much the explanation!
_________________
-------------------------------
Items on sale on Ebay
Sony NEX-7 Carl Zeiss Planar 85mm f1.4, Minolta MD 35mm f1.8, Konica 135mm f2.5, Minolta MD 50mm f1.2, Minolta MD 250mm f5.6, Carl Zeiss Sonnar 180mm f2.8
|
|
| Back to top |
|
|
Orio
Joined: 24 Feb 2007
Posts: 29545
Location: West Emilia
Expire: 2012-12-04
|
| Posted: Tue Mar 27, 2007 10:56 pm Post subject: |
|
|
Orio wrote:
| Attila wrote: |
| Wow! Great result Orio! Thank you very much the explanation! |
I mentioned the wrong Power Retouche plugin that I used, it wasn't Exposure it was Black Definition.
I have corrected the text so now it's right.
_________________
Orio, Administrator
T*
NE CEDE MALIS AUDENTIOR ITO
Ferrania film is reborn! http://www.filmferrania.it/
Support the Ornano film chemicals company and help them survive!
http://forum.mflenses.com/ornano-chemical-products-t55525.html |
|
| Back to top |
|
|
Ballu
Joined: 28 Feb 2007
Posts: 912
Location: Columbus, OH. USofA
|
| Posted: Wed Mar 28, 2007 12:40 am Post subject: |
|
|
Ballu wrote:
Orio.... Thanks very much.. I really liked the final result...
And thanks for providing the work flow.... |
|
| Back to top |
|
|
Orio
Joined: 24 Feb 2007
Posts: 29545
Location: West Emilia
Expire: 2012-12-04
|
| Posted: Wed Mar 28, 2007 12:59 am Post subject: |
|
|
Orio wrote:
| Ballu wrote: |
Orio.... Thanks very much.. I really liked the final result...
And thanks for providing the work flow.... |
You're welcome, Ballu.
Besides, this is really a nice portrait that you have made. The young woman looks extremely comfortable both with her fianc� and with her friend (=you). This transmits a real joy to the viewer, although the young man seems a bit too much self-controlled.
_________________
Orio, Administrator
T*
NE CEDE MALIS AUDENTIOR ITO
Ferrania film is reborn! http://www.filmferrania.it/
Support the Ornano film chemicals company and help them survive!
http://forum.mflenses.com/ornano-chemical-products-t55525.html |
|
| Back to top |
|
|
|
|
|
You cannot post new topics in this forum
You cannot reply to topics in this forum
You cannot edit your posts in this forum
You cannot delete your posts in this forum
You cannot vote in polls in this forum
|


