| View previous topic :: View next topic |
| Author |
Message |
stevemark

Joined: 29 Apr 2011
Posts: 3754
Location: Switzerland
|
 Posted: Sat Jan 02, 2021 4:41 pm Post subject: Minolta MC-X 1.2/58mm and 1.7/85mm repair Posted: Sat Jan 02, 2021 4:41 pm Post subject: Minolta MC-X 1.2/58mm and 1.7/85mm repair |
 |
|
stevemark wrote:
Back in 2017, hidden in a lot of old cameras, I bought a MC 1.2/58mm. While from the outside it looked like new, there was quite a bit of fungus inside. Not only was the space between the front group and rear group affected, but there was also fungus inside the sealed front group. Not much later, together with another Minolta collector (and automotive engineer) we tried to dismantle the front group, albeit without success.
Roughly a year later, again hidden in a lot of old stuff, there was an equally nice looking MC 1.7/85mm. Again, there was a problem - its aperture was stuck open. Since I already had a working MC-II 1.7/85mm and MD 1.7/85mm, I didn't bother to open and clean the newly acquired MC-X 1.7/85mm. Both lenses were shelved and forgotten.
Some days ago I decided to give them another try.
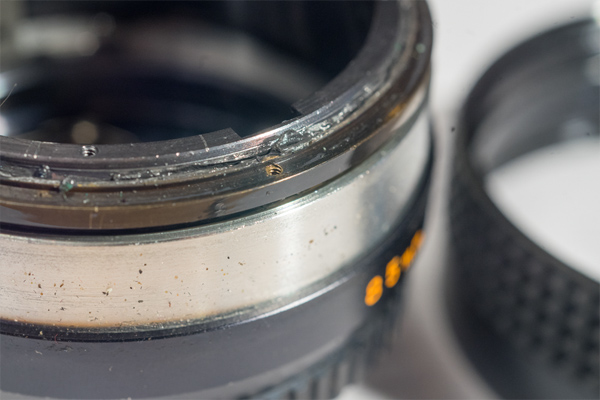
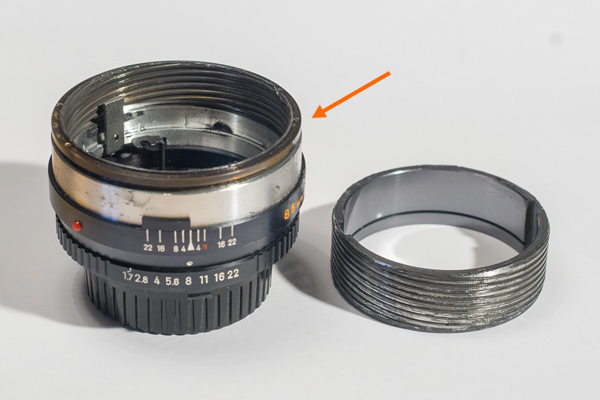
The MC-X 1.2/58mm is pretty straightforward when it comes to removing the front and the rear leans groups. However, opening the sealed front group proved to be a bit tricky: There are two small metal rings keeping the front lens in its position. The first ring has two slots for the spanner wrench, and getting it loose was no problem. The second ring - just beneath the first - obviously is sealed and needs rather more force. It seems that Minolta had a special tool for opening it, since there are four slots instead of the usual two. After some trials, and following the suggestions of Richard Haw, also the second ring came free. Cleaning the inner surface of the first lens was relatively easy, and no traces or damage to the coating was visible. The rear surface of the front group and the first surface of the rear gruoup were only slightly affected by fungus, and easy to clean as well. Reassembling the front group and then the entire lens was no problem. Just be very careful when removing the aperture ring - there's a small metal ball behind it (about 1 mm in diameter!), for "clicking" the aperture. It tends to fly away, pushed by a minute spring ...
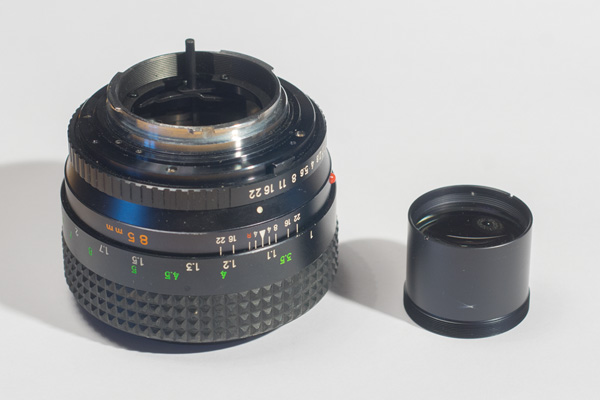
Now the MC 1.2/58mm was perfectly clean again - and test images did confirm that its optical formula must slightly derive from the earlier MC-II 1.2/58mm: The MC-II has a distinctively yellowish tint, the colors of MC-X on the other hand are in line with other Minolta lenses. The MC-X is sharper wide open, and it has more longitudinal CAs.

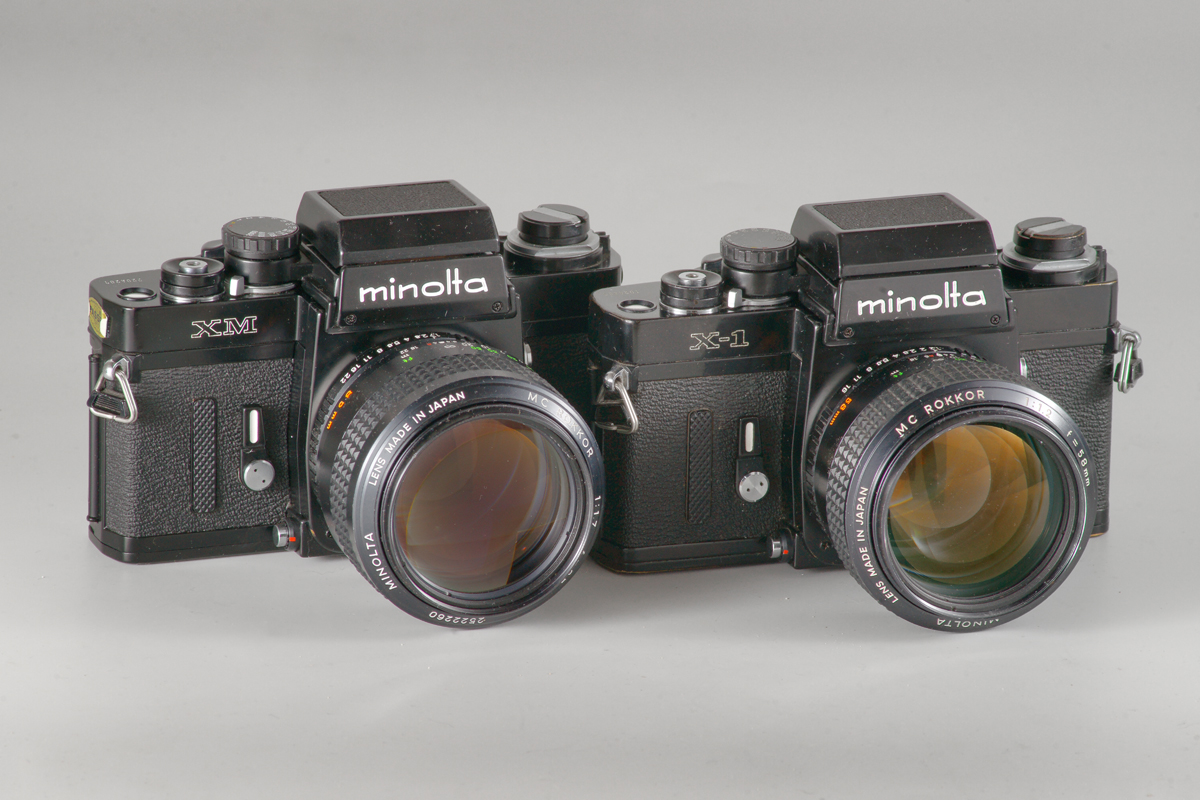
Minolta XM with Minolta MC 1.7/85mm (left) and Minolta X-1 with Minolta MC 1.2/58mm (right), after cleaning
Now having successfully completed the removing of fungus from the 1.2/58mm I thought that cleaning the aperture of the 1.7/85mm would be easy and quickly done. I was wrong, though. More information on that one tomorrow 
S
_________________
www.artaphot.ch |
|
| Back to top |
|
 |
stevemark
Joined: 29 Apr 2011
Posts: 3754
Location: Switzerland
|
| Posted: Sat Jan 02, 2021 7:08 pm Post subject: |
|
|
stevemark wrote:
Minolta MC-X 1.7/85mm #1: Overview
Now let's start with the Minolta MC 1.7/85mm. We'll proceed as follows:
1) Remove the front group
2) Remove the rear group
3) Remove the aperture mechanism
4) dismantle and clean the focusing mechanism
5) dismantle and clean the aperture mechanism
6) re-assemble the aperture mechanism
7) re-assemble the focusing mechanism
8 ) re-assemble front and rear group
9) calibrate the focusing mechanism for infinity
_________________
www.artaphot.ch
Last edited by stevemark on Sat Jan 02, 2021 8:18 pm; edited 1 time in total |
|
| Back to top |
|
|
stevemark
Joined: 29 Apr 2011
Posts: 3754
Location: Switzerland
|
| Posted: Sat Jan 02, 2021 7:18 pm Post subject: |
|
|
stevemark wrote:
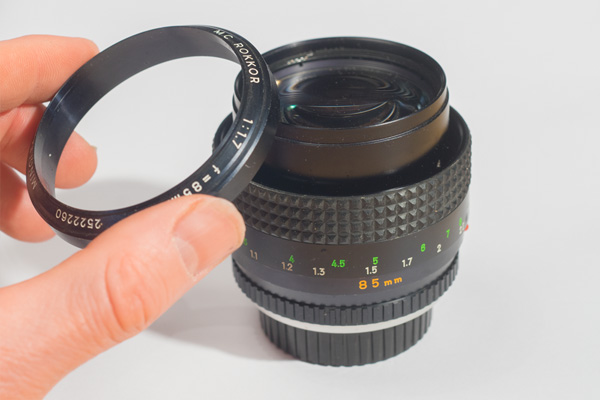
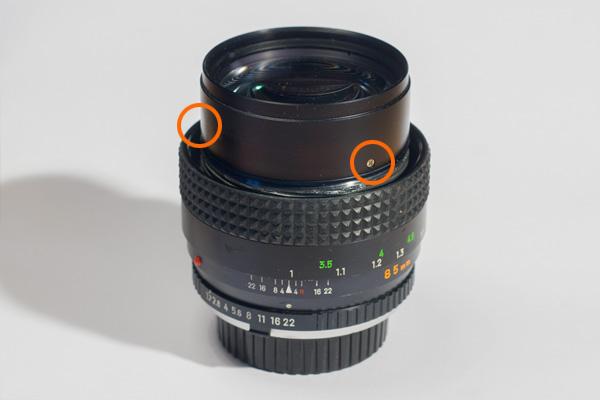
Minolta MC-X 1.7/85mm #1: Removing the front group
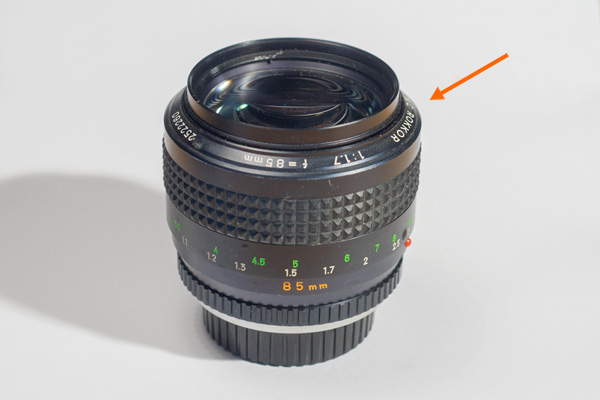
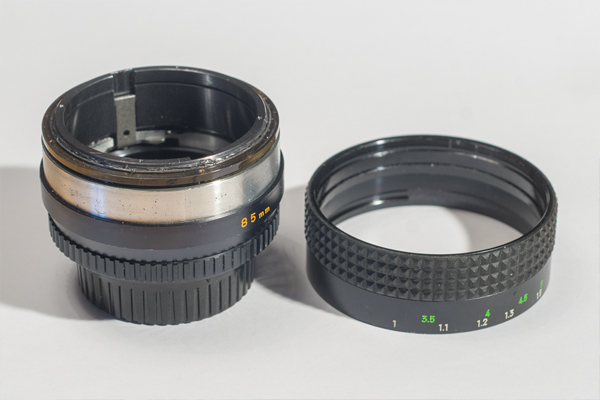
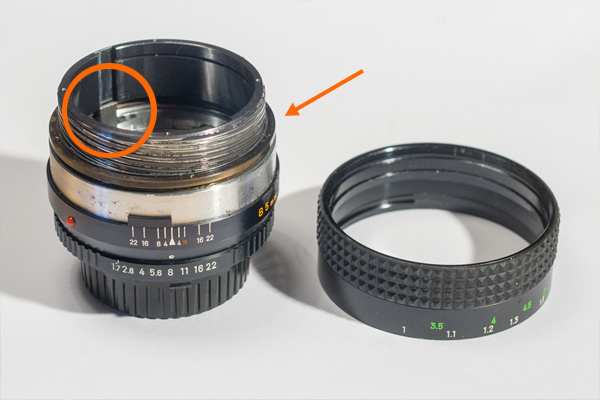
First we remove the front ring of the lens. It's easiest to use rubber gloves, grip the front ring firmly and turn it counter-clockwise. Usually it doesn't need that much force.


Now we turn the focusing ring from infinity to its nearest distance (1 m). The small screws now are visible. Carefully remove them using proper JIS screwdrivers.
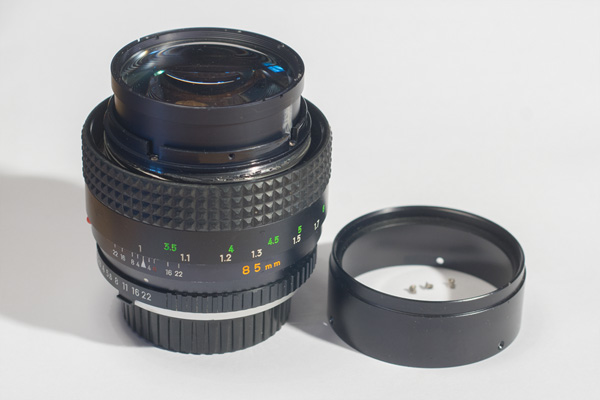
Once the screws are gone you may remove the protecting metal ring.
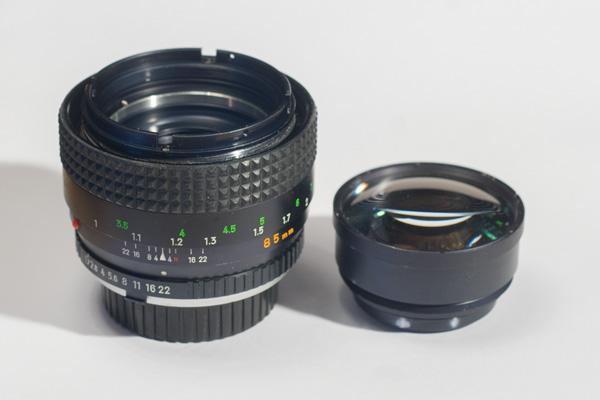
Again using the rubber gloves, grab the front of the lens element firmly and take it out, turning it couter-clockwise.
_________________
www.artaphot.ch |
|
| Back to top |
|
|
stevemark
Joined: 29 Apr 2011
Posts: 3754
Location: Switzerland
|
| Posted: Sat Jan 02, 2021 7:30 pm Post subject: |
|
|
stevemark wrote:
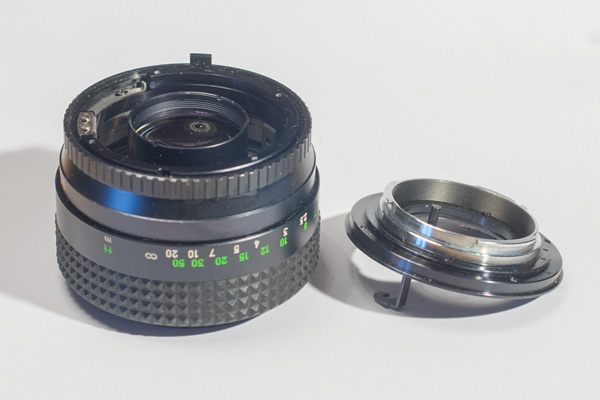
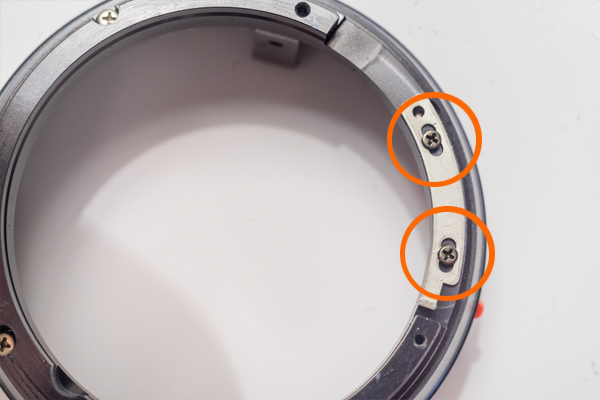
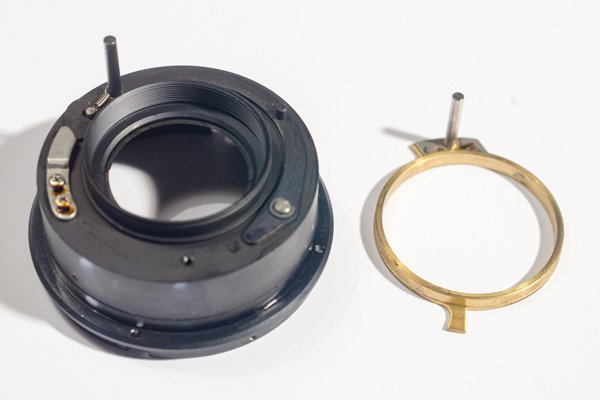
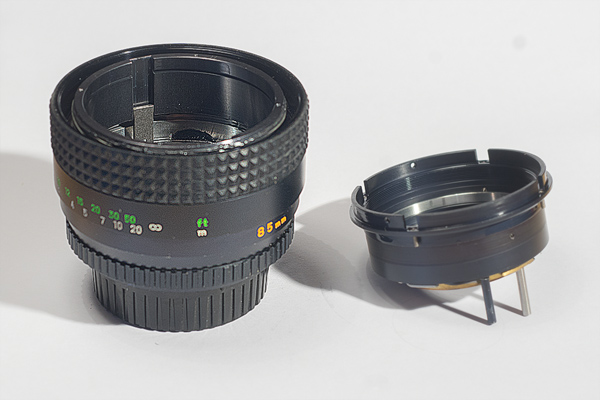
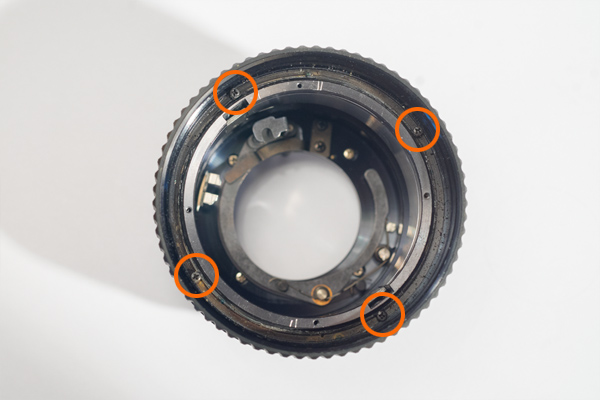
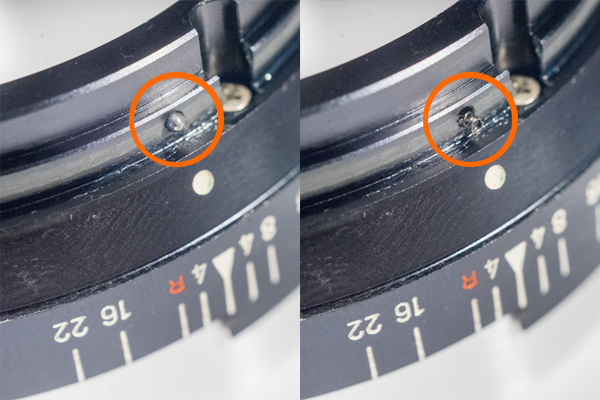
Minolta MC-X 1.7/85mm #2: Removing the rear group
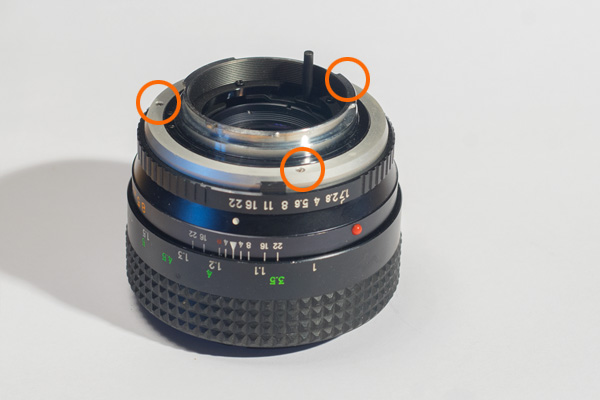
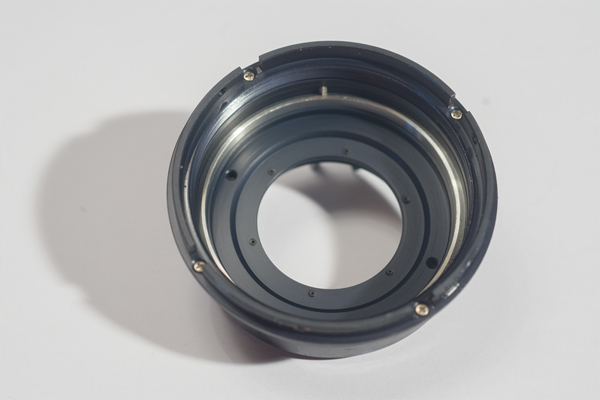
Turn the remaining part upside down and remove the silver colored protecting ring, again using correct JIS screwdrivers.

Now carefully remove the bayonet mechanism itself.
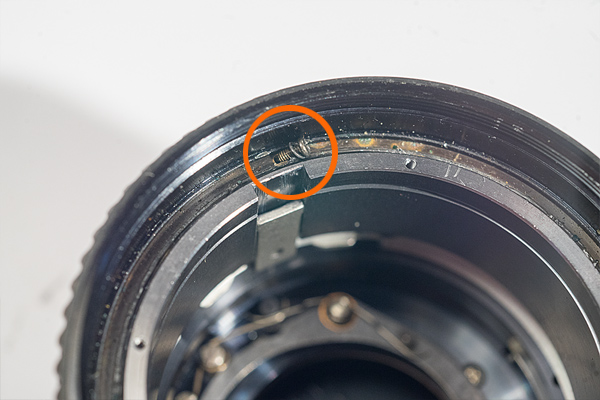
ATTENTION: be very careful NOT to remove the aperture ring, not even accidentally when lifting out the bayonet mechanism!!
The aperture mechanism must stay in place; otherwise you risk that the tiny "aperture-click-ball" (about 1 mm in diameter) will be ejected by the small spring pushing it usually against the aperture ring.
Finding such a tiny steel ball on a wooden floor is difficult. Trying to find it on a carpet is useless ...

Now the bayonet mechanism is removed, and the aperture ring is still in its original position.

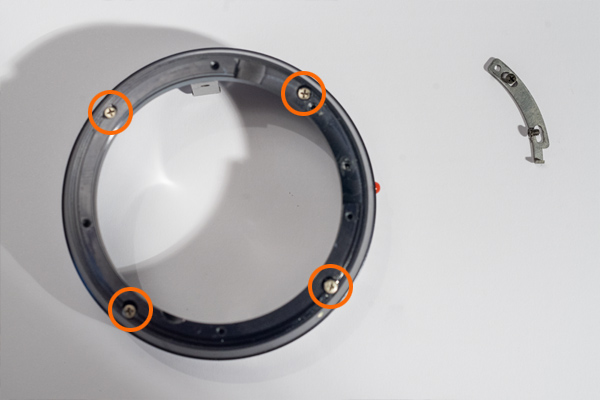
Take a lens spanner wrench and remove the real lens group by turning it counter-clockwise.

Rear lens group removed.

Re-assemble the bayonet mount to prevent the aperture ring from being dislocated (and the aperture-click-ball from being lost).
_________________
www.artaphot.ch |
|
| Back to top |
|
|
visualopsins

Joined: 05 Mar 2009
Posts: 10539
Location: California
Expire: 2025-04-11
|
| Posted: Sat Jan 02, 2021 7:45 pm Post subject: |
|
|
visualopsins wrote:
Topic belongs in "Equipment Care And Repairs" sub-forum...

_________________
☮☮☮☮☮☮☮☮☮☮☮☮☮☮☮☮☮☮☮☮☮☮☮☮☮☮☮☮☮☮☮☮ like attracts like! ☮☮☮☮☮☮☮☮☮☮☮☮☮☮☮☮☮☮☮☮☮☮☮☮☮☮☮☮☮☮☮☮
Cameras: Sony ILCE-7RM2, Spotmatics II, F, and ESII, Nikon P4
Lenses:
M42 Asahi Optical Co., Takumar 1:4 f=35mm, 1:2 f=58mm (Sonnar), 1:2.4 f=58mm (Heliar), 1:2.2 f=55mm (Gaussian), 1:2.8 f=105mm (Model I), 1:2.8/105 (Model II), 1:5.6/200, Tele-Takumar 1:5.6/200, 1:6.3/300, Macro-Takumar 1:4/50, Auto-Takumar 1:2.3 f=35, 1:1.8 f=55mm, 1:2.2 f=55mm, Super-TAKUMAR 1:3.5/28 (fat), 1:2/35 (Fat), 1:1.4/50 (8-element), Super-Multi-Coated Fisheye-TAKUMAR 1:4/17, Super-Multi-Coated TAKUMAR 1:4.5/20, 1:3.5/24, 1:3.5/28, 1:2/35, 1:3.5/35, 1:1.8/85, 1:1.9/85 1:2.8/105, 1:3.5/135, 1:2.5/135 (II), 1:4/150, 1:4/200, 1:4/300, 1:4.5/500, Super-Multi-Coated Macro-TAKUMAR 1:4/50, 1:4/100, Super-Multi-Coated Bellows-TAKUMAR 1:4/100, SMC TAKUMAR 1:1.4/50, 1:1.8/55
M42 Carl Zeiss Jena Flektogon 2.4/35
Contax Carl Zeiss Vario-Sonnar T* 28-70mm F3.5-4.5
Pentax K-mount SMC PENTAX ZOOM 1:3.5 35~105mm, SMC PENTAX ZOOM 1:4 45~125mm
Nikon Micro-NIKKOR-P-C Auto 1:3.5 f=55mm, NIKKOR-P Auto 105mm f/2.5 Pre-AI (Sonnar), Micro-NIKKOR 105mm 1:4 AI, NIKKOR AI-S 35-135mm f/3,5-4,5
Tamron SP 17mm f/3.5 (51B), Tamron SP 17mm f/3.5 (51BB), SP 500mm f/8 (55BB), SP 70-210mm f/3.5 (19AH)
Vivitar 100mm 1:2.8 MC 1:1 Macro Telephoto (Kiron)
|
|
| Back to top |
|
|
stevemark
Joined: 29 Apr 2011
Posts: 3754
Location: Switzerland
|
| Posted: Sat Jan 02, 2021 7:48 pm Post subject: |
|
|
stevemark wrote:
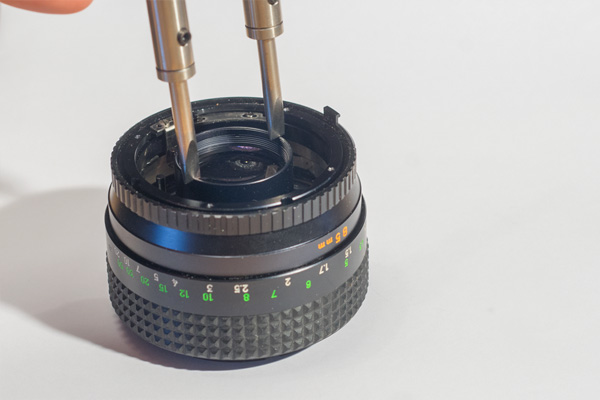
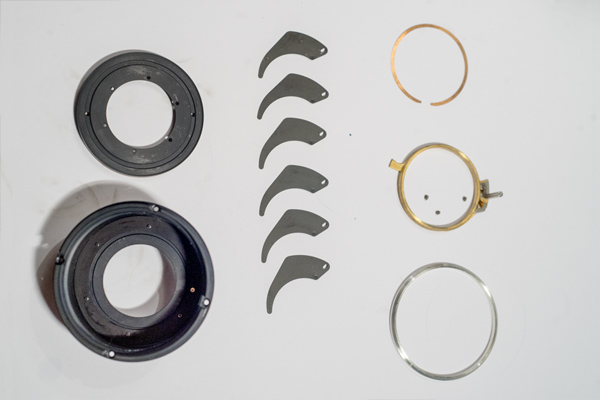
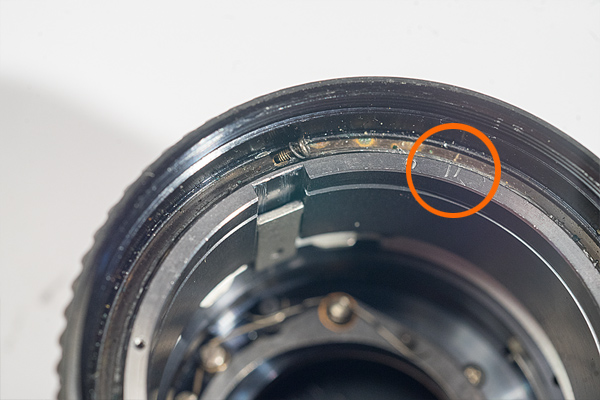
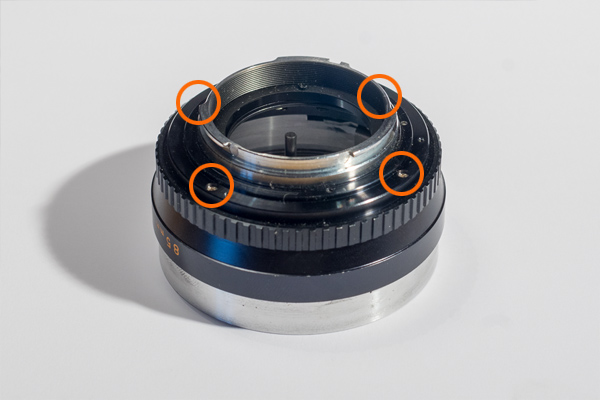
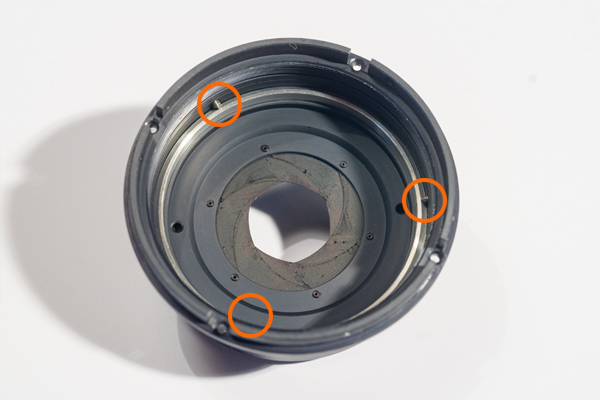
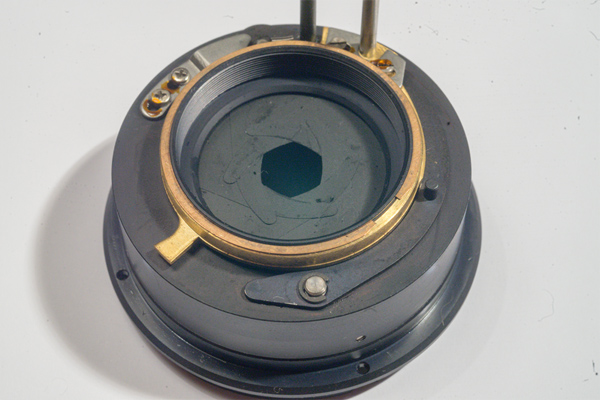
Minolta MC-X 1.7/85mm #3: Removing the aperture mechanism
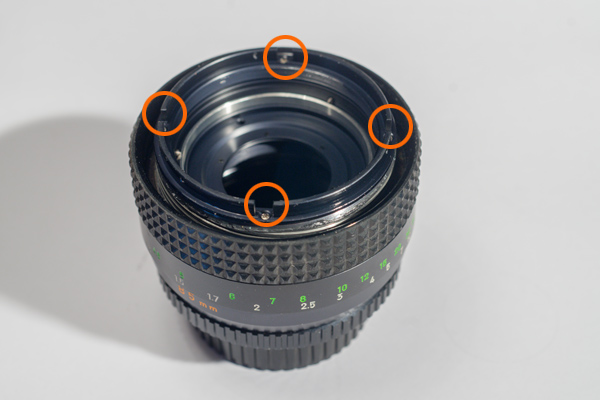
Carefully loosen the four screws indicated.
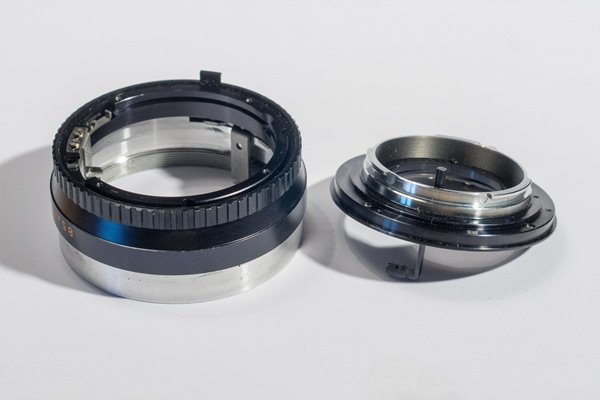
Remove the aperture mechanism.

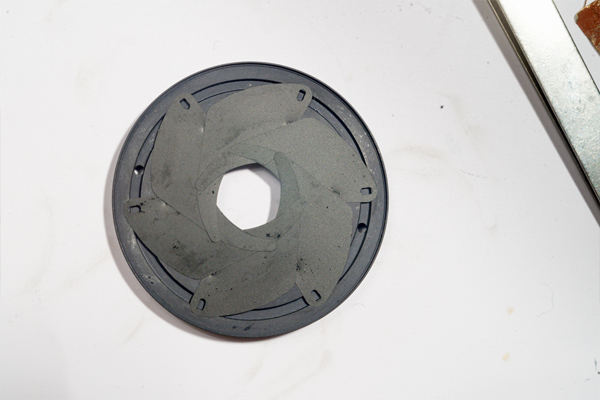
The aperture mechanism seen from the front side (the screws were re-inserted to prevent losing them)
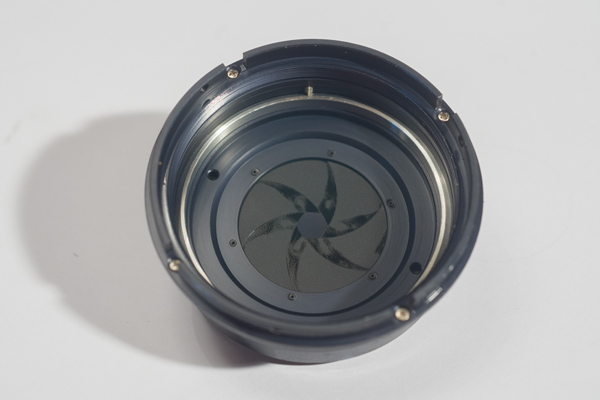
Here's why the aperture didn't work properly any more. Lots of oil between the aperture blades (and not only oil, but'll see that later).
_________________
www.artaphot.ch |
|
| Back to top |
|
|
stevemark
Joined: 29 Apr 2011
Posts: 3754
Location: Switzerland
|
| Posted: Sat Jan 02, 2021 9:46 pm Post subject: |
|
|
stevemark wrote:
Minolta MC-X 1.7/85mm #4: Dismantling and cleaning the focusing mechanism
Now things are getting a bit more compolicated. Dismantling is easy - but being able to correctly reassemble it is another thing.
Before starting with #4, please ensure that the focusing mechanism is set to "infinity". Then, looking from the front side, mark the position of the outer focusing ring (the part with the focusidng rubber). In my case, the aluminium ring had already been marked with a double line (indication a previous servicing of the lens - we will later come back to that). Usually you'd make only one line per ring, of course.
Remove the four screws.

Be careful not to loose the tiny washers on each of the four screws!
Remove the focusing ring without moving/turning the brass ring beneath.

Now mark the exact position of the brass ring vs the outer aluminium shell.
What a mess! The entire inside of the focusing mechanism is covered with oil. Obviously, long time ago, someone has been applying lots of grease ... This is not how a Minolta lens normally looks !
Now turn the narrow brass ring (red arrow) until the inner aluminium ring reaches the end of its guides (red ring); then turn the aluminium ring until it comes out.
ATTENTION: Carefully mark the position of the inner alu ring vs the "in-between" brass ring at the exact position where it comes out - otherwise reassembling will be difficult!
Now the inner aluminum ring has come off.

Then carefully unscrew the brass ring, counting how many turns it needs to come off. Mark the point where it comes off.
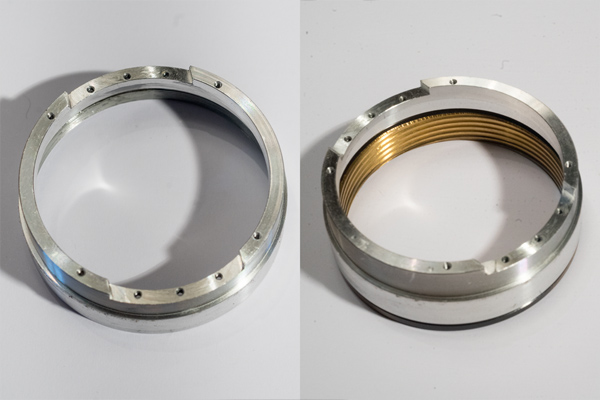
The two rings have come off. The "brass on aluminum" construction ensures the exceptionally smooth focusing of these earlier MC-C lenses.

Lots of grease indeed!
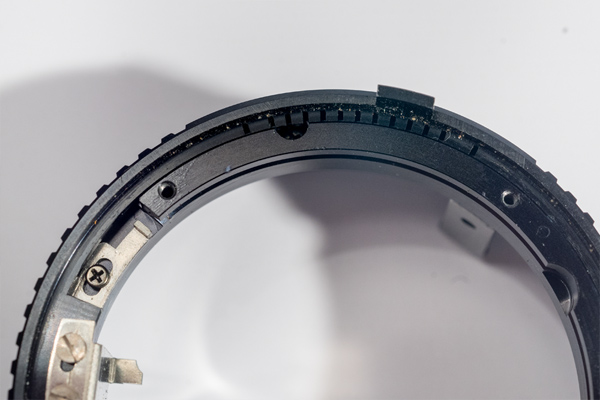
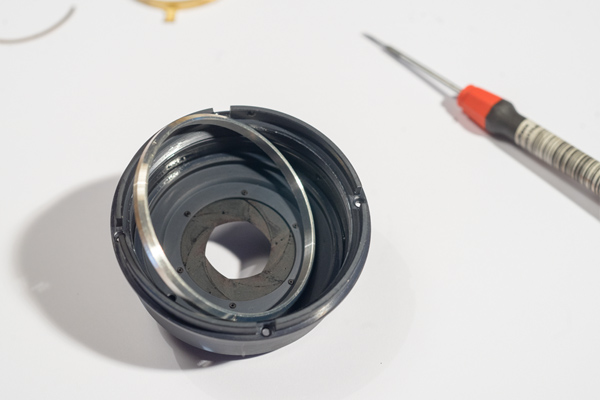
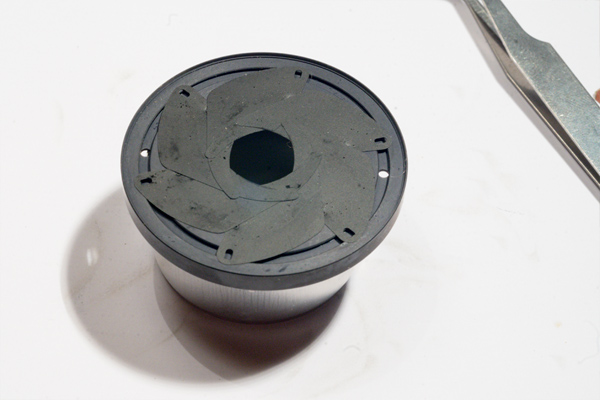
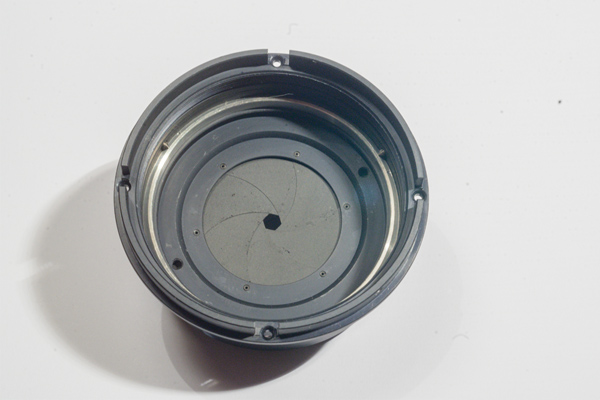
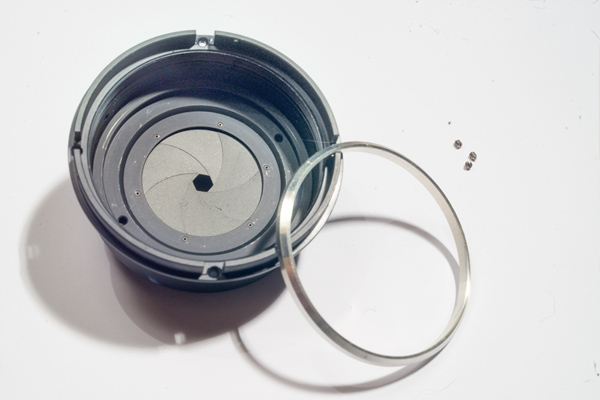
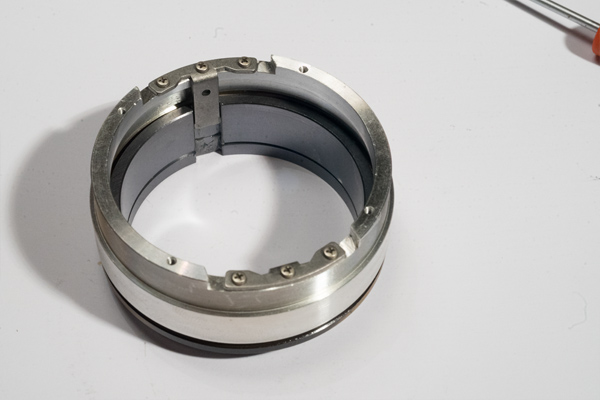
Now turn the remaining "empty" focusing mechanism upside down and remove - again! - the bayonet mount. Again be very careful NOT remove the aperture ring!
Bayonet removed.

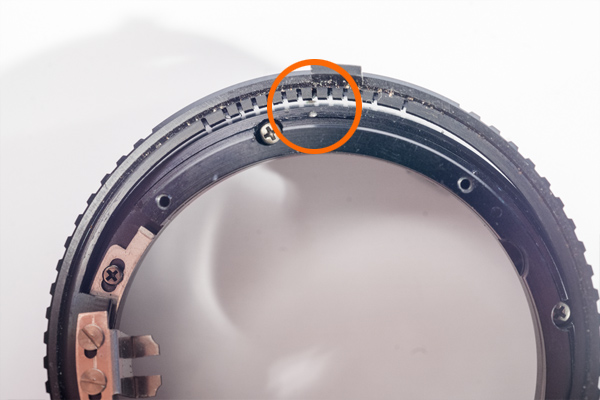
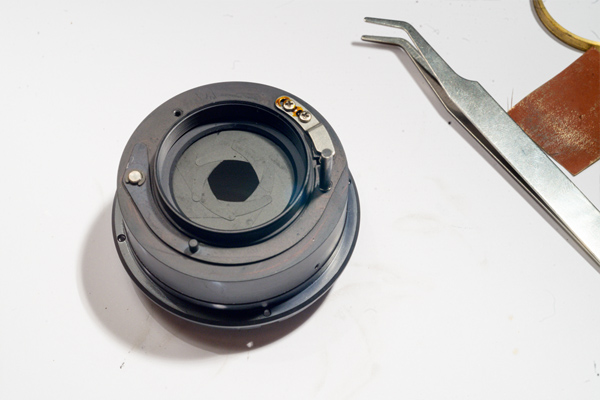
Looking on the top (front) side of the remaining body. The tiny slots / incisions visible on the inside of the aperture ring are meant to produce the "click-stops". There, in between the inner main part and the aperture ring, is the tiny click-stop mechanism consisting of a spring and a steel ball.

Carefully lift the aperture ring at the opposite side of the click-stop mechanism, and remove it very slowly. Usually the small steel ball will remain stuck on the inner part, but it may also fall down.

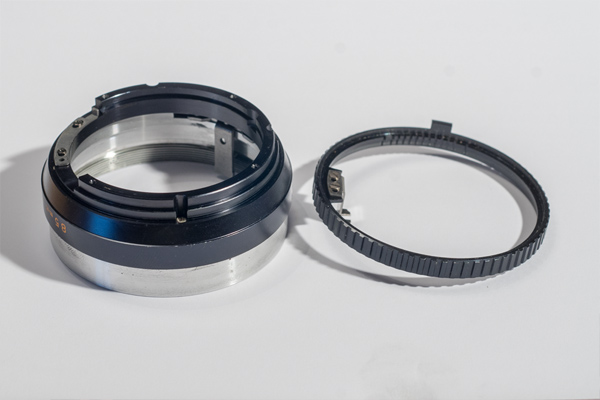
Aperture ring removed.
Steel ball (<1mm diameter) on its original position (left). Tiny steel spring appearing after removing the small steel ball (right).
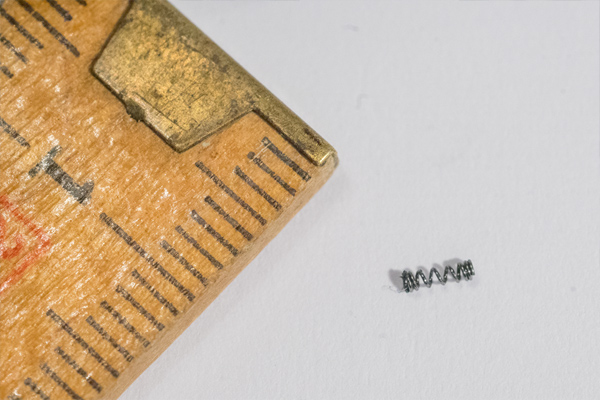
The tiny spring is removed. Its diameter is <1mm!

Back to the remaining part for dismantling - remove the screws after having marked their orîginal position. You may also take a picture, of course.

Stopper removed. Loosen the four screws and remove them.
Separate the two remaining parts (silver and black), and remove the six screws.

Remove the two guides of the focusing mechanism.
Disassembling complete - almost. The aperture mechanism (left side on the middle row) still is isn't dismantled. I was hoping that a thorough rinsing with solvent would be sufficient to clean it (usually that works pretty well).
_________________
www.artaphot.ch |
|
| Back to top |
|
|
stevemark
Joined: 29 Apr 2011
Posts: 3754
Location: Switzerland
|
| Posted: Sun Jan 03, 2021 1:02 pm Post subject: |
|
|
stevemark wrote:
Minolta MC-X 1.7/85mm #5: Dismantling and cleaning the aperture mechanism
Before dismantling the entire aperture mechanism I tried to simply wash it with a solvent (acetone). Though the oil was reoved by the solvent, there were small amounts of a sticky, tar-like resin remaining all over the mechanism.
This resin had to be rmoved thoroughly before the aperture would be working properly, and so I decided to dismantle it completely.
The tar-like substance is a condensation product from the grease. I strongly assume that this lens had been serviced previously with too much of a cheap grease (not the original Minolta grease).
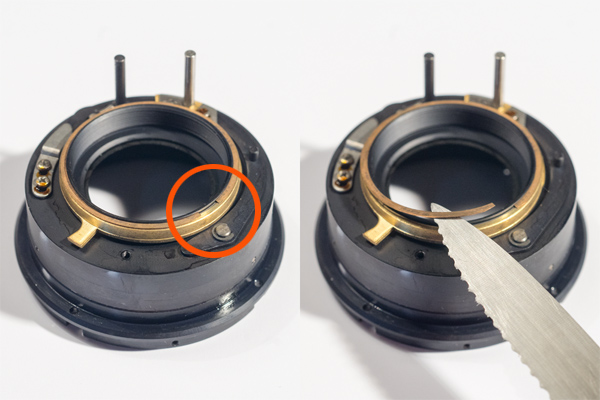
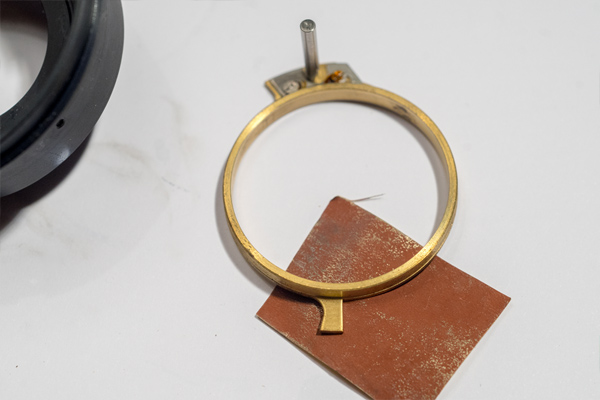
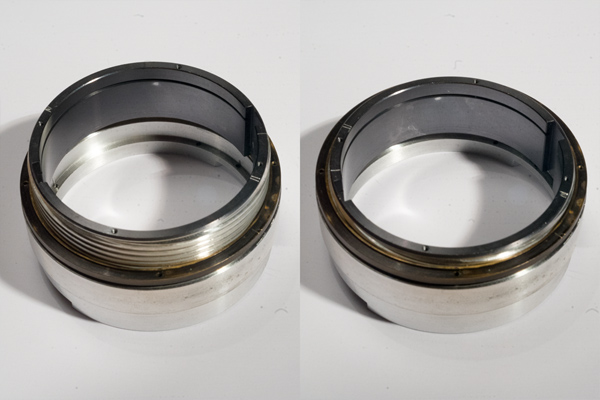
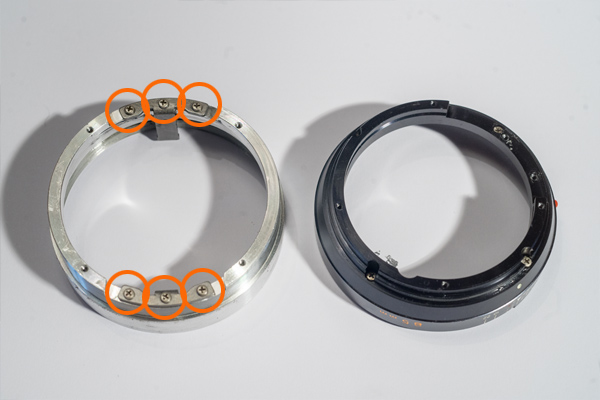
We're starting from the rear end of the aperture mechanism:

There's a thin copper ring (which looks almost like a shim) holding the larger brass ring below in its correct position. The copper ring can be lifted and removed e. g. with a sharp knife.

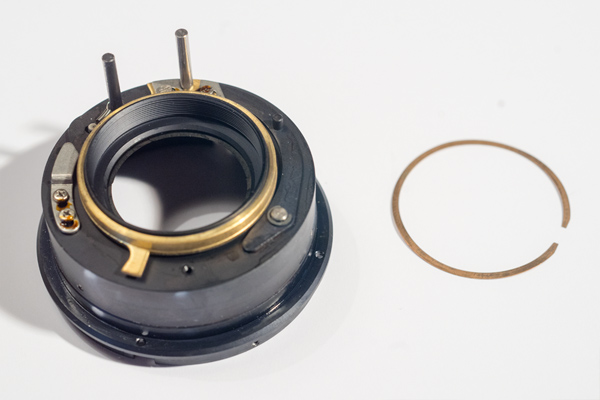
Copper ring removed, brass ring still in place.

Brass ring removed.
Now turn the remaining aperture mechanism upside down and look at it from the front side: there are three tiny headless screws holding a shiny aluminium rin in position (which in turn holds the cover plate in front of the aperture blades).
Carefully remove these screws with a suitable screwdriver.

The headless screws are removed, and so is the shiny aluminium ring.

Now, while slightly pressing the cover plate towards the aperture blades, we turn the aperture upside down again and now lift off the "cap".
The exposed aperture blades now will be laying on top of the cover plate (see image above).
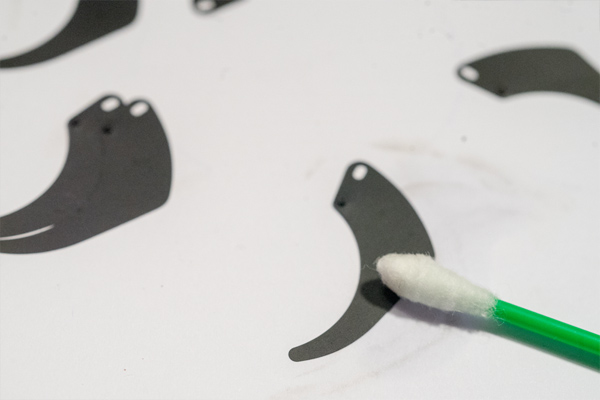
Note the small "droplets" of a sticky adhesive resin-like substance; they somehow are glueing the aperture blades together.

Aperture blades removed, on the right you can see the cover plate.

Cleaning of the blades (scrubbing carefully with acetone)

The inside of the brass ring was so contaminated with tar that I had to use an extremely fine polishing paper (ISO P2500 grade, 8 um particle size).

All the parts of the aperture mechanism after a thorough cleaning.
_________________
www.artaphot.ch |
|
| Back to top |
|
|
stevemark
Joined: 29 Apr 2011
Posts: 3754
Location: Switzerland
|
| Posted: Sun Jan 03, 2021 1:48 pm Post subject: |
|
|
stevemark wrote:
Minolta MC-X 1.7/85mm #6: reassembling the aperture mechanism
Reassembling the aperture mechanism is straightforward and quite easy as long as work according to the steps given below.

Take the cover blade and place it in front of you, with the aperture blade holes on top. Add five aperture blades - one after another - carefully and in the proper orientation (left image). Keep the blades in the "wide open" position.
Add the sixth aperture blade by carefully lifting the first blade slightly (as shown in the middle image).
Finally, using a very small screwdriver, position the sixths (last) aperture blade correctly (right image).
Now carefully close the aperture to a middling position (about f . This requires some patience since you have to move each blade individually and step-by-step. It's best to use e. g. a small screwdriver to shift the blades to their "f8" position. . This requires some patience since you have to move each blade individually and step-by-step. It's best to use e. g. a small screwdriver to shift the blades to their "f8" position.

Place the cover plate - now being below the aperture blades! - on a small circular pedestal (roughly 4 cm in diameter, and at least 2 cm high)
Then carefully put the rear end of the aperture mechanism (I'll call it "cap" from now on) on top of it. Carefully rotate the cap slightly in both directions until at least one of the aperture blades engages. Now turn the entire mechanism including our small pedestal upside down, remove the pedestal and continue to engage the remaining aperture blades. If you do this carefully, one-by-one, and using a small screwdriver to move the blades, it will be straightforward an easy. If you try to do everything at once, you may en up with a mess, though. Take your time. It'll take less than 5 min even for a beginner.
Once all the blades are engaged, you may put the shiny aluminium ring back into its correct position by using the three headless screws. Before tightening the screws, check whether the aperture lever (on the back side of the mecanism) can open and close the aperture as required: It should be fairly easy to move.

Then tighten the headless screws.
Put the brass ring back on the aperture mechanism and secure it with the thin copper ring.
Adjusting the aperture mechanism: The aperture must open completely, and close to its minimal value (about 3 mm diameter). If it doesn't work correctly, adjust it from the front side (i. e. not fron the side shown here!): Use the cover plate (below the shiny alu ring and on top of the aperture blades) to adjust: Just turn the cover plate until everything's OK, the fix it again using the three headless screws mentioned before. The aperture mechanism now is cleaned, reassembled and adjusted.
_________________
www.artaphot.ch
Last edited by stevemark on Sun Jan 14, 2024 5:35 pm; edited 2 times in total |
|
| Back to top |
|
|
stevemark
Joined: 29 Apr 2011
Posts: 3754
Location: Switzerland
|
| Posted: Sun Jan 03, 2021 1:48 pm Post subject: |
|
|
stevemark wrote:
Minolta MC-X 1.7/85mm #6: reassembling the focusing mechanism
ATTENTION:
To reassemble the focusing mechanism you can't just reverse the "#4: Disassembling the focusing mechansim" instructions!
Instead, follow the steps given below.

Start with the cleaned aluminium part (left image) and screw in the brass part (right image). Be sure to apply as many revolutions as you had counted when unsrewing it (in my lens we had about eight revolutions).

The n screw in the aluminum focusing thread. Be sure to start exactly at the marked point - that makes things a lot easier!
Finally reassemble the two guides using the six screws shown above.
All other steps can be done reversing the dismantling instructions given above.
_________________
www.artaphot.ch |
|
| Back to top |
|
|
lumens pixel

Joined: 27 Feb 2019
Posts: 834
Expire: 2021-06-25
|
| Posted: Sun Jan 03, 2021 2:10 pm Post subject: |
|
|
lumens pixel wrote:
Fantastic. So much beyond my skills I am afraid.

_________________
Lumens Pixel
-------------
Minolta SR mount: 16 2,8; Sigma SuperWide 24 2,8; 28 2,5; 28 2,8; 28 3,5; 35 2,8; 45 2,0; 50 1,4; 50 1,7; 50 2,0; 58 1,4; 85 2,0; 100 2,5; 100 4 Macro; 135 3,5; 135 2,8; 200 4; RF 250 5,6; 24-35 3,5; 35-70 3,5; 75-150 4; 70-210 4
Canon FD mount: Tokina RMC 17 3,5; 28 2,8; 35 2,8; 50 1,8; 50 3,5 Macro; 55 1,2; 135 3,5; 135 2,5; 200 4,0; 300 5,6; 28-55 3,5 4,5; Tokina SZ-X SD 270; 70-150 4,5; 70-210 f4; 80-200 4L; Tokina SZ-X 845
Tamron Adaptall: 28-80 3,5-4,2 (27A); 70-210 3,8-4 (46A); 60-300 (23A); 90 2,5 (52B); 35-135 3,5-4,5 (40A)
Tamron SP: 20-40 2,7-3,5 (266D) |
|
| Back to top |
|
|
RokkorDoctor

Joined: 27 Nov 2021
Posts: 1268
Location: Kent, UK
|
| Posted: Fri Jan 21, 2022 10:52 pm Post subject: Re: Minolta MC-X 1.2/58mm and 1.7/85mm repair |
|
|
RokkorDoctor wrote:
Well done on the repairs. 
These two are very robust constructions and are in many ways some of the easier Rokkors to service.
| stevemark wrote: |
Now the MC 1.2/58mm was perfectly clean again - and test images did confirm that its optical formula must slightly derive from the earlier MC-II 1.2/58mm: The MC-II has a distinctively yellowish tint, the colors of MC-X on the other hand are in line with other Minolta lenses. The MC-X is sharper wide open, and it has more longitudinal CAs.
S |
That yellowish tint of the MC-II is resulting from the radioactive Thorium-glass minolta used in the MC-I versions and earlier MC-II versions of the 1.2/58mm (later MC-II and MC-X versions used a different glass). This is a well-known issue with this lens widely discussed on the web. When new out of the factory it would not have had that yellow tint. One of the elements contains a good proportion of Thorium, which is a radioactive element. Over time this glass will discolour yellow/brown:
https://en.wikipedia.org/wiki/Thoriated_glass
Confirmed Minolta Rokkor lenses that used radioactive Thorium glass are:
- MC-I Minolta Rokkor 58mm f/1.2
- Early MC-II Minolta Rokkor 58mm f/1.2 (serial no. lower than 257xxxx; 2568164 is the latest info: https://lens.ws/minolta-mc-rokkor-pg-58mm-f1-2-mc2/)
- Minolta Rokkor 28mm f/2.5 (all versions)
There is another related thread in mflenses:
http://forum.mflenses.com/rokkor-58mm-f-12-question-t66991.html
The yellowing can largely be eliminated by several hours/days of fairly intense exposure to UV light, which I have done on a few copies of the 28mm f/2.5; this works best if the radioactive element is removed from the front cell. I used a terrarium UV lamp for reptiles.
Radiation levels are too low to worry about when carrying around for a few hours (allegedly about the equiv. of a single chest x-ray exposure if you do that), but it wouldn't be advisable to store them near the bed. Thorium has a very long half life, and whilst the decay-series starts with the relatively safe alpha-radiation, some of the daughter elements do produce the more worrisome gamma radiation:
https://pubs.usgs.gov/of/2004/1050/thorium.htm
https://en.wikipedia.org/wiki/Thorium
This gamma radiation is only detectable near the lens, but will be less than detectable background radiation levels at more than 2 meters from the lens (allegedly )
Several instances have been reported where used copies of the earlier model 58mm f/1.2 to be sent internationally (eBay etc.) were prohibited from export and returned by customs due to the radioactive signature detected at customs.
[EDIT] corrected some version no.s
_________________
Mark
SONY A7S, A7RII + dust-sealed modded Novoflex/Fotodiox/Rayqual MD-NEX adapters
Minolta SR-1, SRT-101/303, XD7/XD11, XGM, X700
Bronica SQAi
Ricoh GX100
Minolta majority of all Rokkor SR/AR/MC/MD models made
Sigma 14mm/3.5 for SR mount
Tamron SP 60B 300mm/2.8 (Adaptall)
Samyang T-S 24mm/3.5 (Nikon mount, DIY converted to SR mount)
Schneider-Kreuznach PC-Super-Angulon 28mm/2.8 (SR mount)
Bronica PS 35/40/50/65/80/110/135/150/180/200/250mm |
|
| Back to top |
|
|
stevemark
Joined: 29 Apr 2011
Posts: 3754
Location: Switzerland
|
| Posted: Fri Jan 21, 2022 11:53 pm Post subject: Re: Minolta MC-X 1.2/58mm and 1.7/85mm repair |
|
|
stevemark wrote:
| RokkorDoctor wrote: |
Well done on the repairs.
These two are very robust constructions and are in many ways some of the easier Rokkors to service.
| stevemark wrote: |
Now the MC 1.2/58mm was perfectly clean again - and test images did confirm that its optical formula must slightly derive from the earlier MC-II 1.2/58mm: The MC-II has a distinctively yellowish tint, the colors of MC-X on the other hand are in line with other Minolta lenses. The MC-X is sharper wide open, and it has more longitudinal CAs.
S |
That yellowish tint of the MC-II is resulting from the radioactive Thorium-glass minolta used in the MC-I versions and earlier MC-II versions of the 1.2/58mm (later MC-II and MC-X versions used a different glass). This is a well-known issue with this lens widely discussed on the web. When new out of the factory it would not have had that yellow tint. One of the elements contains a good proportion of Thorium, which is a radioactive element. Over time this glass will discolour yellow/brown:
...
|
Maybe. Maybe not. I don't have access to a Geiger counter, but the (very sligtly) yellowish glass used in my copy of the MC-II 1.2/58mm certainly isn't the same type of glass used e. g. in the Minolta MC 2.5/28mm or the Asahi S-M-C Takumar 1.4/50mm. The color cast is much, much weaker. That said, I have two possible explanations:
1) Rare earth elements ores always occur together with Thorium, and separating Thorium from the rare earth elements isn't that easy. It certainly wasn't easy for those producing e. g. lanthanum in the 1960s. Of course there was a rather good separation of thorium from the rare earth elements, but traces of Thorium certainly did remain, thus possibly causing a very light "yellowing" (and very weak radioactivity, of course)
2) Leitz in their information about the Noctilux-M 1/50mm was stating that the Noctlux had a different color transmission than the other Leica lenses - less transmission at short wavelengths (blue), thus leading to the slightly yellowish color cast of pictures taken with the Noctilux. The Noctilux certainly doesn't have Thorium glass, however its color cast very much looks what I can see on my MC-II 1.2/58mm.
Since the MC-II 1.2/58mm has such a "light" color cast, it seems very unlikely that it is as radioactive as "real thorium lenses" (such as the MC 2.5/28mm or the 1.4/50mm Takumar).
S
_________________
www.artaphot.ch |
|
| Back to top |
|
|
Mir

Joined: 07 Feb 2011
Posts: 977
Location: Montreal, Canada
Expire: 2017-09-30
|
| Posted: Sat Jan 22, 2022 3:38 am Post subject: |
|
|
Mir wrote:
Truly spectacular work .....
Had i seen that a few years back i could've done my 58mm myself !
Thanks for sharing ....
_________________
"Obsta principiis, finem respice"
"There is a fine line between hobby and mental illness"
MISC: Tamron SP 35-80 (01A), Auto Chinon Tomioka 1.4/55, Tokina AT-X 2.5/90, Tamron SP 5,6/300 (54B)
ZEISS: WG Distagon 2.8/25, WG Distagon 2.8/35 HFT, WG Planar HFT 1.4/50, Ultron 1.8/50, WG Sonnar 2.8/85, WG Sonnar HFT 2.8/135
VOIGTLÄNDER : Ultron Aspherical 1.8/21, Ultron 2/28, Nokton Aspherical 1.2/35, Nokton Classic 1.4/40, Nokton Aspherical 1.5/50, Color-Heliar 2.5/75
MINOLTA: MD 3.5/35-70 Macro, MD 1.2/50, MC Rokkor-X 1.2/58, MD Macro 3.5/50
LEITZ: SUMMICRON-R 2/35 (II), SUMMICRON-R 2/50 (II), TELE ELMARIT-M 2,8/90 (Thin)
CANON RF: 2.8/28, 2/35, 1.2/50, 1.4/50, Serenar 1.8/50, 2/85, 2/100, 3.5/100
LTM : CHIYODA KOGAKU SUPER ROKKOR 1.8/5cm, CHIYOKO SUPER ROKKOR C 2/5cm, TOKYO KOGAKU Topcor-S 2/5cm, Nippon Kogaku NIKKOR-H.C 2/5cm, FUJI FILM CO. FUJINON L 2/5cm, KMZ Jupiter-8 2/5cm
And a small Minolta AF set: 2.8/20, 1.4/35, 1.4/50, 2/100, 4.5/100-200
@we3fotography
@7plus_pictures
@_whats.that.car_ |
|
| Back to top |
|
|
cbass

Joined: 27 Jul 2019
Posts: 441
|
| Posted: Sat Jan 22, 2022 4:31 am Post subject: |
|
|
cbass wrote:
Very informative and extremely well written. Thank you.
When you regrease the helicoid what do you use? |
|
| Back to top |
|
|
RokkorDoctor
Joined: 27 Nov 2021
Posts: 1268
Location: Kent, UK
|
| Posted: Sat Jan 22, 2022 10:25 am Post subject: Re: Minolta MC-X 1.2/58mm and 1.7/85mm repair |
|
|
RokkorDoctor wrote:
| stevemark wrote: |
Maybe. Maybe not. I don't have access to a Geiger counter, but the (very sligtly) yellowish glass used in my copy of the MC-II 1.2/58mm certainly isn't the same type of glass used e. g. in the Minolta MC 2.5/28mm or the Asahi S-M-C Takumar 1.4/50mm. The color cast is much, much weaker.
S |
I'm not sure how long you have had it, but it is also possible that for some time during its life it was stored with some UV exposure (lens cap off near a window e.g.)
But as you say, without access to a Geiger counter it will be hard to determine. Either way, it isn't a major health concern and if it doesn't raise noise levels in the camera then it's nothing to worry about; we are not talking Chernobyl / Fukushima levels here after all
_________________
Mark
SONY A7S, A7RII + dust-sealed modded Novoflex/Fotodiox/Rayqual MD-NEX adapters
Minolta SR-1, SRT-101/303, XD7/XD11, XGM, X700
Bronica SQAi
Ricoh GX100
Minolta majority of all Rokkor SR/AR/MC/MD models made
Sigma 14mm/3.5 for SR mount
Tamron SP 60B 300mm/2.8 (Adaptall)
Samyang T-S 24mm/3.5 (Nikon mount, DIY converted to SR mount)
Schneider-Kreuznach PC-Super-Angulon 28mm/2.8 (SR mount)
Bronica PS 35/40/50/65/80/110/135/150/180/200/250mm |
|
| Back to top |
|
|
vandergus

Joined: 14 Jan 2022
Posts: 15
Location: United States
|
| Posted: Sun Jan 23, 2022 2:26 am Post subject: |
|
|
vandergus wrote:
Thanks for posting a detailed tear down of these lenses. I'm hoping to find a 85mm fixer upper and this will certainly come in handy.
For disassembling and reassembling helicoids, I've found that two things that helped me the most were
1.) Measuring the length of the helicoid at infinity with calipers.
2.) Marking or noting exactly where the helicoid came apart.
I've found that scoring mating marks isn't always sufficient. It's possible to put the helicoid back together in a way that the marks line up, but the overall length (and hence infinity focus) is different. If you know that original length, and mate the helicoid threads as they were previously done (see step 2), you are almost guaranteed to get the lens back to its infinity focus point.
Of course, the original infinity focus point could have been wrong, but that requires a different solution.
Cheers and thanks again! |
|
| Back to top |
|
|
RokkorDoctor
Joined: 27 Nov 2021
Posts: 1268
Location: Kent, UK
|
| Posted: Sun Jan 23, 2022 12:02 pm Post subject: |
|
|
RokkorDoctor wrote:
| vandergus wrote: |
For disassembling and reassembling helicoids, I've found that two things that helped me the most were
1.) Measuring the length of the helicoid at infinity with calipers.
2.) Marking or noting exactly where the helicoid came apart. |
Yep, that's pretty standard practice.
| vandergus wrote: |
I've found that scoring mating marks isn't always sufficient. It's possible to put the helicoid back together in a way that the marks line up, but the overall length (and hence infinity focus) is different. |
That is likely because of movement on the fine thread. Most of these focus mechanisms are technically called "double helicoid focussing". There are many design variations, but in the most common ones there are two threads involved (hence the name double-helicoid):
- The course thread, usually a multi-start thread and that is the one which can be a pain to get mated up again
- The fine thread, by which the rotating part of the helicoid is screwed into the base of the lens, which is usually a single-start thread with something like a 0.4mm pitch or so
Ideally both threads need marking and measuring before disassembly. I usually also mark the infinity alignment on the rotating part of the helicoid and measure the small gap between the rotating part of the helicoid and base of the lens in order to make sure I have given the fine thread the required no. of turns when re-assembling.
Incidentally, Minolta has some lenses where the double-helicoid has two course threads instead of one course and one fine, e.g. the MD 135mm f/2, MD 200mm f/2.8, and MC/MD 100mm f/3.5 f/4 macro lenses.
Some of Minolta's floating-focus lenses (see below) have only one course thread (hence the rotating front element), and floating focus space is handled by a slot & cam mechanism.
| vandergus wrote: |
If you know that original length, and mate the helicoid threads as they were previously done (see step 2), you are almost guaranteed to get the lens back to its infinity focus point. |
Correct, but in any case most Minolta lenses have an easily accessible facility for making a fine-adjustment to the collimation after assembly of the lens. Usually the focus grip can be rotated relative to the rotating part of the helicoid and is secured by three screws.
Lenses where that doesn't work are:
- The floating-focus lenses 17mm f/4, 20mm f/2.8, 21mm f/2.8, 24mm f/2.8, 28mm f/2, 24mm f/2.8 VFC, SHIFT-CA 35mm f/2.8; these need careful attention to keep the float-space calibrated and locked whilst collimating
- Some older AUTO-ROKKOR and early MC lenses which were collimated in-factory by fitting the appropriate thickness brass shim, with no facility to fine adjust the rotational position at which the focus grip is fixed to the helicoid. Some of these lenses have the fine thread not machined directly into the base of the lens, but instead inside a thin aluminium ring that attaches to the base with 4 screws in 4 possible orientations. Together with the 0.4mm fine thread pitch this can be used to fine-adjust collimation to the nearest 0.1mm if you don't want to re-shim, which on those slower lenses may have been acceptable in the film-days but won't satisfy pixel-peepers now.
| vandergus wrote: |
Of course, the original infinity focus point could have been wrong, but that requires a different solution.
Cheers and thanks again! |
That's why it is advisable when servicing lenses that, failing access to a purpose-made collimation setup, some DIY alternative for collimating lenses be devised. There are many ways of doing that, some more accurate than others. Pretty much all of those DIY setups require access to at least one setup with known good mount-register/lens-register, for which calipers aren't accurate enough; you'll need access to either a Vernier depth-gauge to 0.02mm accuracy (not just 0.02mm resolution, which rules out the cheapo ones), or ideally a depth micrometer. The latter will be much more expensive than expected as for proper use of a 25-50mm or 50-75mm depth micrometer you'll also need a 25mm resp. 50mm gauge block and grade 0 flat granite reference surface... 
_________________
Mark
SONY A7S, A7RII + dust-sealed modded Novoflex/Fotodiox/Rayqual MD-NEX adapters
Minolta SR-1, SRT-101/303, XD7/XD11, XGM, X700
Bronica SQAi
Ricoh GX100
Minolta majority of all Rokkor SR/AR/MC/MD models made
Sigma 14mm/3.5 for SR mount
Tamron SP 60B 300mm/2.8 (Adaptall)
Samyang T-S 24mm/3.5 (Nikon mount, DIY converted to SR mount)
Schneider-Kreuznach PC-Super-Angulon 28mm/2.8 (SR mount)
Bronica PS 35/40/50/65/80/110/135/150/180/200/250mm |
|
| Back to top |
|
|
Knudsen

Joined: 16 Jun 2021
Posts: 115
Location: Indiana
|
| Posted: Sun Jan 23, 2022 2:50 pm Post subject: |
|
|
Knudsen wrote:
| RokkorDoctor wrote: |
That's why it is advisable when servicing lenses that, failing access to a purpose-made collimation setup, some DIY alternative for collimating lenses be devised. There are many ways of doing that, some more accurate than others. Pretty much all of those DIY setups require access to at least one setup with known good mount-register/lens-register, for which calipers aren't accurate enough; you'll need access to either a Vernier depth-gauge to 0.02mm accuracy (not just 0.02mm resolution, which rules out the cheapo ones), or ideally a depth micrometer. The latter will be much more expensive than expected as for proper use of a 25-50mm or 50-75mm depth micrometer you'll also need a 25mm resp. 50mm gauge block and grade 0 flat granite reference surface... |
Never buy Mitutoyo calipers, micrometers, depth gauges, etc. !!!!! If you do, you will never be able to even touch a pair of cheapies again. My tool cabinet full of measuring things had to be upgraded. Then I keep a pair of less loved calipers on each bench, by my lathes and mills out of cases and banging about by hand tools, and in my kitchen of all places. The beat around calipers mostly came in an ebay lot from an industry, so were 1/4 price. But this adventure cost me probably well over $1500 USD!

_________________
~Jon |
|
| Back to top |
|
|
RokkorDoctor
Joined: 27 Nov 2021
Posts: 1268
Location: Kent, UK
|
| Posted: Sun Jan 23, 2022 5:28 pm Post subject: |
|
|
RokkorDoctor wrote:
| Knudsen wrote: |
Never buy Mitutoyo calipers, micrometers, depth gauges, etc. !!!!! If you do, you will never be able to even touch a pair of cheapies again.
|
So true; Mitutoyo calipers, micrometers and depth gauges is all I have here at home . One of them I inherited from my dad; when properly cared for a Mitutoyo pair of calipers will last a lifetime and then some!
Still tempted to get myself a smallest grade 0 granite flat from them. I'll just need to find a way to convince the wife that a granite chopping board from the local kitchen shop isn't quite the same thing!
_________________
Mark
SONY A7S, A7RII + dust-sealed modded Novoflex/Fotodiox/Rayqual MD-NEX adapters
Minolta SR-1, SRT-101/303, XD7/XD11, XGM, X700
Bronica SQAi
Ricoh GX100
Minolta majority of all Rokkor SR/AR/MC/MD models made
Sigma 14mm/3.5 for SR mount
Tamron SP 60B 300mm/2.8 (Adaptall)
Samyang T-S 24mm/3.5 (Nikon mount, DIY converted to SR mount)
Schneider-Kreuznach PC-Super-Angulon 28mm/2.8 (SR mount)
Bronica PS 35/40/50/65/80/110/135/150/180/200/250mm |
|
| Back to top |
|
|
Lightshow

Joined: 04 Nov 2011
Posts: 3669
Location: Calgary
|
| Posted: Mon Jan 24, 2022 3:30 am Post subject: |
|
|
Lightshow wrote:
I know from experience that you do want to over lubricant the helicoid on these two lenses(MCII in my case) the path from the helicoid to the aperture mechanism is too short, don't use any grease that has even the slightest tendency to separate out or your freshly relubed lens will get a wet and sticky aperture.
I somehow missed this thread when it was first active, at least I caught it on the rebound.
Nice job stevemark, I can tell you spent quite the effort to document the process, so thank you for that effort. 
_________________
A Manual Focus Junky...
One photographers junk lens is an artists favorite tool.
My lens list
http://www.flickr.com/photos/lightshow-photography/ |
|
| Back to top |
|
|
RokkorDoctor
Joined: 27 Nov 2021
Posts: 1268
Location: Kent, UK
|
| Posted: Mon Jan 24, 2022 1:47 pm Post subject: |
|
|
RokkorDoctor wrote:
| Lightshow wrote: |
I know from experience that you do want to over lubricant the helicoid on these two lenses(MCII in my case) the path from the helicoid to the aperture mechanism is too short, don't use any grease that has even the slightest tendency to separate out or your freshly relubed lens will get a wet and sticky aperture.
|
It is a problem with these helicoid focussing lenses. Greases resistant to oil separation are too thick, and the ones with the right thickness (too) readily release their oil, as that is what a grease is supposed to do. AFAIK, a grease without any risk of oil separation hasn't been invented yet.
Grease-like substitutes that don't release their oil generally aren't real greases, but oils or petroleum jelly that sit just below their drop/melting point at room temperature, set rock-hard in winter and readily melt when exposed to summer temperatures 
In some Rokkor lenses (notably the MC W. ROKKOR 24mm f/2.8 ) Minolta used an anti-diffusion compound ("Emralon 325 antidiffusion compound", as per the service manual for the 24mm f/2.8 ). This is applied on the inner barrel between the helicoid and the aperture assembly, clearly intended to prevent oil migration into the aperture assembly.
Its efficacy here may be questionable though as these type of barriers will fail under heavy oil contamination, which may explain why Minolta didn't use it in most of their other lenses (other than the cost perhaps).
Unfortunately I could not find any information on Emralon 325; it may have been long discontinued. There is still a Bonderite 325 (formerly Emralon), but that now seems to be a resin-bonded PTFE dry lube coating, which sounds like something different.
Nye lubricants now do something similar (Nyebar, an oleophobic fluorocarbon compound designed to prevent oil migration), but this does not appear to be available to the general public.
_________________
Mark
SONY A7S, A7RII + dust-sealed modded Novoflex/Fotodiox/Rayqual MD-NEX adapters
Minolta SR-1, SRT-101/303, XD7/XD11, XGM, X700
Bronica SQAi
Ricoh GX100
Minolta majority of all Rokkor SR/AR/MC/MD models made
Sigma 14mm/3.5 for SR mount
Tamron SP 60B 300mm/2.8 (Adaptall)
Samyang T-S 24mm/3.5 (Nikon mount, DIY converted to SR mount)
Schneider-Kreuznach PC-Super-Angulon 28mm/2.8 (SR mount)
Bronica PS 35/40/50/65/80/110/135/150/180/200/250mm |
|
| Back to top |
|
|
RokkorDoctor
Joined: 27 Nov 2021
Posts: 1268
Location: Kent, UK
|
| Posted: Mon Jan 24, 2022 2:00 pm Post subject: |
|
|
RokkorDoctor wrote:
One additional hint on disassembly of the MC 58mm f/1.2:
stevemark already wisely mentioned the aperture click-ball to watch out for.
However, there are at least a couple of lenses (58mm f/1.2 and another one I can't remember now) that have eight screws that appear to hold the mount onto the lens. In fact only four of those screws (the long ones) hold the mount onto the lens. The other four (the short ones) hold together a ball-race inside the mount. Only undo the long screws to remove the mount; if you undo all the short ones you'll spend a good hour on your knees on the floor hunting for tiny ball bearings. Don't ask me how I know
_________________
Mark
SONY A7S, A7RII + dust-sealed modded Novoflex/Fotodiox/Rayqual MD-NEX adapters
Minolta SR-1, SRT-101/303, XD7/XD11, XGM, X700
Bronica SQAi
Ricoh GX100
Minolta majority of all Rokkor SR/AR/MC/MD models made
Sigma 14mm/3.5 for SR mount
Tamron SP 60B 300mm/2.8 (Adaptall)
Samyang T-S 24mm/3.5 (Nikon mount, DIY converted to SR mount)
Schneider-Kreuznach PC-Super-Angulon 28mm/2.8 (SR mount)
Bronica PS 35/40/50/65/80/110/135/150/180/200/250mm
Last edited by RokkorDoctor on Mon Jan 24, 2022 2:36 pm; edited 1 time in total |
|
| Back to top |
|
|
RokkorDoctor
Joined: 27 Nov 2021
Posts: 1268
Location: Kent, UK
|
| Posted: Mon Jan 24, 2022 2:34 pm Post subject: |
|
|
RokkorDoctor wrote:
A hint as to handling of Minolta aperture blades:
Once cleaned as per stevemark's instructions, DO NOT touch them with your fingers. Skin acids will readily promote rusting of the blades and make for visible finger prints.
On the majority (TBH I think all) of Minolta's Rokkor-era aperture blades, the hinge pin riveted onto the blades is hollow.
A fine-tipped wooden tooth-pick/cocktail-stick pressed lightly into this hole is a very useful pick-up tool. Once placed into position hold the blade down with a second tooth-pick/cocktail-stick to release the one from the hinge pin with a light twist. Any accidentally broken-off tip (which is rare if you are careful) can be pulled out with some tweezers.
The same tools can be used to turn blades over or manipulate them; the soft wood will not damage the edges. 
_________________
Mark
SONY A7S, A7RII + dust-sealed modded Novoflex/Fotodiox/Rayqual MD-NEX adapters
Minolta SR-1, SRT-101/303, XD7/XD11, XGM, X700
Bronica SQAi
Ricoh GX100
Minolta majority of all Rokkor SR/AR/MC/MD models made
Sigma 14mm/3.5 for SR mount
Tamron SP 60B 300mm/2.8 (Adaptall)
Samyang T-S 24mm/3.5 (Nikon mount, DIY converted to SR mount)
Schneider-Kreuznach PC-Super-Angulon 28mm/2.8 (SR mount)
Bronica PS 35/40/50/65/80/110/135/150/180/200/250mm |
|
| Back to top |
|
|
Ernst Dinkla
Joined: 30 Nov 2016
Posts: 378
|
| Posted: Mon Jan 24, 2022 5:14 pm Post subject: |
|
|
Ernst Dinkla wrote:
| RokkorDoctor wrote: |
That's why it is advisable when servicing lenses that, failing access to a purpose-made collimation setup, some DIY alternative for collimating lenses be devised. There are many ways of doing that, some more accurate than others. Pretty much all of those DIY setups require access to at least one setup with known good mount-register/lens-register, for which calipers aren't accurate enough; you'll need access to either a Vernier depth-gauge to 0.02mm accuracy (not just 0.02mm resolution, which rules out the cheapo ones), or ideally a depth micrometer. The latter will be much more expensive than expected as for proper use of a 25-50mm or 50-75mm depth micrometer you'll also need a 25mm resp. 50mm gauge block and grade 0 flat granite reference surface... |
Made a collimator of a Makinon 135mm 2.8 lens. Chemically etched UV filter mounted at the rear and the lens fixed at infinity, stars helped there. White LED lamps running on a battery underneath that etched glass. On the etched side of the glass I drew some lines to help in measuring focal lengths. Scanned that glass at high resolution then and measured the diameter with a caliper to get precise calculations of the distances between the lines. I went by some known actual focal lengths of lenses to get the process of measuring focal lengths calibrated.
What Stevemark showed here is a very nice job. Most jobs I have done were on less complex and less expensive lenses but often included the conversion to another mount, EF or Sony FE. Salvaged fixed compact camera lenses too. You can measure everything but in the end it is nice to have infinity at your desktop for the final calibration. For some time I'm thinking of modifying a longer focal length medium format projection lens to a collimator to get a wider field etched glass for measuring the focal lengths.
Floating element lenses and zooms require more care in keeping the internal groups/elements at the right distance so you have to measure more and the infinity calibration can not always be done as simple with the fine threaded contra helicoid (as I call that part). For example adding a Canon EF mount 3D printed bayonet sleeve on the MD mount of the last version of the Minolta 35-70mm 3.5 macro lens asked for a 0.5mm reduction between the lens barrel and the MD mount as the register distances differ that much. There is a kind of infinity calibration possible on the front element/group of that zoom but it compromises the internal scheme. However in the one I had there were 3 brass shim rings for infinity tweaking near the rear of the lens and one measured 0,5mm. After removing that one a final infinity calibration at the front showed hardly any displacement of the scratched markings I had there.
On the double helicoid designs. Using the same grease on both threads gives way higher friction on the fine threaded one. Better use different greases to control the friction.
My aim is usually not to bring a lens I adapt to the shape it had when it left the factory. Often the condition is not up that level either. Sometimes I seek a shorter MFD than it originally had and when the helicoid allows it I will modify the total to get there. Which could mean that the fine thread contra helicoid is turned in to near locking up and the multi thread helicoid entered at other spots than originally. Stops on the focusing converted too then. Sometimes a really worn out helicoid benefits of using a shift on entering the threads, heavy silicon grease adding to that. As another mount and by that register distance differences require modifications anyway it is usually possible to get the scales at the top again.
Using a 15mm floated glass panel here, though I know a source for secondhand granite surface table plates. Really large ex Philips and ASML industry ones that are bought up by chocolateries I was told by the merchant :-0 Too big for me.
_________________
Met vriendelijke groet, Ernst
http://www.pigment-print.com/spectralplots/spectrumviz_1.htm
March 2017 update, 750+ inkjet media white spectral plots |
|
| Back to top |
|
|
|
|