| View previous topic :: View next topic |
| Author |
Message |
Doc Sharptail


Joined: 23 Nov 2020
Posts: 992
Location: Winnipeg Canada
|
 Posted: Thu Feb 24, 2022 5:15 am Post subject: First a/i Conversion. Posted: Thu Feb 24, 2022 5:15 am Post subject: First a/i Conversion. |
 |
|
Doc Sharptail wrote:

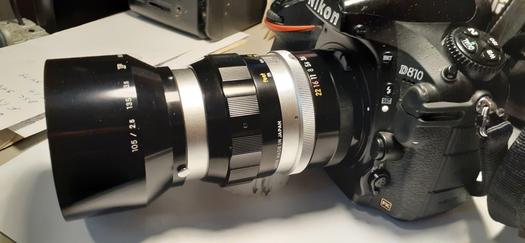
This old nikkor 50mm f1.4 s.c. is definitely worth the following work.
I got it done. It is not pretty, but it works the way it should. I retained the rabbit ears prong for my older film cameras,
and that works the way it should as well.
Hardest, and most time consuming part of this job is the bayonet screws.
On this lens, they were locked in with epoxy, rather than thread locker.
Heat is the way to go with these straight-slotted flat head screws.
I found torquing them in a bit before trying to back them out helped break the epoxy grip.
It took a lot of heating, and re-heating, and re-heating  of the screws to get them to budge. of the screws to get them to budge.
Despite what the you-tube videos tell you, on this lens, the fifth screw that retains the aperture return spring has to come out.
It is the only screw out of the 5 that was not epoxied.
The spring assembly is not difficult to re-assemble.
I am emboldened now to get at the other pre-a/i nikkors. 
I would have preferred to use my mill cutters to rebate the aperture ring, but there's no drill press here.
I used a somewhat chattering cutting wheel on the dremel to start the cuts.
Didn't want to push my luck and did the majority of the cutting with a hand file.
The aperture ring is marked up badly enough from the two start cuts.
I am in quite a bit of a good mood over this now...
-D.S.
_________________
D-810, F2, FTN.
35mm f2 O.C. nikkor
50 f2 H nikkor, 50 f 1.4 AI-s, 135 f3.5 Q,
50 f2 K nikkor 2x, 28-85mm f3.5-4.5 A/I-s, 35-105 3.5-4.5 A/I-s, 200mm f4 Micro A/I, partial list.
"Ain't no half-way" -S.R.V.
"Oh Yeah... Alright" -Paul Simon
Last edited by Doc Sharptail on Thu Feb 24, 2022 3:29 pm; edited 1 time in total |
|
| Back to top |
|
 |
cooltouch


Joined: 15 Jan 2009
Posts: 9097
Location: Houston, Texas
|
| Posted: Thu Feb 24, 2022 12:22 pm Post subject: |
|
|
cooltouch wrote:
I responded to your later post, asking if you did it yourself. I see now that you did. Yeah, having a milling machine would be the hot ticket. The way I plan to do it is just to use a hand file, and not even try to use a Dremel. With a steady hand and a good file, you can make very precice cuts.
_________________
Michael
My Gear List: http://michaelmcbroom.com/photo/gear.html
My Gallery: http://michaelmcbroom.com/gallery3/index.php/
My Flickr Page: https://www.flickr.com/photos/11308754@N08/albums
My Music: https://soundcloud.com/michaelmcbroom/albums
My Blog: http://michaelmcbroom.com/blogistan/ |
|
| Back to top |
|
|
RokkorDoctor

Joined: 27 Nov 2021
Posts: 1268
Location: Kent, UK
|
| Posted: Thu Feb 24, 2022 2:42 pm Post subject: Re: First a/i Conversion. |
|
|
RokkorDoctor wrote:
Nice work D.S.! 
| Doc Sharptail wrote: |
On this lens, they were locked in with epoxy, rather than thread locker.
Heat is the way to go with these straight-slotted flat head screws.
I found torquing them in a bit before trying to back them out helped break the epoxy grip.
It took a lot of heating, and re-heating, and re-heating of the screws to get them to budge. |
Minolta did the same to their zoom cams on some zooms. Impossible to remove; the heat required would damage the optics still inside the zoom barrel 
| Doc Sharptail wrote: |
| I would have preferred to use my mill cutters to rebate the aperture, but there's no drill press here. |
I wouldn't recommend milling with a drill press unless you are milling butter. Drill press columns aren't anywhere near stiff enough.
A proper mini milling machine is on my list of things I would like to have, but will likely never get. The Proxxon mini mills apparently aren't much good; too much runout & vertical play in the bearings, and table instability. Good for wood but not brass & aluminium, or so I have read.
_________________
Mark
SONY A7S, A7RII + dust-sealed modded Novoflex/Fotodiox/Rayqual MD-NEX adapters
Minolta SR-1, SRT-101/303, XD7/XD11, XGM, X700
Bronica SQAi
Ricoh GX100
Minolta majority of all Rokkor SR/AR/MC/MD models made
Sigma 14mm/3.5 for SR mount
Tamron SP 60B 300mm/2.8 (Adaptall)
Samyang T-S 24mm/3.5 (Nikon mount, DIY converted to SR mount)
Schneider-Kreuznach PC-Super-Angulon 28mm/2.8 (SR mount)
Bronica PS 35/40/50/65/80/110/135/150/180/200/250mm |
|
| Back to top |
|
|
Doc Sharptail
Joined: 23 Nov 2020
Posts: 992
Location: Winnipeg Canada
|
| Posted: Thu Feb 24, 2022 3:16 pm Post subject: Re: First a/i Conversion. |
|
|
Doc Sharptail wrote:
| RokkorDoctor wrote: |
Nice work D.S.!
| Doc Sharptail wrote: |
| I would have preferred to use my mill cutters to rebate the aperture, but there's no drill press here. |
I wouldn't recommend milling with a drill press unless you are milling butter. Drill press columns aren't anywhere near stiff enough.
A proper mini milling machine is on my list of things I would like to have, but will likely never get. The Proxxon mini mills apparently aren't much good; too much runout & vertical play in the bearings, and table instability. Good for wood but not brass & aluminium, or so I have read. |
I have personally milled two rifles for scope mounts on an old "Beaver" industrial drill press, and I am way far off being the first to do so. I had actually read about this being done in my gun books. Not my favorite thing to do. Slow speeds, lots of cutting oil, and very light tension on the column are essential. For the flat work runout is not the big fat hairy deal it could be.
The soft aluminum is very near butter- at least on the nikkor aperture rings. It could probably be done rotating the chuck assembly by hand on a drill press with a good cutter.
I am going to try again in the next few days- there are still at least 2 more lenses to be converted here.
Might as well get into the lens pile now, and get things "found" and located 
I may try doing the starter cuts with my needle files- if I can find them.
-D.S.
_________________
D-810, F2, FTN.
35mm f2 O.C. nikkor
50 f2 H nikkor, 50 f 1.4 AI-s, 135 f3.5 Q,
50 f2 K nikkor 2x, 28-85mm f3.5-4.5 A/I-s, 35-105 3.5-4.5 A/I-s, 200mm f4 Micro A/I, partial list.
"Ain't no half-way" -S.R.V.
"Oh Yeah... Alright" -Paul Simon |
|
| Back to top |
|
|
Doc Sharptail
Joined: 23 Nov 2020
Posts: 992
Location: Winnipeg Canada
|
| Posted: Sat Feb 26, 2022 5:09 am Post subject: |
|
|
Doc Sharptail wrote:
| cooltouch wrote: |
| I responded to your later post, asking if you did it yourself. I see now that you did. Yeah, having a milling machine would be the hot ticket. The way I plan to do it is just to use a hand file, and not even try to use a Dremel. With a steady hand and a good file, you can make very precice cuts. |
I've got two more lenses done now.
This time the dremel was not used, and the end notches are a lot cleaner.
A three cornered file out of the needle file set made nice precision cuts at the notch ends, exactly where they were supposed to be.
The bulk of metal removal was done with a small M/B file.

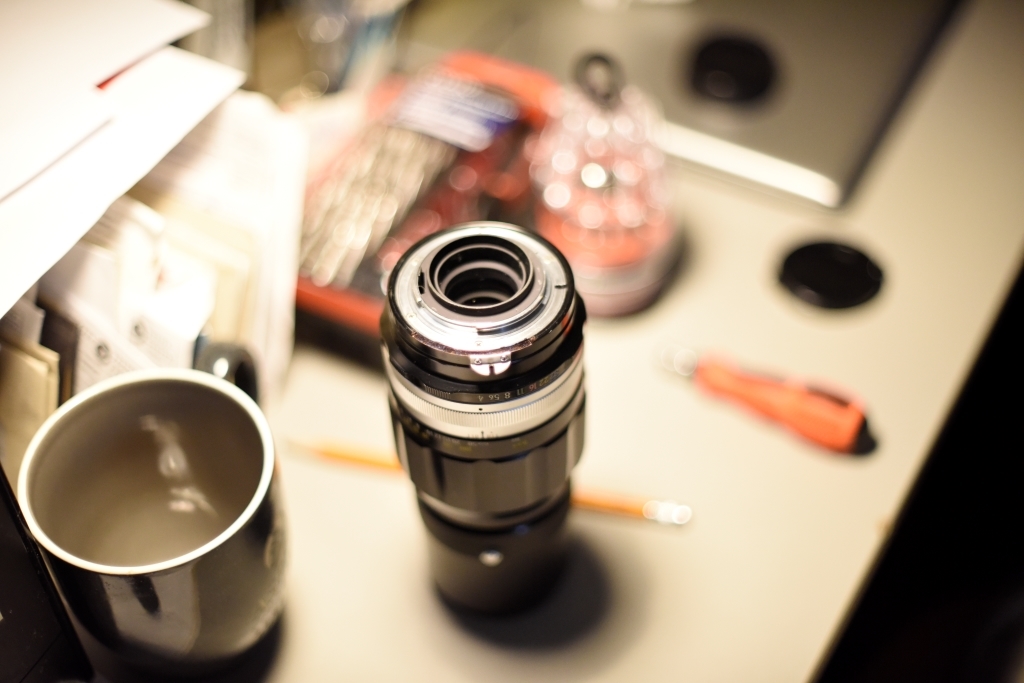
Nikkor Q.C. 200mm f4.
Beautiful lens to work on.
The epoxied in straight slotted bayonet screws were factory updated with thread locked cross-point screws.
I didn't even have to heat them to get them off.
The brass block assembly aperture return spring has been updated to a unitized version independent of the bayonet screws.

What the work area looks like when something is completed.
Both frames taken on the S.C. Nikkor 50mm f1.4 wide open.
The other lens was super easy- a "K" 50mm f2.
I have a dog version that had the factory conversion ring, so it was just a matter of swapping rings.
I have a stumper of a lens to do yet- a 135mm f3.5 "Q" nikkor with badly seized straight slotted bayonet screws.
I only managed to get one off. It's hole was completely filled with epoxy.
My guess is the bayonet mount is epoxied to the internal frame of the lens.
I'm going to take a few days off working on lenses, and try to get a few photos done.
It would probably be a good idea for me to leave the "Q" 135mm alone for a while (before I break something)- even though it's a beautiful lens on film.
-D.S.
_________________
D-810, F2, FTN.
35mm f2 O.C. nikkor
50 f2 H nikkor, 50 f 1.4 AI-s, 135 f3.5 Q,
50 f2 K nikkor 2x, 28-85mm f3.5-4.5 A/I-s, 35-105 3.5-4.5 A/I-s, 200mm f4 Micro A/I, partial list.
"Ain't no half-way" -S.R.V.
"Oh Yeah... Alright" -Paul Simon |
|
| Back to top |
|
|
philslizzy

Joined: 07 Aug 2012
Posts: 4748
Location: Cheshire, England
|
| Posted: Mon Feb 28, 2022 12:35 am Post subject: |
|
|
philslizzy wrote:
| cooltouch wrote: |
| I responded to your later post, asking if you did it yourself. I see now that you did. Yeah, having a milling machine would be the hot ticket. The way I plan to do it is just to use a hand file, and not even try to use a Dremel. With a steady hand and a good file, you can make very precice cuts. |
I used a hand file when I did it. It was a little untidy, but finished off with a nail file and a lick of black paint it passed muster. its easy to do.
_________________
Hero in the 'messin-with-cameras-for-the-hell-of-it department'. Official. |
|
| Back to top |
|
|
Doc Sharptail
Joined: 23 Nov 2020
Posts: 992
Location: Winnipeg Canada
|
| Posted: Wed Mar 02, 2022 7:29 am Post subject: |
|
|
Doc Sharptail wrote:
That's the last one- the Nikkor Q 135 f 3.5 is now converted.
I'll get some test frames up later, after they are shot..
-D.S.
_________________
D-810, F2, FTN.
35mm f2 O.C. nikkor
50 f2 H nikkor, 50 f 1.4 AI-s, 135 f3.5 Q,
50 f2 K nikkor 2x, 28-85mm f3.5-4.5 A/I-s, 35-105 3.5-4.5 A/I-s, 200mm f4 Micro A/I, partial list.
"Ain't no half-way" -S.R.V.
"Oh Yeah... Alright" -Paul Simon |
|
| Back to top |
|
|
|
|
|
You cannot post new topics in this forum
You cannot reply to topics in this forum
You cannot edit your posts in this forum
You cannot delete your posts in this forum
You cannot vote in polls in this forum
|