| View previous topic :: View next topic |
| Author |
Message |
kypfer

Joined: 27 Sep 2017
Posts: 515
Location: Jersey C.I.
|
 Posted: Sun Jun 02, 2019 4:11 pm Post subject: DSLR Pinhole pics :) Posted: Sun Jun 02, 2019 4:11 pm Post subject: DSLR Pinhole pics :) |
 |
|
kypfer wrote:
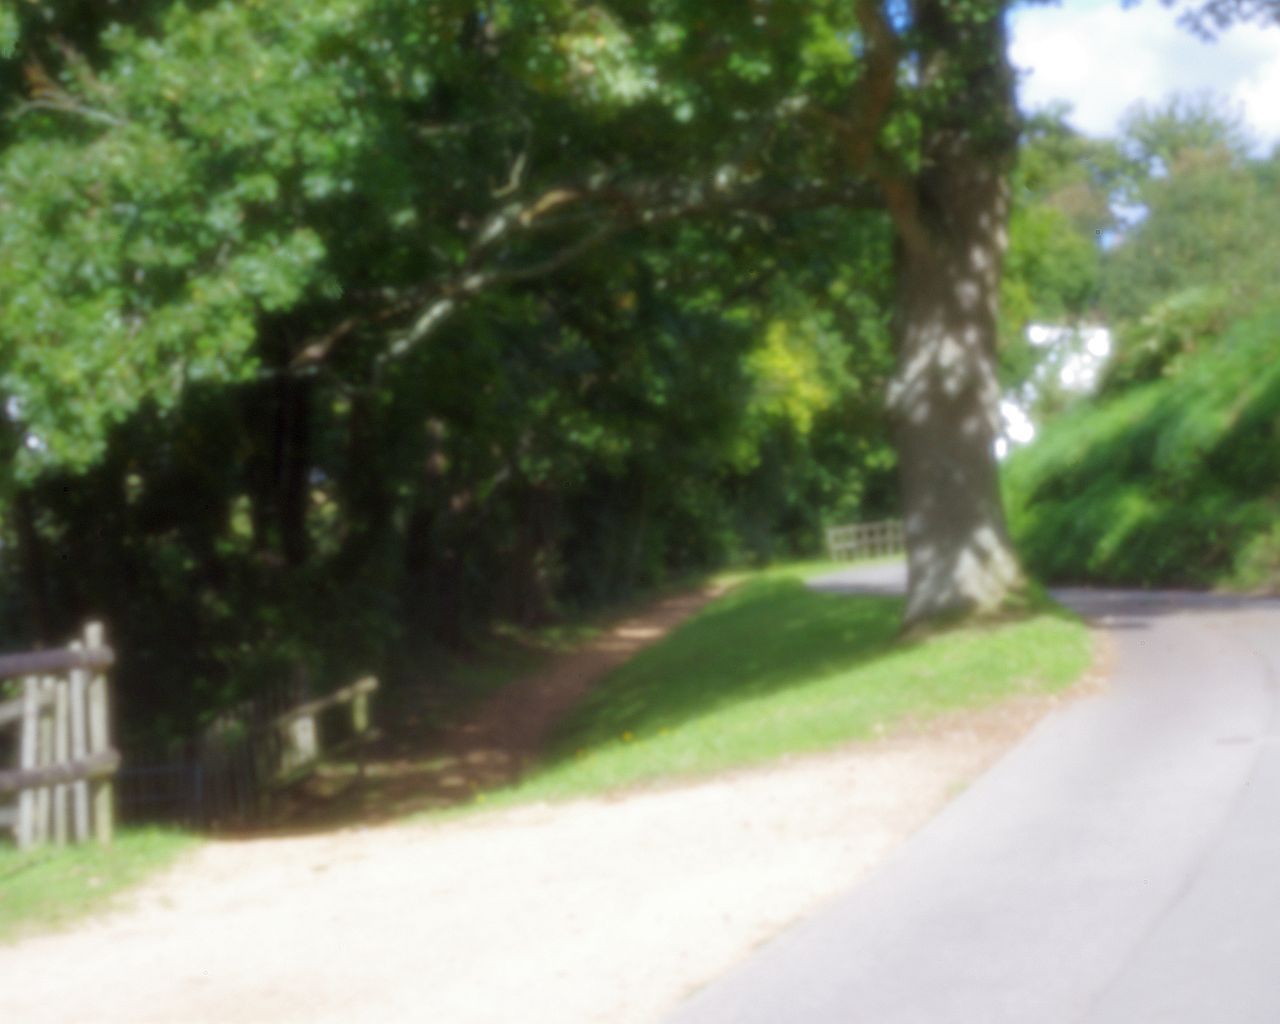
This thread has been quiet for while. I thought I'd post a couple of my favourites taken with my Pentax and a body-cap with a home-made aluminium pinhole glued in. Any of the obvious dust spots will have been removed 
#1

#2

#3

#4
 |
|
| Back to top |
|
 |
visualopsins


Joined: 05 Mar 2009
Posts: 10541
Location: California
Expire: 2025-04-11
|
| Posted: Sun Jun 02, 2019 5:41 pm Post subject: |
|
|
visualopsins wrote:
   
_________________
☮☮☮☮☮☮☮☮☮☮☮☮☮☮☮☮☮☮☮☮☮☮☮☮☮☮☮☮☮☮☮☮ like attracts like! ☮☮☮☮☮☮☮☮☮☮☮☮☮☮☮☮☮☮☮☮☮☮☮☮☮☮☮☮☮☮☮☮
Cameras: Sony ILCE-7RM2, Spotmatics II, F, and ESII, Nikon P4
Lenses:
M42 Asahi Optical Co., Takumar 1:4 f=35mm, 1:2 f=58mm (Sonnar), 1:2.4 f=58mm (Heliar), 1:2.2 f=55mm (Gaussian), 1:2.8 f=105mm (Model I), 1:2.8/105 (Model II), 1:5.6/200, Tele-Takumar 1:5.6/200, 1:6.3/300, Macro-Takumar 1:4/50, Auto-Takumar 1:2.3 f=35, 1:1.8 f=55mm, 1:2.2 f=55mm, Super-TAKUMAR 1:3.5/28 (fat), 1:2/35 (Fat), 1:1.4/50 (8-element), Super-Multi-Coated Fisheye-TAKUMAR 1:4/17, Super-Multi-Coated TAKUMAR 1:4.5/20, 1:3.5/24, 1:3.5/28, 1:2/35, 1:3.5/35, 1:1.8/85, 1:1.9/85 1:2.8/105, 1:3.5/135, 1:2.5/135 (II), 1:4/150, 1:4/200, 1:4/300, 1:4.5/500, Super-Multi-Coated Macro-TAKUMAR 1:4/50, 1:4/100, Super-Multi-Coated Bellows-TAKUMAR 1:4/100, SMC TAKUMAR 1:1.4/50, 1:1.8/55
M42 Carl Zeiss Jena Flektogon 2.4/35
Contax Carl Zeiss Vario-Sonnar T* 28-70mm F3.5-4.5
Pentax K-mount SMC PENTAX ZOOM 1:3.5 35~105mm, SMC PENTAX ZOOM 1:4 45~125mm
Nikon Micro-NIKKOR-P-C Auto 1:3.5 f=55mm, NIKKOR-P Auto 105mm f/2.5 Pre-AI (Sonnar), Micro-NIKKOR 105mm 1:4 AI, NIKKOR AI-S 35-135mm f/3,5-4,5
Tamron SP 17mm f/3.5 (51B), Tamron SP 17mm f/3.5 (51BB), SP 500mm f/8 (55BB), SP 70-210mm f/3.5 (19AH)
Vivitar 100mm 1:2.8 MC 1:1 Macro Telephoto (Kiron)
|
|
| Back to top |
|
|
kiddo
Joined: 29 Jun 2018
Posts: 1121
|
| Posted: Sun Jun 02, 2019 11:40 pm Post subject: |
|
|
kiddo wrote:
I really like It, but I still don't get it how did you do it - reminds me some of the first color movies ,probably seventies |
|
| Back to top |
|
|
kypfer
Joined: 27 Sep 2017
Posts: 515
Location: Jersey C.I.
|
| Posted: Mon Jun 03, 2019 6:46 am Post subject: |
|
|
kypfer wrote:
| kiddo wrote: |
| I really like It, but I still don't get it how did you do it - reminds me some of the first color movies ,probably seventies |
Basically, you remove the lens from the camera completely, then fit a body cap which has a "pinhole" fitted in the centre. Depending on your camera you may have to go into the menus and set it to "Operate without lens" or whatever phrasing is used.
So, drill a 1/4" hole in the centre of an opaque body cap, then over that hole affix a piece of aluminium foil (from a pie case or similar) which has a literal pinhole in it. This pinhole will act as an extremely basic "lens" with a very small aperture and virtually infinite depth of field. The smaller the hole the better the resolution, but, inevitably, the longer the exposure. The focal length of the pinhole is simply the distance from the pinhole itself to the sensor in the camera, so for a "telephoto" effect the body cap can be fitted to an extension tube. This will increase the exposure as the effective aperture of the pinhole gets smaller the further away it is from the sensor.
A typical exposure would be between 1-10 seconds with ISO 1-400 in good light. TTL metering will work, but keep the viewfinder very well shielded from stray light, both to not affect metering and to prevent light leakage affecting your final exposure. This is where the little black viewfinder cover that may have been supplied with your DSLR will come in useful Live-View can be a handy compositional aid to help deal with the inevitably dim optical viewfinder image, but is by no means essential
For the cost of a body cap and a few minutes of your time you can have a genuine photographic accessory that doesn't rely on your abilities with Photoshop to produce something out of the ordinary Do be aware, the slightest speck of dust on your sensor will be emphasised by this procedure, (a characteristic of the optics involved), so be prepared to spend a few minutes "spotting" at least the lighter areas of your final image
Good luck! |
|
| Back to top |
|
|
cooltouch

Joined: 15 Jan 2009
Posts: 9097
Location: Houston, Texas
|
| Posted: Mon Jun 03, 2019 12:27 pm Post subject: |
|
|
cooltouch wrote:
Very nice. The softness gives your photos an impressionistic feel.
I have seen commercially available pinhole lens caps. They had a brass insert in the center, into which was drilled a tiny hole. But your method will certainly work, and is a heck of a lot cheaper! Makes me want to scrounge up an extra body cap, except I don't have any -- not for my NEX, at least.
_________________
Michael
My Gear List: http://michaelmcbroom.com/photo/gear.html
My Gallery: http://michaelmcbroom.com/gallery3/index.php/
My Flickr Page: https://www.flickr.com/photos/11308754@N08/albums
My Music: https://soundcloud.com/michaelmcbroom/albums
My Blog: http://michaelmcbroom.com/blogistan/ |
|
| Back to top |
|
|
DConvert

Joined: 12 Jun 2010
Posts: 902
Location: Essex UK
|
| Posted: Mon Jun 03, 2019 2:28 pm Post subject: |
|
|
DConvert wrote:
| kypfer wrote: |
| kiddo wrote: |
| I really like It, but I still don't get it how did you do it - reminds me some of the first color movies ,probably seventies |
Basically, you remove the lens from the camera completely, then fit a body cap which has a "pinhole" fitted in the centre. Depending on your camera you may have to go into the menus and set it to "Operate without lens" or whatever phrasing is used.
So, drill a 1/4" hole in the centre of an opaque body cap, then over that hole affix a piece of aluminium foil (from a pie case or similar) which has a literal pinhole in it. This pinhole will act as an extremely basic "lens" with a very small aperture and virtually infinite depth of field. The smaller the hole the better the resolution, but, inevitably, the longer the exposure. The focal length of the pinhole is simply the distance from the pinhole itself to the sensor in the camera, so for a "telephoto" effect the body cap can be fitted to an extension tube. This will increase the exposure as the effective aperture of the pinhole gets smaller the further away it is from the sensor.
A typical exposure would be between 1-10 seconds with ISO 1-400 in good light. TTL metering will work, but keep the viewfinder very well shielded from stray light, both to not affect metering and to prevent light leakage affecting your final exposure. This is where the little black viewfinder cover that may have been supplied with your DSLR will come in useful Live-View can be a handy compositional aid to help deal with the inevitably dim optical viewfinder image, but is by no means essential
For the cost of a body cap and a few minutes of your time you can have a genuine photographic accessory that doesn't rely on your abilities with Photoshop to produce something out of the ordinary Do be aware, the slightest speck of dust on your sensor will be emphasised by this procedure, (a characteristic of the optics involved), so be prepared to spend a few minutes "spotting" at least the lighter areas of your final image
Good luck! |
One of the advantages of mirrorless cameras is the viewfinder can't cause light leaks like this.
I made my own bodycap pinhole years ago for my k100d, but it was too wide to work well. (At least hand held shots were possible with flash)
Subsequently I bought a premade one but haven't really done much with that. I wish I'd got a M42 version as then I could use it with a helicoid for a zoom pinhole 
I really must dig it out & have another play, you've shown the results can be excellent! |
|
| Back to top |
|
|
kypfer
Joined: 27 Sep 2017
Posts: 515
Location: Jersey C.I.
|
| Posted: Mon Jun 03, 2019 4:01 pm Post subject: |
|
|
kypfer wrote:
| DConvert wrote: |
One of the advantages of mirrorless cameras is the viewfinder can't cause light leaks like this.
I made my own bodycap pinhole years ago for my k100d, but it was too wide to work well. (At least hand held shots were possible with flash)
Subsequently I bought a premade one but haven't really done much with that. I wish I'd got a M42 version as then I could use it with a helicoid for a zoom pinhole
I really must dig it out & have another play, you've shown the results can be excellent! |
Less of an advantage of mirrorless cameras is that the flange-sensor distance can be so short that a body-cap pinhole acts as an ultra-wide ... which is fine if that's what you want, but then the pinhole itself really does need to be really small which can be easier said than done if you're not buying commercially
If you've already got an M42 helicoid just buy an M42 body-cap or two ... they're little more than pennies on eBay, especially if you're prepared to wait a couple of weeks for delivery from "overseas", and have another go at making one yourself ... you might have to eat a pie to get the foil, but call it "suffering for art"
I must admit, if I'm "going basic" like this, a fixed-length "optic" suits me fine. I'll wander around 'till I find an appropriate viewpoint then set everything up on a tripod and "do the job properly". Gives me an enormous sense of satisfaction and bystanders think if I'm using a tripod I must know what I'm doing !! |
|
| Back to top |
|
|
Sciolist

Joined: 29 Mar 2017
Posts: 1445
Location: Scotland
Expire: 2021-04-16
|
| Posted: Tue Jun 04, 2019 1:55 pm Post subject: |
|
|
Sciolist wrote:
| DConvert wrote: |
I wish I'd got a M42 version as then I could use it with a helicoid for a zoom pinhole
|
On it - https://www.ebay.co.uk/itm/M39-LMT-l39-Pinhole-body-cap-for-Leica-Canon-Voigtlander-lens-camera-4-1-2-3-5/183540392801?ssPageName=STRK%3AMEBIDX%3AIT&_trksid=p2060353.m1438.l2649.
Looks like it may have to be an M39 + M42 step up ring for me. Thanks for sharing a great idea DConvert. . |
|
| Back to top |
|
|
DConvert
Joined: 12 Jun 2010
Posts: 902
Location: Essex UK
|
| Posted: Tue Jun 04, 2019 5:44 pm Post subject: |
|
|
DConvert wrote:
Well there are times when you just have to add a little complication. High tech optics, who needs them |
|
| Back to top |
|
|
rusell7
Joined: 16 Apr 2021
Posts: 20
Location: Montana
|
| Posted: Sat Apr 24, 2021 10:59 am Post subject: |
|
|
rusell7 wrote:
|
|
| Back to top |
|
|
Elizabeth-Raful
Joined: 29 May 2021
Posts: 1
Location: USA
|
| Posted: Sat May 29, 2021 12:10 pm Post subject: |
|
|
Elizabeth-Raful wrote:
Very nice! |
|
| Back to top |
|
|
|
|
|
You cannot post new topics in this forum
You cannot reply to topics in this forum
You cannot edit your posts in this forum
You cannot delete your posts in this forum
You cannot vote in polls in this forum
|