| View previous topic :: View next topic |
| Author |
Message |
cooltouch


Joined: 15 Jan 2009
Posts: 9097
Location: Houston, Texas
|
 Posted: Thu Feb 26, 2015 3:41 am Post subject: Cherry Blossoms with Canon FD and Tamron Adaptall Macros Posted: Thu Feb 26, 2015 3:41 am Post subject: Cherry Blossoms with Canon FD and Tamron Adaptall Macros |
 |
|
cooltouch wrote:
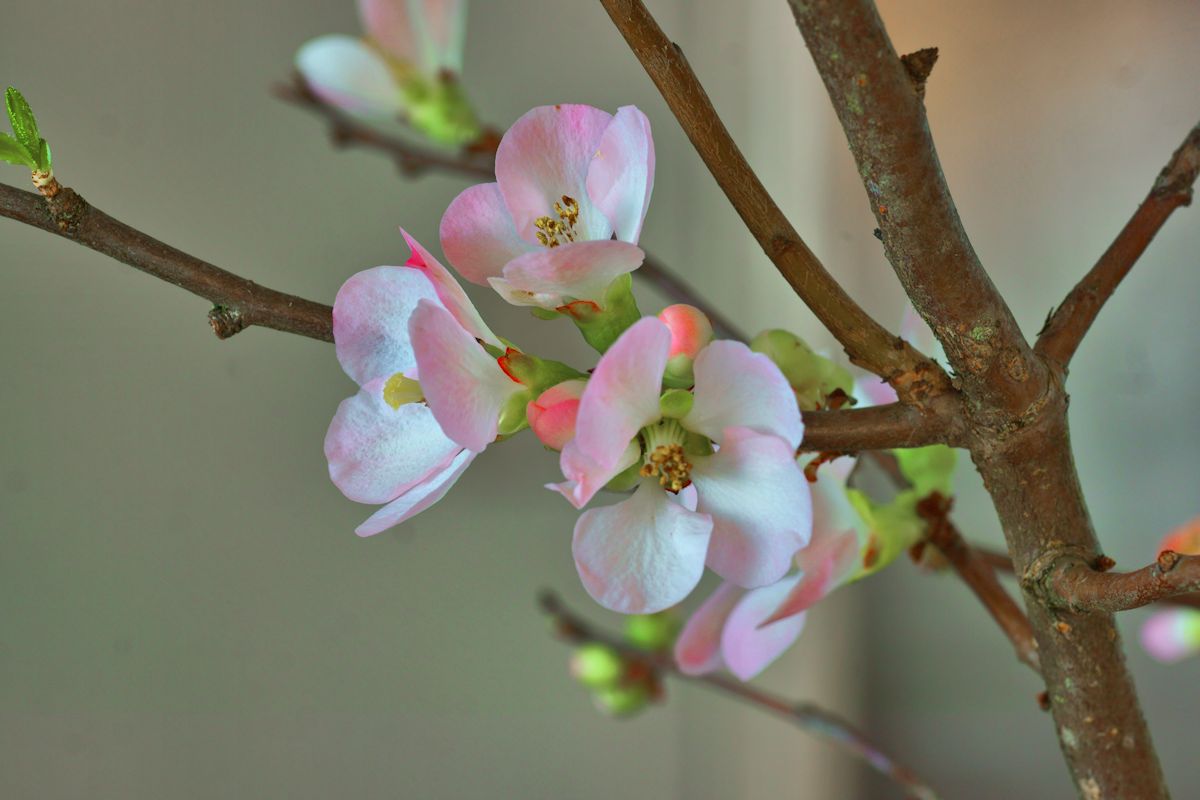
I was feeling kinda bored today and got to staring at a bunch of sticks stuffed inside a vase in our kitchen. Well, they're more than just sticks. They're small branches pruned from a Japanese Cherry tree (sakura). Well, they're budding out pretty nicely, I gotta admit, but they sure are budding out early. Usually cherry blossoms don't appear until about April or so -- at least in Japan and/or Washington DC -- but then, this is Houston, where most trees begin to bud out, and some begin to blossom, by mid-February. So I thought, hey, why not? I haven't taken any pics with my NEX 7 using either my Canon FD 100mm f/4 or Tamron SP 90mm f/2.5 macro yet. Truth be told, I haven't really used my Canon FD macro much at all. Seems like, if I've got serious macro work to do, I usually reach for my Tamron SP 90mm or my 55mm f/3.5 Micro Nikkor first. But the Canon has an excellent reputation, so there is no reason why I shouldn't be using it, especially now that I have a NEX, which handles FD lenses nicely.
So, I ended up doing a quicky comparison. Nothing formal. Just two shots with each lens: one at f/8 and one at f/16. Here's a closeup of the subject:

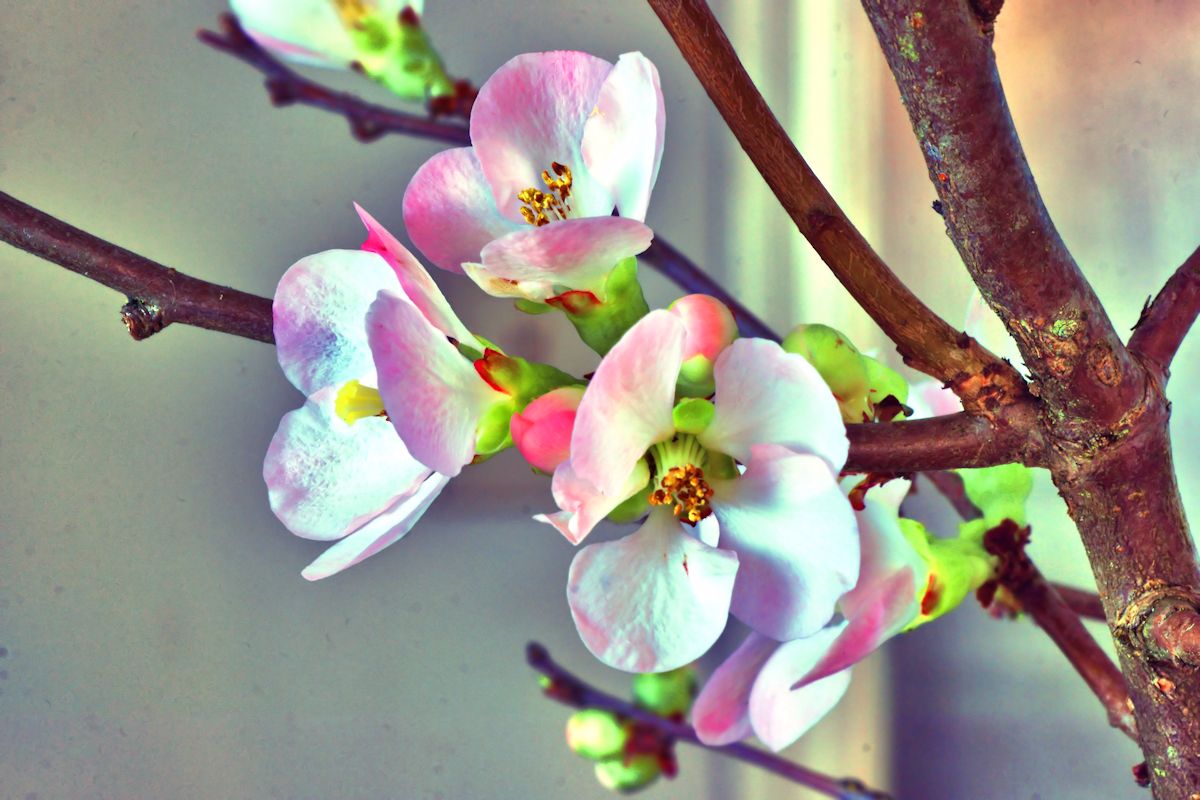
Next, a pic taken with the Canon 100 macro at f/8:

And then the Tamron 90 macro at f/8:

Then the Canon 100 macro at f/16:

And the Tamron macro at f/16:

For this particular subject, I think that f/16 is the minimum f/stop to get the depth of field set so that the pistels and stamens of both buds are in reasonably sharp focus.
Finally, here are 100% crops from each lens at the point of focus -- the pistels and stamens of the top bud. First the Canon:

And then the Tamron:

A few comments about post processing: yes, I did some post processing, but it was limited to brightening up the images somewhat and increasing saturation selectively. I had to do this because these blooms are located indoors, and the light is dull, which rendered somewhat dull looking photos. So I brightened them up just a bit. But no sharpness or contrast enhancement was done to any of the images.
Personally, I don't see a dime's bit of difference between the two, except the Canon's image is just a bit larger due to its 10mm longer focal length. I'm glad to find this out, though, since its been my experience that my Tamron macro is one of the sharpest lenses I own -- if not the sharpest. Welp, now it appears that I have two lense that can vie for that title. Actually, I have a 100mm f/4 SMC Takumar macro in M42 that I really want to give a good try to, so maybe I'll give it a go tomorrow -- and match it up with . . . hmmm . . . aha! My much vaunted Kiron 100mm f/2.5 macro! That should be interesting. I've got more macro lenses than that, though. I still have my 55mm Micro Nikkor and my Vivitar 135mm "close focus" (which is actually a macro).
_________________
Michael
My Gear List: http://michaelmcbroom.com/photo/gear.html
My Gallery: http://michaelmcbroom.com/gallery3/index.php/
My Flickr Page: https://www.flickr.com/photos/11308754@N08/albums
My Music: https://soundcloud.com/michaelmcbroom/albums
My Blog: http://michaelmcbroom.com/blogistan/ |
|
| Back to top |
|
 |
Lightshow

Joined: 04 Nov 2011
Posts: 3669
Location: Calgary
|
| Posted: Thu Feb 26, 2015 5:36 am Post subject: |
|
|
Lightshow wrote:
The light must have changed lots during your shooting, the shutter speeds range from 4-30 seconds.
What was the first one shot with?
_________________
A Manual Focus Junky...
One photographers junk lens is an artists favorite tool.
My lens list
http://www.flickr.com/photos/lightshow-photography/ |
|
| Back to top |
|
|
cooltouch
Joined: 15 Jan 2009
Posts: 9097
Location: Houston, Texas
|
| Posted: Thu Feb 26, 2015 7:28 am Post subject: |
|
|
cooltouch wrote:
The first was with the Canon 100mm macro.
The light didn't change significantly. But the apertures did. I wasn't paying attention to the shutter speeds all that closely because I had the camera set to aperture priority. Now that you mention it, I recall one exposure where the shutter speed was 30 seconds. Maybe I had the aperture set to f/22 instead of f/16, I dunno. Not a whole lot of difference in depth of field can be seen, though.
_________________
Michael
My Gear List: http://michaelmcbroom.com/photo/gear.html
My Gallery: http://michaelmcbroom.com/gallery3/index.php/
My Flickr Page: https://www.flickr.com/photos/11308754@N08/albums
My Music: https://soundcloud.com/michaelmcbroom/albums
My Blog: http://michaelmcbroom.com/blogistan/ |
|
| Back to top |
|
|
marcusBMG

Joined: 07 Dec 2012
Posts: 1304
Location: Conwy N Wales
|
| Posted: Thu Feb 26, 2015 12:47 pm Post subject: |
|
|
marcusBMG wrote:
Nice pics but I think you need more light to get a decent measure of the capabilities of the lenses.
_________________
pentax ME super (retired)
Pentax K3-ii; pentax K-S2; Samsung NX 20; Lumix G1 + adapters;
Adaptall collection (proliferating!) inc 200-500mm 31A, 300mm f2.8, 400mm f4.
Primes: takumar 55mm; smc 28mm, 50mm; kino/komine 28mm f2's, helios 58mm, Tamron Nestar 400mm, novoflex 400mm, Vivitar 135mm close focus, 105mm macro; Jupiter 11A; CZJ 135mm.
A classic zoom or two: VS1 (komine), Kiron Zoomlock... |
|
| Back to top |
|
|
cooltouch
Joined: 15 Jan 2009
Posts: 9097
Location: Houston, Texas
|
| Posted: Thu Feb 26, 2015 8:41 pm Post subject: |
|
|
cooltouch wrote:
| marcusBMG wrote: |
| Nice pics but I think you need more light to get a decent measure of the capabilities of the lenses. |
Yeah, well it was indoors and I had already tried using the NEX's flash. It was washing everything out. And I didn't feel like dragging the sticks outside. Besides, it was pretty overcast that day anyway. Dunno about you, but I can see plenty of detail. The Zeiss article about sharpness vs contrast comes to mind. I guess I could have used fill light and contrast to pump up things more. Maybe you'd like this better?

_________________
Michael
My Gear List: http://michaelmcbroom.com/photo/gear.html
My Gallery: http://michaelmcbroom.com/gallery3/index.php/
My Flickr Page: https://www.flickr.com/photos/11308754@N08/albums
My Music: https://soundcloud.com/michaelmcbroom/albums
My Blog: http://michaelmcbroom.com/blogistan/ |
|
| Back to top |
|
|
marcusBMG
Joined: 07 Dec 2012
Posts: 1304
Location: Conwy N Wales
|
| Posted: Thu Feb 26, 2015 11:42 pm Post subject: |
|
|
marcusBMG wrote:
Mmm yes my efforts at using on board flash have often looked like that too (though a couple of the pics with the adaptall 85-210mm I just posted came out ok, but I wasn't nearly as close).
When I did some comparisons of some adaptall zoom lenses for close focus, quite a lot of the test pics were of a muchness. On reflection I felt that in order to really discriminate between the lenses I needed more optimum lighting conditions, something more like a studio set up. As the light gets duller, the images just get softer and converge. But hey, I am a macro neophyte, it was just a thought.
_________________
pentax ME super (retired)
Pentax K3-ii; pentax K-S2; Samsung NX 20; Lumix G1 + adapters;
Adaptall collection (proliferating!) inc 200-500mm 31A, 300mm f2.8, 400mm f4.
Primes: takumar 55mm; smc 28mm, 50mm; kino/komine 28mm f2's, helios 58mm, Tamron Nestar 400mm, novoflex 400mm, Vivitar 135mm close focus, 105mm macro; Jupiter 11A; CZJ 135mm.
A classic zoom or two: VS1 (komine), Kiron Zoomlock... |
|
| Back to top |
|
|
cooltouch
Joined: 15 Jan 2009
Posts: 9097
Location: Houston, Texas
|
| Posted: Fri Feb 27, 2015 4:51 am Post subject: |
|
|
cooltouch wrote:
You know, something I've just started experimenting with is using bounce flash with the built-in flash on my NEX 7. Unlike the pop-up flashes on most DSLRs, the NEX's flash is on an articulated extension and the flash can actually be pointed straight up, or at an angle for bounce, as well. I was playing around with it tonight, and actually was getting some interesting results. Of course, I have to hold the flash in position with one hand while depressing the shutter button with the other, but it's not too awkward once you get used to it. I'll post some test shots later, show you what I mean.
_________________
Michael
My Gear List: http://michaelmcbroom.com/photo/gear.html
My Gallery: http://michaelmcbroom.com/gallery3/index.php/
My Flickr Page: https://www.flickr.com/photos/11308754@N08/albums
My Music: https://soundcloud.com/michaelmcbroom/albums
My Blog: http://michaelmcbroom.com/blogistan/ |
|
| Back to top |
|
|
drjs


Joined: 25 Feb 2013
Posts: 485
Location: USA
|
| Posted: Fri Feb 27, 2015 1:43 pm Post subject: |
|
|
drjs wrote:
One idea is to use a large home made softbox very close to the subject. I made one out of quick oat cylinders and it works very well. There are similar ones made out of pringle cans all over internet (just google). The problem with flash and macro is that at a close distance, unless the light dramatically softened, you will get very harsh shadows.
_________________
Follow me on 500px |
|
| Back to top |
|
|
cooltouch
Joined: 15 Jan 2009
Posts: 9097
Location: Houston, Texas
|
| Posted: Fri Feb 27, 2015 11:31 pm Post subject: |
|
|
cooltouch wrote:
Yeah, I know. I've had good luck in the past shooting close-ups with a bounce card attached to a hot-shoe mounted flash. A bounce card is just a piece of white posterboard that I cut into about 4" x 6" piece with a short extension that is used to attach to the head of a flash with a rubber band. Some folks use velcro. I just point the flash more or less straight up. The card is parallel to the head but it sticks up enough so it reflects a lot of the light and tosses this softened light on the subject. The result is minimal shadows and the lighting is not nearly as harsh. Plus with the sensor pointed at the subject, auto flash can still be done.
Of course, for true macro shots, there's always the ring flash option. I have one that's TTL for Nikon, but its for the older Nikon film cameras. Probably won't function in TTL mode with the newer digital cameras. And it's sure not gonna work with my NEX. No, for the NEX, I'm better off using a manual flash with a bounce head that can be set to fractions of power output. It's pretty easy to dial in correct exposure with a manual flash if I have a flash with multiple fractional output settings.
The biggest annoyance with the NEX 7 is dealing with its proprietary flash shoe. I bought a couple of adapters that take it from the proprietary shoe to standard ISO. The ISO contacts line up with Canon's TTL system, but they don't provide TTL with any Canon system I'm aware of, so I don't really know why they added these extra contacts. Nonetheless, a flash like a Vivitar 285 can be used on the adapter and its fractional power settings can be dialed in, plus its onboard thyristor should be able to handle exposure pretty well. And using the bounce method I described is also very doable.
_________________
Michael
My Gear List: http://michaelmcbroom.com/photo/gear.html
My Gallery: http://michaelmcbroom.com/gallery3/index.php/
My Flickr Page: https://www.flickr.com/photos/11308754@N08/albums
My Music: https://soundcloud.com/michaelmcbroom/albums
My Blog: http://michaelmcbroom.com/blogistan/ |
|
| Back to top |
|
|
Lloydy

Joined: 02 Sep 2009
Posts: 7785
Location: Ironbridge. UK.
Expire: 2022-01-01
|
| Posted: Fri Feb 27, 2015 11:55 pm Post subject: |
|
|
Lloydy wrote:
| drjs wrote: |
| One idea is to use a large home made softbox very close to the subject. I made one out of quick oat cylinders and it works very well. There are similar ones made out of pringle cans all over internet (just google). The problem with flash and macro is that at a close distance, unless the light dramatically softened, you will get very harsh shadows. |
I just grab the nearest bit of paper, an old till receipt will do, and I just hold it in front of the flash or secure it with an elastic band to make a diffuser. People spend a lot of money buying diffusers, why? If you want less light, use thicker paper. 
_________________
LENSES & CAMERAS FOR SALE.....
I have loads of stuff that I have to get rid of, if you see me commenting about something I have got and you want one, ask me.
My Flickr https://www.flickr.com/photos/mudplugga/
My ipernity -
http://www.ipernity.com/home/294337 |
|
| Back to top |
|
|
Himself
Joined: 01 Mar 2007
Posts: 3215
Location: Montreal
Expire: 2013-05-30
|
| Posted: Sat Feb 28, 2015 1:53 pm Post subject: |
|
|
Himself wrote:
| Lloydy wrote: |
| I just grab the nearest bit of paper, an old till receipt will do, and I just hold it in front of the flash or secure it with an elastic band to make a diffuser. People spend a lot of money buying diffusers, why? If you want less light, use thicker paper. |
Same technique here. I use paper towels.
_________________
Moderator Himself |
|
| Back to top |
|
|
Ray Parkhurst

Joined: 04 Jul 2011
Posts: 497
Location: Santa Clara, CA, USA
|
| Posted: Sat Feb 28, 2015 2:40 pm Post subject: |
|
|
Ray Parkhurst wrote:
Shooting at such small apertures pretty much makes all macro lenses look the same. The lenses you're testing are all good lenses. The differences between them will be apparent mostly at large apertures and 100% crops. Some may have color shifts but if you properly white balance these shifts pretty much go away, if you want them to. |
|
| Back to top |
|
|
|
|
|
You cannot post new topics in this forum
You cannot reply to topics in this forum
You cannot edit your posts in this forum
You cannot delete your posts in this forum
You cannot vote in polls in this forum
|