| View previous topic :: View next topic |
| Author |
Message |
cooltouch


Joined: 15 Jan 2009
Posts: 9097
Location: Houston, Texas
|
 Posted: Mon Oct 04, 2010 6:16 pm Post subject: Posted: Mon Oct 04, 2010 6:16 pm Post subject: |
 |
|
cooltouch wrote:
Very nice kit, Jesito.
I took a camera repair class taught by a grizzled old repair guy about 20 years ago, and learned a few things from him. One has to do with screwdrivers. He pointed out that the screws found in cameras that look like Philips actually aren't -- they're "cross point." According to him, the angle of the tip is different. Cross points have a shallower angle than Philips. It was not easy to find cross-point screwdrivers, though. I think of my three or four sets of "jeweler's screwdrivers," only one is cross points. Used to be, back then, you could buy repair tools from Vivitar, and I bought several cross point and slotted screwdrivers from them. Still have 'em.
A couple of items I'd add to Jesito's list are: Naphtha -- a great all-around solvent for getting gummed up things ungummed up. Useful for shutters and other precision areas. And PlioBond -- or contact cement, if you can't find Pliobond. They're essentially the same thing. This is a flexible cement that works great for reattaching rubber focusing grips to lens barrels that may have come loose, or for reattaching leatherettes to camera bodies. Sometimes you don't need it with the leatherettes. You can use acetone to "reactivate" the dried out adhesive on the leatherette and it will re-adhere itself to the camera body.
I will also use denatured alcohol and cotton swabs (Q-tips) for some cleaning chores. Like, for example, a Canon FTb I bought last year. The mirror cushion had rotted and a previous owner smeared the rotted rubber across the focusing screen. It was a mess. I didn't feel like having to dismantle the top end of the camera to remove the focusing screen and give it a proper cleaning, so I thought I'd try a cotton swab soaked in denatured alcohol. Wiped it across the focusing screen, and to my surprise, it removed all traces of the gunky sticky rubber residue. I had a spotlessly clean focusing screen. This combination also works well just for general detail cleaning of a camera or lens's exterior.
Also, I've passed along this recommendation here before from time to time, and I will again. If you get stuck and you have questions that folks here can't answer -- like say you're taking apart a fairly complicated zoom lens or hoping to fix a camera's meter -- then I recommend you drop in at the camera repair forum over at KY Photo:
Go here and click on "Maintenance and Repair."
http://www.kyphoto.com/cgi-bin/forum/discus.cgi
There are some very knowledgeable folks who hang out there, including Rick Oleson, a well-known repair guy. I've gotten help several times from forum members when I was stuck.
_________________
Michael
My Gear List: http://michaelmcbroom.com/photo/gear.html
My Gallery: http://michaelmcbroom.com/gallery3/index.php/
My Flickr Page: https://www.flickr.com/photos/11308754@N08/albums
My Music: https://soundcloud.com/michaelmcbroom/albums
My Blog: http://michaelmcbroom.com/blogistan/ |
|
| Back to top |
|
 |
Jesito

Joined: 24 Aug 2007
Posts: 5745
Location: Olivella, Catalonia, (Spain)
Expire: 2015-01-07
|
| Posted: Tue Oct 05, 2010 8:27 am Post subject: |
|
|
Jesito wrote:
Thanks for your comments, cooltouch.
Regarding solvents, I do prefer to use Isopropylic alcohol, either pure or dilluted to a 70% (depending on the application), although I keep a can of lighter fluid for the case it's needed.
Regards.
Jes.
_________________
Jesito, Moderator 
Jesito's backsack:
Zooms Sigma 70-300, Tamron 35-135 and 70-210 short, 70-210 long, 28-70 CF Macro, 35-70, 35-80, Vivitar 70-210 KA, Tamron 70-250.
Fixed Industar-50, , Tamron 24mm, Tamron 135mm, Sands Hunter 135mm, Pancolar 50mm, Volna-3, many Exakta lenses
DSLR SIGMA SD9 & SD14, EOS 5D, Sony A700 and NEXF3, Oly E-330, E-400, E-450, E-1
TLR/6x6/645 YashicaMat, Petri 6x45, Nettar, Franka Solida, Brilliant
SLR Minolta X300, Fuji STX II, Praktica VLC3, Pentax P30t, EXA500, EXA 1A, Spotmatic(2), Chinon CM-4S, Ricoh, Contax, Konica TC-X , Minolta 5000, 7000i, 3Sxi, EOS 500 and CX
Rangefinders Chinon 35EE, Konica C35 auto, Canonet 28, Yashica Lynx, FED-2, Yashica electro 35, Argus C3 & C4, Regula Cita III, Voigtlander Vitoret (many), Welta Welti-I, Kodak Signette 35, Zorki-4, Bessa-R & L, Minolta Weathermatic, olympus XA2
Compact Film Konica C35V, Voigtlander Vitorets, Canon Prima Super 105, Olympus XA2 and XA3
Compact Digital Olympus C-5050, Aiptek Slim 3000, Canon Powershot A540, Nikon 5200, SIGMA DP1s, Polaroid X530, IXUS55, Kodak 6490, Powershot G9 and G10
CSCCanon EOS-M, Samsung NX100 and NX210, Lumix G5, NEX-F3 |
|
| Back to top |
|
|
cooltouch
Joined: 15 Jan 2009
Posts: 9097
Location: Houston, Texas
|
| Posted: Thu Oct 07, 2010 8:20 pm Post subject: |
|
|
cooltouch wrote:
Isopropyl alcohol certainly works well, and I too keep a bottle handy. I prefer denatured, however, because the regular iso that you buy off the shelf at your local drug store is about half water, and after the alcohol evaporates, water remains. This can be a problem in some situations. With denatured alcohol, I don't have this problem.
It's worth noting that "lighter fluid" and naphtha are the same thing. 
_________________
Michael
My Gear List: http://michaelmcbroom.com/photo/gear.html
My Gallery: http://michaelmcbroom.com/gallery3/index.php/
My Flickr Page: https://www.flickr.com/photos/11308754@N08/albums
My Music: https://soundcloud.com/michaelmcbroom/albums
My Blog: http://michaelmcbroom.com/blogistan/ |
|
| Back to top |
|
|
Jesito
Joined: 24 Aug 2007
Posts: 5745
Location: Olivella, Catalonia, (Spain)
Expire: 2015-01-07
|
| Posted: Thu Oct 07, 2010 8:51 pm Post subject: |
|
|
Jesito wrote:
| cooltouch wrote: |
Isopropyl alcohol certainly works well, and I too keep a bottle handy. I prefer denatured, however, because the regular iso that you buy off the shelf at your local drug store is about half water, and after the alcohol evaporates, water remains. This can be a problem in some situations. With denatured alcohol, I don't have this problem.
It's worth noting that "lighter fluid" and naphtha are the same thing. |
Well, the one I use is 100% water free, I buy it at a chemicals store for labs.
You're right, most commercial alcohols (ethilic, methilic...) come with some water dillution. Denaturated have the problem of the add-ons (colour, smell) that are added to make them ucomfortable for the human use... and they also remain after evaporation...
Regards.
Jes.
_________________
Jesito, Moderator
Jesito's backsack:
Zooms Sigma 70-300, Tamron 35-135 and 70-210 short, 70-210 long, 28-70 CF Macro, 35-70, 35-80, Vivitar 70-210 KA, Tamron 70-250.
Fixed Industar-50, , Tamron 24mm, Tamron 135mm, Sands Hunter 135mm, Pancolar 50mm, Volna-3, many Exakta lenses
DSLR SIGMA SD9 & SD14, EOS 5D, Sony A700 and NEXF3, Oly E-330, E-400, E-450, E-1
TLR/6x6/645 YashicaMat, Petri 6x45, Nettar, Franka Solida, Brilliant
SLR Minolta X300, Fuji STX II, Praktica VLC3, Pentax P30t, EXA500, EXA 1A, Spotmatic(2), Chinon CM-4S, Ricoh, Contax, Konica TC-X , Minolta 5000, 7000i, 3Sxi, EOS 500 and CX
Rangefinders Chinon 35EE, Konica C35 auto, Canonet 28, Yashica Lynx, FED-2, Yashica electro 35, Argus C3 & C4, Regula Cita III, Voigtlander Vitoret (many), Welta Welti-I, Kodak Signette 35, Zorki-4, Bessa-R & L, Minolta Weathermatic, olympus XA2
Compact Film Konica C35V, Voigtlander Vitorets, Canon Prima Super 105, Olympus XA2 and XA3
Compact Digital Olympus C-5050, Aiptek Slim 3000, Canon Powershot A540, Nikon 5200, SIGMA DP1s, Polaroid X530, IXUS55, Kodak 6490, Powershot G9 and G10
CSCCanon EOS-M, Samsung NX100 and NX210, Lumix G5, NEX-F3 |
|
| Back to top |
|
|
Jesito
Joined: 24 Aug 2007
Posts: 5745
Location: Olivella, Catalonia, (Spain)
Expire: 2015-01-07
|
| Posted: Thu Oct 07, 2010 8:52 pm Post subject: |
|
|
Jesito wrote:
| cooltouch wrote: |
Isopropyl alcohol certainly works well, and I too keep a bottle handy. I prefer denatured, however, because the regular iso that you buy off the shelf at your local drug store is about half water, and after the alcohol evaporates, water remains. This can be a problem in some situations. With denatured alcohol, I don't have this problem.
It's worth noting that "lighter fluid" and naphtha are the same thing. |
Well, the one I use is 100% water free, I buy it at a chemicals store for labs.
You're right, most commercial alcohols (ethilic, methilic...) come with some water dillution. Denaturated have the problem of the add-ons (colour, smell) that are added to make them ucomfortable for the human use... and they also remain after evaporation...
Regards.
Jes.
_________________
Jesito, Moderator
Jesito's backsack:
Zooms Sigma 70-300, Tamron 35-135 and 70-210 short, 70-210 long, 28-70 CF Macro, 35-70, 35-80, Vivitar 70-210 KA, Tamron 70-250.
Fixed Industar-50, , Tamron 24mm, Tamron 135mm, Sands Hunter 135mm, Pancolar 50mm, Volna-3, many Exakta lenses
DSLR SIGMA SD9 & SD14, EOS 5D, Sony A700 and NEXF3, Oly E-330, E-400, E-450, E-1
TLR/6x6/645 YashicaMat, Petri 6x45, Nettar, Franka Solida, Brilliant
SLR Minolta X300, Fuji STX II, Praktica VLC3, Pentax P30t, EXA500, EXA 1A, Spotmatic(2), Chinon CM-4S, Ricoh, Contax, Konica TC-X , Minolta 5000, 7000i, 3Sxi, EOS 500 and CX
Rangefinders Chinon 35EE, Konica C35 auto, Canonet 28, Yashica Lynx, FED-2, Yashica electro 35, Argus C3 & C4, Regula Cita III, Voigtlander Vitoret (many), Welta Welti-I, Kodak Signette 35, Zorki-4, Bessa-R & L, Minolta Weathermatic, olympus XA2
Compact Film Konica C35V, Voigtlander Vitorets, Canon Prima Super 105, Olympus XA2 and XA3
Compact Digital Olympus C-5050, Aiptek Slim 3000, Canon Powershot A540, Nikon 5200, SIGMA DP1s, Polaroid X530, IXUS55, Kodak 6490, Powershot G9 and G10
CSCCanon EOS-M, Samsung NX100 and NX210, Lumix G5, NEX-F3 |
|
| Back to top |
|
|
cooltouch
Joined: 15 Jan 2009
Posts: 9097
Location: Houston, Texas
|
| Posted: Thu Oct 07, 2010 9:13 pm Post subject: |
|
|
cooltouch wrote:
The denatured alcohol I buy has less than 10% of the denaturing additives, which I don't really consider to be a problem. Some folks develop a sensitivity to these additives, however, so I should probably add a cautionary note about its use -- use protective gloves, don't inhale fumes, etc.
_________________
Michael
My Gear List: http://michaelmcbroom.com/photo/gear.html
My Gallery: http://michaelmcbroom.com/gallery3/index.php/
My Flickr Page: https://www.flickr.com/photos/11308754@N08/albums
My Music: https://soundcloud.com/michaelmcbroom/albums
My Blog: http://michaelmcbroom.com/blogistan/ |
|
| Back to top |
|
|
ZoneV

Joined: 09 Nov 2009
Posts: 1633
Location: Germany
Expire: 2011-12-02
|
| Posted: Thu Oct 14, 2010 8:17 am Post subject: |
|
|
ZoneV wrote:
I worked with a spanner wrench at work and was dissapointed.
My modified big old caliper was much better - here are some pictures of it:
http://www.4photos.de/camera-diy/kamera-reparatur-werkzeug.html
It is big enoug for all the lenses I open 
For some tasks I use a part of a bicycle tube. The rubber is good to open some filter rings. But I still need something like those rubbers you mentioned.
For flash capacitor draining I build a adjustable resistor with high voltag cables - but I think there are better commercial devices to buy - for less money.
I use Wiha PicoFinish Phillips screwdrivers.
_________________
Camera modification, repair and DIY - some links to look through: http://www.4photos.de/camera-diy/index-en.html
I AM A LENS NERD!
Epis, Elmaron, Emerald, Ernostar, Helioplan and Heidosmat.
Epiotar, Kameraobjektiv, Anastigmat, Epis, Meganast, Magnagon, Quinar, Culmigon, Novotrinast, Novflexar, Colorplan, Sekor, Kinon, Talon, Telemegor, Xenon, Xenar, Ultra, Ultra Star. Tessar, Janar, Visionar, Kiptar, Kipronar and Rotelar.
|
|
| Back to top |
|
|
Jesito
Joined: 24 Aug 2007
Posts: 5745
Location: Olivella, Catalonia, (Spain)
Expire: 2015-01-07
|
| Posted: Thu Oct 14, 2010 12:53 pm Post subject: |
|
|
Jesito wrote:
| ZoneV wrote: |
I worked with a spanner wrench at work and was dissapointed.
My modified big old caliper was much better - here are some pictures of it:
http://www.4photos.de/camera-diy/kamera-reparatur-werkzeug.html
It is big enoug for all the lenses I open
For some tasks I use a part of a bicycle tube. The rubber is good to open some filter rings. But I still need something like those rubbers you mentioned.
For flash capacitor draining I build a adjustable resistor with high voltag cables - but I think there are better commercial devices to buy - for less money.
I use Wiha PicoFinish Phillips screwdrivers. |
Thanks for the info!. The caliper mod is a sound idea... I think I have a spare one to try  The benefit is the big handle that will provide a good push. The benefit is the big handle that will provide a good push.
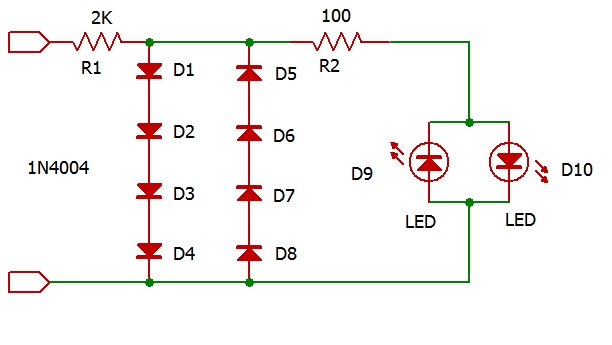
To discharge capacitors, I built this unit that is very effective:

The diodes provide a fixed voltage to the LEDs that light whilst there is energy stored in the capacitor. The resistor R1 has to be able of disipating 5 Watt or more...
Regards.
Jes.
_________________
Jesito, Moderator
Jesito's backsack:
Zooms Sigma 70-300, Tamron 35-135 and 70-210 short, 70-210 long, 28-70 CF Macro, 35-70, 35-80, Vivitar 70-210 KA, Tamron 70-250.
Fixed Industar-50, , Tamron 24mm, Tamron 135mm, Sands Hunter 135mm, Pancolar 50mm, Volna-3, many Exakta lenses
DSLR SIGMA SD9 & SD14, EOS 5D, Sony A700 and NEXF3, Oly E-330, E-400, E-450, E-1
TLR/6x6/645 YashicaMat, Petri 6x45, Nettar, Franka Solida, Brilliant
SLR Minolta X300, Fuji STX II, Praktica VLC3, Pentax P30t, EXA500, EXA 1A, Spotmatic(2), Chinon CM-4S, Ricoh, Contax, Konica TC-X , Minolta 5000, 7000i, 3Sxi, EOS 500 and CX
Rangefinders Chinon 35EE, Konica C35 auto, Canonet 28, Yashica Lynx, FED-2, Yashica electro 35, Argus C3 & C4, Regula Cita III, Voigtlander Vitoret (many), Welta Welti-I, Kodak Signette 35, Zorki-4, Bessa-R & L, Minolta Weathermatic, olympus XA2
Compact Film Konica C35V, Voigtlander Vitorets, Canon Prima Super 105, Olympus XA2 and XA3
Compact Digital Olympus C-5050, Aiptek Slim 3000, Canon Powershot A540, Nikon 5200, SIGMA DP1s, Polaroid X530, IXUS55, Kodak 6490, Powershot G9 and G10
CSCCanon EOS-M, Samsung NX100 and NX210, Lumix G5, NEX-F3 |
|
| Back to top |
|
|
berraneck

Joined: 24 May 2009
Posts: 972
Location: prague, czech republic
|
| Posted: Tue Nov 02, 2010 11:06 pm Post subject: |
|
|
berraneck wrote:
That�s a great thread here! Thanks Jesito!
Could you please advice some supplier of these tools? Where to get them, what prices are appropriate, what to seek for?
Thanks!
b
_________________
equipment doesn�t count, good photographs do |
|
| Back to top |
|
|
Jesito
Joined: 24 Aug 2007
Posts: 5745
Location: Olivella, Catalonia, (Spain)
Expire: 2015-01-07
|
| Posted: Tue Nov 02, 2010 11:29 pm Post subject: |
|
|
Jesito wrote:
| berraneck wrote: |
That�s a great thread here! Thanks Jesito!
Could you please advice some supplier of these tools? Where to get them, what prices are appropriate, what to seek for?
Thanks!
b |
A little difficult. Our official provider, Alex (HK300) is not visiting the forum since July. I've found some alternative providers for some of the tools.
Please, tell wich of the tool are you interested in and I'll try to give you a rough idea of how much it can cost and where to find a similar one.
Regards.
Jes.
_________________
Jesito, Moderator
Jesito's backsack:
Zooms Sigma 70-300, Tamron 35-135 and 70-210 short, 70-210 long, 28-70 CF Macro, 35-70, 35-80, Vivitar 70-210 KA, Tamron 70-250.
Fixed Industar-50, , Tamron 24mm, Tamron 135mm, Sands Hunter 135mm, Pancolar 50mm, Volna-3, many Exakta lenses
DSLR SIGMA SD9 & SD14, EOS 5D, Sony A700 and NEXF3, Oly E-330, E-400, E-450, E-1
TLR/6x6/645 YashicaMat, Petri 6x45, Nettar, Franka Solida, Brilliant
SLR Minolta X300, Fuji STX II, Praktica VLC3, Pentax P30t, EXA500, EXA 1A, Spotmatic(2), Chinon CM-4S, Ricoh, Contax, Konica TC-X , Minolta 5000, 7000i, 3Sxi, EOS 500 and CX
Rangefinders Chinon 35EE, Konica C35 auto, Canonet 28, Yashica Lynx, FED-2, Yashica electro 35, Argus C3 & C4, Regula Cita III, Voigtlander Vitoret (many), Welta Welti-I, Kodak Signette 35, Zorki-4, Bessa-R & L, Minolta Weathermatic, olympus XA2
Compact Film Konica C35V, Voigtlander Vitorets, Canon Prima Super 105, Olympus XA2 and XA3
Compact Digital Olympus C-5050, Aiptek Slim 3000, Canon Powershot A540, Nikon 5200, SIGMA DP1s, Polaroid X530, IXUS55, Kodak 6490, Powershot G9 and G10
CSCCanon EOS-M, Samsung NX100 and NX210, Lumix G5, NEX-F3 |
|
| Back to top |
|
|
berraneck
Joined: 24 May 2009
Posts: 972
Location: prague, czech republic
|
| Posted: Tue Nov 02, 2010 11:56 pm Post subject: |
|
|
berraneck wrote:
I would like to repair some of my Zuiko lenses - first 50/1.8, after some practising 50/1.2. I haven�t done anything like that before.
I pretend i would need a spanner wrench, some screwdivers, something to grab lenses with, some finger gloves? For start, just basic tools.
_________________
equipment doesn�t count, good photographs do |
|
| Back to top |
|
|
dainiuss
Joined: 05 Nov 2010
Posts: 5
Location: UK
|
| Posted: Sun Nov 07, 2010 6:21 pm Post subject: |
|
|
dainiuss wrote:
Any recommendation on where can I buy/how to make myself the lens unscrewing tubes? |
|
| Back to top |
|
|
Jesito
Joined: 24 Aug 2007
Posts: 5745
Location: Olivella, Catalonia, (Spain)
Expire: 2015-01-07
|
| Posted: Sun Nov 07, 2010 6:37 pm Post subject: |
|
|
Jesito wrote:
| berraneck wrote: |
I would like to repair some of my Zuiko lenses - first 50/1.8, after some practising 50/1.2. I haven�t done anything like that before.
I pretend i would need a spanner wrench, some screwdivers, something to grab lenses with, some finger gloves? For start, just basic tools. |
Right, you would need a spanner wrench and/or rubber cups to disassemble the lenses.
I don't use finger gloves, just full latex or vinyl gloves (for the whole hand).
And some vacuum cups to lift the lenses.
Regards.
Jes.
_________________
Jesito, Moderator
Jesito's backsack:
Zooms Sigma 70-300, Tamron 35-135 and 70-210 short, 70-210 long, 28-70 CF Macro, 35-70, 35-80, Vivitar 70-210 KA, Tamron 70-250.
Fixed Industar-50, , Tamron 24mm, Tamron 135mm, Sands Hunter 135mm, Pancolar 50mm, Volna-3, many Exakta lenses
DSLR SIGMA SD9 & SD14, EOS 5D, Sony A700 and NEXF3, Oly E-330, E-400, E-450, E-1
TLR/6x6/645 YashicaMat, Petri 6x45, Nettar, Franka Solida, Brilliant
SLR Minolta X300, Fuji STX II, Praktica VLC3, Pentax P30t, EXA500, EXA 1A, Spotmatic(2), Chinon CM-4S, Ricoh, Contax, Konica TC-X , Minolta 5000, 7000i, 3Sxi, EOS 500 and CX
Rangefinders Chinon 35EE, Konica C35 auto, Canonet 28, Yashica Lynx, FED-2, Yashica electro 35, Argus C3 & C4, Regula Cita III, Voigtlander Vitoret (many), Welta Welti-I, Kodak Signette 35, Zorki-4, Bessa-R & L, Minolta Weathermatic, olympus XA2
Compact Film Konica C35V, Voigtlander Vitorets, Canon Prima Super 105, Olympus XA2 and XA3
Compact Digital Olympus C-5050, Aiptek Slim 3000, Canon Powershot A540, Nikon 5200, SIGMA DP1s, Polaroid X530, IXUS55, Kodak 6490, Powershot G9 and G10
CSCCanon EOS-M, Samsung NX100 and NX210, Lumix G5, NEX-F3 |
|
| Back to top |
|
|
Jesito
Joined: 24 Aug 2007
Posts: 5745
Location: Olivella, Catalonia, (Spain)
Expire: 2015-01-07
|
| Posted: Sun Nov 07, 2010 6:55 pm Post subject: |
|
|
Jesito wrote:
difficult to say now. Alex (Hk300) is not anymore available, and he was who provided mines.
In the past I used to go to the harware stores and ask for the rubber plugs that are used to end the metal tube legs on some chairs.
I found these, that look better than the ones from India:
Click here to see on Ebay
But no experience with them.
Also found these rubber cups (also no experience with them) The seller seems to have them in several different diameters.
Click here to see on Ebay
Good Luck!
Regards.
Jes.
_________________
Jesito, Moderator
Jesito's backsack:
Zooms Sigma 70-300, Tamron 35-135 and 70-210 short, 70-210 long, 28-70 CF Macro, 35-70, 35-80, Vivitar 70-210 KA, Tamron 70-250.
Fixed Industar-50, , Tamron 24mm, Tamron 135mm, Sands Hunter 135mm, Pancolar 50mm, Volna-3, many Exakta lenses
DSLR SIGMA SD9 & SD14, EOS 5D, Sony A700 and NEXF3, Oly E-330, E-400, E-450, E-1
TLR/6x6/645 YashicaMat, Petri 6x45, Nettar, Franka Solida, Brilliant
SLR Minolta X300, Fuji STX II, Praktica VLC3, Pentax P30t, EXA500, EXA 1A, Spotmatic(2), Chinon CM-4S, Ricoh, Contax, Konica TC-X , Minolta 5000, 7000i, 3Sxi, EOS 500 and CX
Rangefinders Chinon 35EE, Konica C35 auto, Canonet 28, Yashica Lynx, FED-2, Yashica electro 35, Argus C3 & C4, Regula Cita III, Voigtlander Vitoret (many), Welta Welti-I, Kodak Signette 35, Zorki-4, Bessa-R & L, Minolta Weathermatic, olympus XA2
Compact Film Konica C35V, Voigtlander Vitorets, Canon Prima Super 105, Olympus XA2 and XA3
Compact Digital Olympus C-5050, Aiptek Slim 3000, Canon Powershot A540, Nikon 5200, SIGMA DP1s, Polaroid X530, IXUS55, Kodak 6490, Powershot G9 and G10
CSCCanon EOS-M, Samsung NX100 and NX210, Lumix G5, NEX-F3 |
|
| Back to top |
|
|
Jesito
Joined: 24 Aug 2007
Posts: 5745
Location: Olivella, Catalonia, (Spain)
Expire: 2015-01-07
|
| Posted: Mon Nov 08, 2010 9:13 pm Post subject: |
|
|
Jesito wrote:
Some spanners from Micro Tools: Not so cheap, but look nice:
Micro Tools Spanners
Regards.
Jes.
_________________
Jesito, Moderator
Jesito's backsack:
Zooms Sigma 70-300, Tamron 35-135 and 70-210 short, 70-210 long, 28-70 CF Macro, 35-70, 35-80, Vivitar 70-210 KA, Tamron 70-250.
Fixed Industar-50, , Tamron 24mm, Tamron 135mm, Sands Hunter 135mm, Pancolar 50mm, Volna-3, many Exakta lenses
DSLR SIGMA SD9 & SD14, EOS 5D, Sony A700 and NEXF3, Oly E-330, E-400, E-450, E-1
TLR/6x6/645 YashicaMat, Petri 6x45, Nettar, Franka Solida, Brilliant
SLR Minolta X300, Fuji STX II, Praktica VLC3, Pentax P30t, EXA500, EXA 1A, Spotmatic(2), Chinon CM-4S, Ricoh, Contax, Konica TC-X , Minolta 5000, 7000i, 3Sxi, EOS 500 and CX
Rangefinders Chinon 35EE, Konica C35 auto, Canonet 28, Yashica Lynx, FED-2, Yashica electro 35, Argus C3 & C4, Regula Cita III, Voigtlander Vitoret (many), Welta Welti-I, Kodak Signette 35, Zorki-4, Bessa-R & L, Minolta Weathermatic, olympus XA2
Compact Film Konica C35V, Voigtlander Vitorets, Canon Prima Super 105, Olympus XA2 and XA3
Compact Digital Olympus C-5050, Aiptek Slim 3000, Canon Powershot A540, Nikon 5200, SIGMA DP1s, Polaroid X530, IXUS55, Kodak 6490, Powershot G9 and G10
CSCCanon EOS-M, Samsung NX100 and NX210, Lumix G5, NEX-F3 |
|
| Back to top |
|
|
Jesito
Joined: 24 Aug 2007
Posts: 5745
Location: Olivella, Catalonia, (Spain)
Expire: 2015-01-07
|
| Posted: Mon Nov 08, 2010 9:22 pm Post subject: |
|
|
Jesito wrote:
Also from Micro Tools there is a nice Lens Ring Tool Set
Here is the one set that fits most common lens rings leaving the center clear for the glass portion of the lens. Sizes are 13, 19, 21, 24, 29, 30, 36, 37, 44, 45, 54 & 62mm:

(BTW, I'm not related in any way to Micro Tools, just found them as an alternative to the MFLenses tools, and thought it could be useful for the colleagues )
Regards.
Jes.
_________________
Jesito, Moderator
Jesito's backsack:
Zooms Sigma 70-300, Tamron 35-135 and 70-210 short, 70-210 long, 28-70 CF Macro, 35-70, 35-80, Vivitar 70-210 KA, Tamron 70-250.
Fixed Industar-50, , Tamron 24mm, Tamron 135mm, Sands Hunter 135mm, Pancolar 50mm, Volna-3, many Exakta lenses
DSLR SIGMA SD9 & SD14, EOS 5D, Sony A700 and NEXF3, Oly E-330, E-400, E-450, E-1
TLR/6x6/645 YashicaMat, Petri 6x45, Nettar, Franka Solida, Brilliant
SLR Minolta X300, Fuji STX II, Praktica VLC3, Pentax P30t, EXA500, EXA 1A, Spotmatic(2), Chinon CM-4S, Ricoh, Contax, Konica TC-X , Minolta 5000, 7000i, 3Sxi, EOS 500 and CX
Rangefinders Chinon 35EE, Konica C35 auto, Canonet 28, Yashica Lynx, FED-2, Yashica electro 35, Argus C3 & C4, Regula Cita III, Voigtlander Vitoret (many), Welta Welti-I, Kodak Signette 35, Zorki-4, Bessa-R & L, Minolta Weathermatic, olympus XA2
Compact Film Konica C35V, Voigtlander Vitorets, Canon Prima Super 105, Olympus XA2 and XA3
Compact Digital Olympus C-5050, Aiptek Slim 3000, Canon Powershot A540, Nikon 5200, SIGMA DP1s, Polaroid X530, IXUS55, Kodak 6490, Powershot G9 and G10
CSCCanon EOS-M, Samsung NX100 and NX210, Lumix G5, NEX-F3 |
|
| Back to top |
|
|
cooltouch
Joined: 15 Jan 2009
Posts: 9097
Location: Houston, Texas
|
| Posted: Mon Nov 08, 2010 10:20 pm Post subject: |
|
|
cooltouch wrote:
I have a set of those spanners, Jesito, and I do not recommend them. Not only are they way overpriced, but those interchangeable tips slip out of place and move around. The result is a scarred lens element or front ring -- or both. If you insist on using one of those sets, be very careful with it. It works well only if the ring is not very tight.
_________________
Michael
My Gear List: http://michaelmcbroom.com/photo/gear.html
My Gallery: http://michaelmcbroom.com/gallery3/index.php/
My Flickr Page: https://www.flickr.com/photos/11308754@N08/albums
My Music: https://soundcloud.com/michaelmcbroom/albums
My Blog: http://michaelmcbroom.com/blogistan/ |
|
| Back to top |
|
|
Jesito
Joined: 24 Aug 2007
Posts: 5745
Location: Olivella, Catalonia, (Spain)
Expire: 2015-01-07
|
| Posted: Tue Nov 09, 2010 12:01 am Post subject: |
|
|
Jesito wrote:
| cooltouch wrote: |
| I have a set of those spanners, Jesito, and I do not recommend them. Not only are they way overpriced, but those interchangeable tips slip out of place and move around. The result is a scarred lens element or front ring -- or both. If you insist on using one of those sets, be very careful with it. It works well only if the ring is not very tight. |
Thanks for your comment, Michael!!
No, I'm not really wishing to use them, just looking for alternatives to the nice ones provided in the past by our colleague HK300, unfortunately missing since long.
Any feedback (in any sense) for any of the tools will be very appreciated!
Regards.
Jes.
_________________
Jesito, Moderator
Jesito's backsack:
Zooms Sigma 70-300, Tamron 35-135 and 70-210 short, 70-210 long, 28-70 CF Macro, 35-70, 35-80, Vivitar 70-210 KA, Tamron 70-250.
Fixed Industar-50, , Tamron 24mm, Tamron 135mm, Sands Hunter 135mm, Pancolar 50mm, Volna-3, many Exakta lenses
DSLR SIGMA SD9 & SD14, EOS 5D, Sony A700 and NEXF3, Oly E-330, E-400, E-450, E-1
TLR/6x6/645 YashicaMat, Petri 6x45, Nettar, Franka Solida, Brilliant
SLR Minolta X300, Fuji STX II, Praktica VLC3, Pentax P30t, EXA500, EXA 1A, Spotmatic(2), Chinon CM-4S, Ricoh, Contax, Konica TC-X , Minolta 5000, 7000i, 3Sxi, EOS 500 and CX
Rangefinders Chinon 35EE, Konica C35 auto, Canonet 28, Yashica Lynx, FED-2, Yashica electro 35, Argus C3 & C4, Regula Cita III, Voigtlander Vitoret (many), Welta Welti-I, Kodak Signette 35, Zorki-4, Bessa-R & L, Minolta Weathermatic, olympus XA2
Compact Film Konica C35V, Voigtlander Vitorets, Canon Prima Super 105, Olympus XA2 and XA3
Compact Digital Olympus C-5050, Aiptek Slim 3000, Canon Powershot A540, Nikon 5200, SIGMA DP1s, Polaroid X530, IXUS55, Kodak 6490, Powershot G9 and G10
CSCCanon EOS-M, Samsung NX100 and NX210, Lumix G5, NEX-F3 |
|
| Back to top |
|
|
dainiuss
Joined: 05 Nov 2010
Posts: 5
Location: UK
|
| Posted: Tue Nov 09, 2010 2:24 pm Post subject: |
|
|
dainiuss wrote:
Thanks for your links Jesito, indeed very helpful! |
|
| Back to top |
|
|
Jesito
Joined: 24 Aug 2007
Posts: 5745
Location: Olivella, Catalonia, (Spain)
Expire: 2015-01-07
|
| Posted: Tue Nov 09, 2010 3:53 pm Post subject: |
|
|
Jesito wrote:
| dainiuss wrote: |
| Thanks for your links Jesito, indeed very helpful! |
You are welcome!.
Jes.
_________________
Jesito, Moderator
Jesito's backsack:
Zooms Sigma 70-300, Tamron 35-135 and 70-210 short, 70-210 long, 28-70 CF Macro, 35-70, 35-80, Vivitar 70-210 KA, Tamron 70-250.
Fixed Industar-50, , Tamron 24mm, Tamron 135mm, Sands Hunter 135mm, Pancolar 50mm, Volna-3, many Exakta lenses
DSLR SIGMA SD9 & SD14, EOS 5D, Sony A700 and NEXF3, Oly E-330, E-400, E-450, E-1
TLR/6x6/645 YashicaMat, Petri 6x45, Nettar, Franka Solida, Brilliant
SLR Minolta X300, Fuji STX II, Praktica VLC3, Pentax P30t, EXA500, EXA 1A, Spotmatic(2), Chinon CM-4S, Ricoh, Contax, Konica TC-X , Minolta 5000, 7000i, 3Sxi, EOS 500 and CX
Rangefinders Chinon 35EE, Konica C35 auto, Canonet 28, Yashica Lynx, FED-2, Yashica electro 35, Argus C3 & C4, Regula Cita III, Voigtlander Vitoret (many), Welta Welti-I, Kodak Signette 35, Zorki-4, Bessa-R & L, Minolta Weathermatic, olympus XA2
Compact Film Konica C35V, Voigtlander Vitorets, Canon Prima Super 105, Olympus XA2 and XA3
Compact Digital Olympus C-5050, Aiptek Slim 3000, Canon Powershot A540, Nikon 5200, SIGMA DP1s, Polaroid X530, IXUS55, Kodak 6490, Powershot G9 and G10
CSCCanon EOS-M, Samsung NX100 and NX210, Lumix G5, NEX-F3 |
|
| Back to top |
|
|
aliasant

Joined: 17 Feb 2010
Posts: 39
Location: Stockholm, Sweden
|
| Posted: Wed Nov 24, 2010 6:20 pm Post subject: Repaint |
|
|
aliasant wrote:
Great Thread !
I have taken apart quite a few old lenses with varying results but one thing I havnt been able to figure out is how to repaint the numbers and lines?
I want to repaint quite a few lenses were the color is almost or even completely gone.
What kind of paint is normally used or could be used?
There are probably new kinds of paint that might work better then the old ones? |
|
| Back to top |
|
|
cooltouch
Joined: 15 Jan 2009
Posts: 9097
Location: Houston, Texas
|
| Posted: Wed Nov 24, 2010 8:10 pm Post subject: |
|
|
cooltouch wrote:
Assuming the numbers are recessed and not silkscreened onto the lens, I've heard of it done the following way:
Buy model airplane enamel paint in the small bottles in the colors you need.
Using the tip of a toothpick, first clean out the number or line "grooves" with alcohol to remove all traces of dirt and grime. Let the alcohol evaporate.
Using the tip of another toothpick, dip it into the paint and push the paint into the number or line grooves. Dip a cotton swab into paint thinner, and wipe across the lens body or part over the number or line grooves, then wipe clean with a paper towel. If necessary, add a bit of paint thinner to the paper towel and wipe over the lens body or part again.
You should have wet paint down into the number grooves now and the excess traces of paint should have been removed with the cotton swab and paper towel. Let the paint dry.
_________________
Michael
My Gear List: http://michaelmcbroom.com/photo/gear.html
My Gallery: http://michaelmcbroom.com/gallery3/index.php/
My Flickr Page: https://www.flickr.com/photos/11308754@N08/albums
My Music: https://soundcloud.com/michaelmcbroom/albums
My Blog: http://michaelmcbroom.com/blogistan/ |
|
| Back to top |
|
|
aliasant
Joined: 17 Feb 2010
Posts: 39
Location: Stockholm, Sweden
|
| Posted: Thu Nov 25, 2010 10:09 am Post subject: |
|
|
aliasant wrote:
| cooltouch wrote: |
Assuming the numbers are recessed and not silkscreened onto the lens, I've heard of it done the following way:
Buy model airplane enamel paint in the small bottles in the colors you need.
|
Thanx for the tip.
Im not sure airplane hobby paint is what I would like to use though  Not unless there is a more "authentic" way. Not unless there is a more "authentic" way.
What do the professionals use?
What kind of paint was Nikon, Canon and others using "yesterday" and what are they using today? Maybe they too use hobby paint but I have read somewere that they atleast used to use some kind of wax-like paint that was first heated up so it melted, then poored into the recessed numbers and any paint leftovers were simply wiped of.
Any ideas? |
|
| Back to top |
|
|
pat donnelly
Joined: 19 Jan 2010
Posts: 666
Location: Brisbane, Australia
|
| Posted: Thu Nov 25, 2010 10:24 am Post subject: Used to holiday with my family at Estartit |
|
|
pat donnelly wrote:
Jesito
Many thanks for a very thorough primer on repair!
You live in a very beautiful part of the world!
Pat
_________________
---------------------------------
EP-1, E-410, E-300, D100, D1,
C-Mt: 25mm 1.9, 75mm 1.4, 75mm 1.3, 75mm 1.9, Ultra wides, one inch sensor, 20+ c-mount zooms
OM 350mm f2.8, Nikkor 180 f2.8, Exa 180 f2.8,
Tamrons: 90mm f2.5, 500mm f8 x3, 135 f2.5, 200 f3.5, 24mm 2.5, 28mm 2.5 x8,
FD 500mm mirror lens |
|
| Back to top |
|
|
Sevo
Joined: 22 Aug 2008
Posts: 1189
Location: Frankfurt, Germany
Expire: 2012-12-03
|
| Posted: Thu Nov 25, 2010 11:04 am Post subject: |
|
|
Sevo wrote:
| aliasant wrote: |
Im not sure airplane hobby paint is what I would like to use though Not unless there is a more "authentic" way.
What do the professionals use?
|
You can get matte and glossy black paint from camera repair material suppliers. Beyond that, the said model paints are the only ones that exist in tiny packages and a wide variety of colours and surfaces, so essentially it boils down to Revell for professionals as well.
In the past, manufacturers used pretty much the same (solvent/alkyd) paint type - but sprayed onto the bare, pre-etched metal, dried in a cleanroom and heat cured.
Now that industrial paint processes are generally using technologies not applicable at workshop level (like powder coating or electrophoresis), there is no question of using "original paints" any more - current paints cannot be applied in touch-up repairs.
_________________
Sevo |
|
| Back to top |
|
|
|
|