| View previous topic :: View next topic |
| Author |
Message |
jamaeolus


Joined: 19 Mar 2014
Posts: 2929
Location: Eugene
Expire: 2015-08-20
|
 Posted: Wed Apr 14, 2021 5:32 am Post subject: Anyone disassembled the fd 85mm 1.8 optical block? Posted: Wed Apr 14, 2021 5:32 am Post subject: Anyone disassembled the fd 85mm 1.8 optical block? |
 |
|
jamaeolus wrote:
I went to sell a Canon fd 85mm 1.8 and discovered tiny fungus filaments on the back of the objective element. I have gotten the optical block out of the barrel but it is not obvious to me what to do next. it is the nFD version. It looks to have a single tiny hole on the side of thumper part of the cylinder.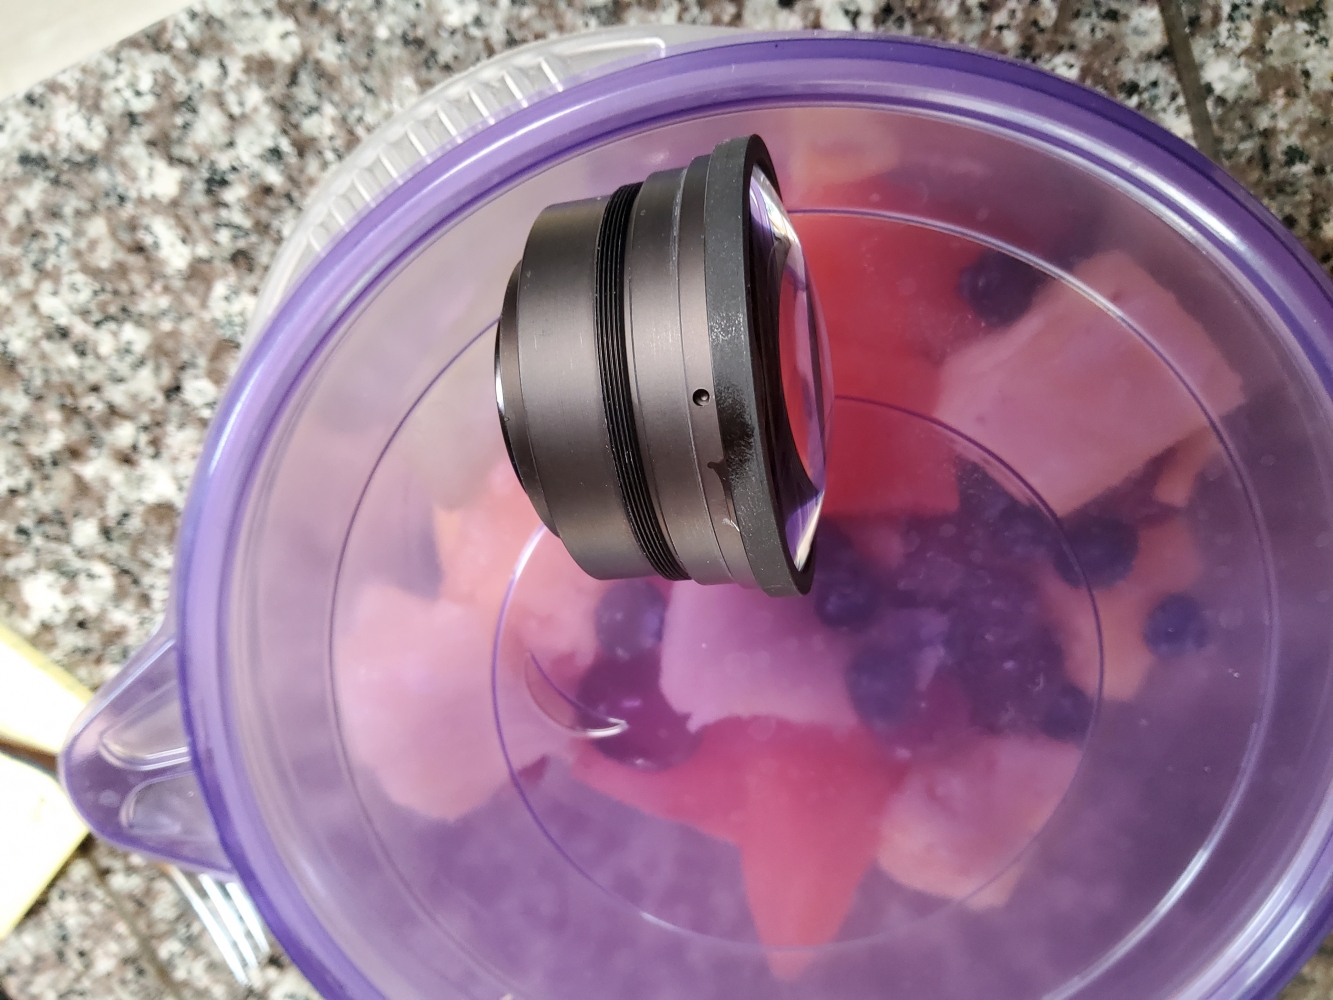
_________________
photos are moments frozen in time |
|
| Back to top |
|
 |
Lightshow

Joined: 04 Nov 2011
Posts: 3669
Location: Calgary
|
| Posted: Wed Apr 14, 2021 9:28 pm Post subject: |
|
|
Lightshow wrote:
I've not opened that one, it was made at the time that manufacturers started cutting corners to save $\¥, and force a replacement of the block rather than a simple cleaning, Minolta did this in the MD line and the M mount lenses.
It does look like it might have have some glue coming out of the parting line, if you can't get it to unscrew, I'd carefully dig into the hole to see if it had glue or something in it, a solvent could help separation of those parts, but there is a doublet within that block and I'd be worried that the solvent could attack that.

I tried to find a nFD/New FD/FDn disassembly video/forum or blog post but it seems to be only FL, FD SSC, and EF lenses, this may point to it being near impossible to repair.
Well, I spoke too soon....
This may help.
https://www.dpreview.com/forums/thread/3293179
Looks like the first element comes out relatively easy, but the doublet looks to be a challenge, the microfiche looks like the last element is held in by a retaining clip, it may be easier to access the back half of the doublet from the back end.
_________________
A Manual Focus Junky...
One photographers junk lens is an artists favorite tool.
My lens list
http://www.flickr.com/photos/lightshow-photography/ |
|
| Back to top |
|
|
Gardener

Joined: 22 Sep 2013
Posts: 950
Location: USA
|
| Posted: Wed Apr 14, 2021 10:53 pm Post subject: |
|
|
Gardener wrote:
Unscrew the front retaining ring, remove front element and see what's under it. Most likely, there will be a spacing ring that keeps the doublet in place. Also, hard to believe there isn't a retaining ring at the back of that assembly. |
|
| Back to top |
|
|
jamaeolus
Joined: 19 Mar 2014
Posts: 2929
Location: Eugene
Expire: 2015-08-20
|
| Posted: Thu Apr 15, 2021 9:56 pm Post subject: |
|
|
jamaeolus wrote:
So, I have gotten to the optical block with 2 types of colored metal as seen in the photo. The front element does not "just pop out" using inertia. Is the front most metal ring (which appears to be held in with some type of glue) needing to be removed as well? I currently have the block soaking in the glorious spring sunshine we are currently blessed with (which I personally am unable to enjoy as I am stuck in the pharmacy where I work). Anyway thanks for the efforts and information so far. I will continue to fuss until I get too frustrated or it works then I intend to sell. I will keep you appraised of my progress (or lack therof).
_________________
photos are moments frozen in time |
|
| Back to top |
|
|
visualopsins

Joined: 05 Mar 2009
Posts: 10541
Location: California
Expire: 2025-04-11
|
| Posted: Thu Apr 15, 2021 10:53 pm Post subject: |
|
|
visualopsins wrote:
| jamaeolus wrote: |
| So, I have gotten to the optical block with 2 types of colored metal as seen in the photo. The front element does not "just pop out" using inertia. Is the front most metal ring (which appears to be held in with some type of glue) needing to be removed as well? I currently have the block soaking in the glorious spring sunshine we are currently blessed with (which I personally am unable to enjoy as I am stuck in the pharmacy where I work). Anyway thanks for the efforts and information so far. I will continue to fuss until I get too frustrated or it works then I intend to sell. I will keep you appraised of my progress (or lack therof). |
Yes, unscrew the "front most metal ring". A drop of ethanol where it is "glued" may be necessary to dissolve the glue. Others have already suggested these steps...
_________________
☮☮☮☮☮☮☮☮☮☮☮☮☮☮☮☮☮☮☮☮☮☮☮☮☮☮☮☮☮☮☮☮ like attracts like! ☮☮☮☮☮☮☮☮☮☮☮☮☮☮☮☮☮☮☮☮☮☮☮☮☮☮☮☮☮☮☮☮
Cameras: Sony ILCE-7RM2, Spotmatics II, F, and ESII, Nikon P4
Lenses:
M42 Asahi Optical Co., Takumar 1:4 f=35mm, 1:2 f=58mm (Sonnar), 1:2.4 f=58mm (Heliar), 1:2.2 f=55mm (Gaussian), 1:2.8 f=105mm (Model I), 1:2.8/105 (Model II), 1:5.6/200, Tele-Takumar 1:5.6/200, 1:6.3/300, Macro-Takumar 1:4/50, Auto-Takumar 1:2.3 f=35, 1:1.8 f=55mm, 1:2.2 f=55mm, Super-TAKUMAR 1:3.5/28 (fat), 1:2/35 (Fat), 1:1.4/50 (8-element), Super-Multi-Coated Fisheye-TAKUMAR 1:4/17, Super-Multi-Coated TAKUMAR 1:4.5/20, 1:3.5/24, 1:3.5/28, 1:2/35, 1:3.5/35, 1:1.8/85, 1:1.9/85 1:2.8/105, 1:3.5/135, 1:2.5/135 (II), 1:4/150, 1:4/200, 1:4/300, 1:4.5/500, Super-Multi-Coated Macro-TAKUMAR 1:4/50, 1:4/100, Super-Multi-Coated Bellows-TAKUMAR 1:4/100, SMC TAKUMAR 1:1.4/50, 1:1.8/55
M42 Carl Zeiss Jena Flektogon 2.4/35
Contax Carl Zeiss Vario-Sonnar T* 28-70mm F3.5-4.5
Pentax K-mount SMC PENTAX ZOOM 1:3.5 35~105mm, SMC PENTAX ZOOM 1:4 45~125mm
Nikon Micro-NIKKOR-P-C Auto 1:3.5 f=55mm, NIKKOR-P Auto 105mm f/2.5 Pre-AI (Sonnar), Micro-NIKKOR 105mm 1:4 AI, NIKKOR AI-S 35-135mm f/3,5-4,5
Tamron SP 17mm f/3.5 (51B), Tamron SP 17mm f/3.5 (51BB), SP 500mm f/8 (55BB), SP 70-210mm f/3.5 (19AH)
Vivitar 100mm 1:2.8 MC 1:1 Macro Telephoto (Kiron)
|
|
| Back to top |
|
|
jamaeolus
Joined: 19 Mar 2014
Posts: 2929
Location: Eugene
Expire: 2015-08-20
|
| Posted: Fri Apr 16, 2021 12:10 am Post subject: |
|
|
jamaeolus wrote:
OK.... yeah . I have done that, but perhaps have not put enough torque. I really don't want to damage the lens as the fungus is not very bad and is unlikely to have any appreciable effect on IQ. I will give it another go. Maybe use just a tiny amount of acetone.
_________________
photos are moments frozen in time |
|
| Back to top |
|
|
Slalom


Joined: 10 Dec 2017
Posts: 151
Location: Stourbridge
|
| Posted: Fri Apr 16, 2021 8:23 am Post subject: |
|
|
Slalom wrote:
Try UV? Found a pair of UV torches 3x AAA powered.
Use on a sheet of foil (wrapped around a card 100mm Square) Place lens on it resting on filter thread.
More foil round a mount size card (largest) with a hole for the torch, switch torch on and balance, with hole pointing to mount and Torch lighting the lens interior.
When batteries go flat check to see if it worked.
Easier with symetric mounts. |
|
| Back to top |
|
|
Lightshow
Joined: 04 Nov 2011
Posts: 3669
Location: Calgary
|
| Posted: Sat Apr 17, 2021 9:01 pm Post subject: |
|
|
Lightshow wrote:
UV should kill any living fungus, but if it's already made any acid it will continue to etch the glass, so cleaning is the best option.
Perhaps jamaeolus can post a few more pictures of the optical block for us to look over, perhaps one of us will see a path forward.
_________________
A Manual Focus Junky...
One photographers junk lens is an artists favorite tool.
My lens list
http://www.flickr.com/photos/lightshow-photography/ |
|
| Back to top |
|
|
jamaeolus
Joined: 19 Mar 2014
Posts: 2929
Location: Eugene
Expire: 2015-08-20
|
| Posted: Wed Apr 21, 2021 8:58 pm Post subject: |
|
|
jamaeolus wrote:
Yay! The thing finally broke free. I had to really torque on it. I ended up wrapping the back portion with blue paint masking tape, which I like because it comes off without a residue. Then using stainless hose clams to give my vise something to grab without marring the sensitive aluminum. This was the fourth time I had soaked it in isopropyl alcohol. The filaments cleaned off easily with isopropyl and q-tips, leaving no evidence of their stay.
_________________
photos are moments frozen in time |
|
| Back to top |
|
|
jamaeolus
Joined: 19 Mar 2014
Posts: 2929
Location: Eugene
Expire: 2015-08-20
|
| Posted: Wed Apr 21, 2021 9:21 pm Post subject: |
|
|
jamaeolus wrote:
So, a more complete explanation seems warranted. Using the rubber lens wrench I removed the name bezel. Under the bezel is a single ring with 2 small spanner wrench holes about the size of the ball in typical ball point pin. Using a spanner wrench the whole front optical block comes out. That is what is pictured in the photo. That part was surprisingly easy. You can see in the photo that the front-most thin ring of metal appears different than the rest of the aluminum tube that contains the bottom portion of the front optical block. The tube separates at that joint. Canon (in its infinite wisdom) glued those 2 metal tubes , in addition to very fine aluminum threads. Therein lies the difficulty I ran into. So following advice from friendly forum members I applied isopropyl and tried to wrestle it loose. That was the source of my frustration. I kept addiing more alcohol and more force to the point I could not grip tight to enough to hold the bottom tube from spinning along with the front element holding ring. That was when I came p with the idea of using stainless hose clamps. I hope this helps future lens wrenchers.
Thanks to everyone for their advice.
_________________
photos are moments frozen in time
Last edited by jamaeolus on Wed Apr 21, 2021 11:14 pm; edited 1 time in total |
|
| Back to top |
|
|
visualopsins
Joined: 05 Mar 2009
Posts: 10541
Location: California
Expire: 2025-04-11
|
| Posted: Wed Apr 21, 2021 10:12 pm Post subject: |
|
|
visualopsins wrote:
 I thought of using kitchen jar lid opener or oil filter removal tool, but forgot to post, oops. Or strap wrench... I thought of using kitchen jar lid opener or oil filter removal tool, but forgot to post, oops. Or strap wrench...
_________________
☮☮☮☮☮☮☮☮☮☮☮☮☮☮☮☮☮☮☮☮☮☮☮☮☮☮☮☮☮☮☮☮ like attracts like! ☮☮☮☮☮☮☮☮☮☮☮☮☮☮☮☮☮☮☮☮☮☮☮☮☮☮☮☮☮☮☮☮
Cameras: Sony ILCE-7RM2, Spotmatics II, F, and ESII, Nikon P4
Lenses:
M42 Asahi Optical Co., Takumar 1:4 f=35mm, 1:2 f=58mm (Sonnar), 1:2.4 f=58mm (Heliar), 1:2.2 f=55mm (Gaussian), 1:2.8 f=105mm (Model I), 1:2.8/105 (Model II), 1:5.6/200, Tele-Takumar 1:5.6/200, 1:6.3/300, Macro-Takumar 1:4/50, Auto-Takumar 1:2.3 f=35, 1:1.8 f=55mm, 1:2.2 f=55mm, Super-TAKUMAR 1:3.5/28 (fat), 1:2/35 (Fat), 1:1.4/50 (8-element), Super-Multi-Coated Fisheye-TAKUMAR 1:4/17, Super-Multi-Coated TAKUMAR 1:4.5/20, 1:3.5/24, 1:3.5/28, 1:2/35, 1:3.5/35, 1:1.8/85, 1:1.9/85 1:2.8/105, 1:3.5/135, 1:2.5/135 (II), 1:4/150, 1:4/200, 1:4/300, 1:4.5/500, Super-Multi-Coated Macro-TAKUMAR 1:4/50, 1:4/100, Super-Multi-Coated Bellows-TAKUMAR 1:4/100, SMC TAKUMAR 1:1.4/50, 1:1.8/55
M42 Carl Zeiss Jena Flektogon 2.4/35
Contax Carl Zeiss Vario-Sonnar T* 28-70mm F3.5-4.5
Pentax K-mount SMC PENTAX ZOOM 1:3.5 35~105mm, SMC PENTAX ZOOM 1:4 45~125mm
Nikon Micro-NIKKOR-P-C Auto 1:3.5 f=55mm, NIKKOR-P Auto 105mm f/2.5 Pre-AI (Sonnar), Micro-NIKKOR 105mm 1:4 AI, NIKKOR AI-S 35-135mm f/3,5-4,5
Tamron SP 17mm f/3.5 (51B), Tamron SP 17mm f/3.5 (51BB), SP 500mm f/8 (55BB), SP 70-210mm f/3.5 (19AH)
Vivitar 100mm 1:2.8 MC 1:1 Macro Telephoto (Kiron)
|
|
| Back to top |
|
|
jamaeolus
Joined: 19 Mar 2014
Posts: 2929
Location: Eugene
Expire: 2015-08-20
|
| Posted: Thu Apr 22, 2021 12:43 am Post subject: |
|
|
jamaeolus wrote:
Well, I had tried the jar lid opener. and my strap wrenches are all way too big for this job. The hose clamp technique actually worked pretty well.
_________________
photos are moments frozen in time |
|
| Back to top |
|
|
|
|
|
You cannot post new topics in this forum
You cannot reply to topics in this forum
You cannot edit your posts in this forum
You cannot delete your posts in this forum
You cannot vote in polls in this forum
|


